V tomto článku popíšu, jak můžete monitorovat váš server Debian 8 (Jessie) pomocí Munin a Monit. munin vytváří šikovnou malou grafiku o téměř každém aspektu vašeho serveru (průměrné zatížení, využití paměti, využití CPU, propustnost MySQL, provoz eth0 atd.) bez velké konfigurace, zatímco Monit kontroluje dostupnost služeb jako Apache, MySQL, Postfix a bere příslušná akce, jako je restart, pokud zjistí, že se služba nechová podle očekávání. Kombinace těchto dvou vám poskytuje plné monitorování:grafika, která vám umožní rozpoznat aktuální nebo nadcházející problémy (jako „Brzy potřebujeme větší server, naše průměrná zátěž se rychle zvyšuje.“) a hlídací pes, který zajišťuje dostupnost monitorovaných služeb. .
Přestože Munin umožňuje monitorovat více než jeden server, zde se budeme zabývat pouze monitorováním systému, kde je nainstalován.
Tento tutoriál byl napsán pro Debian 8 (Jessie), ale konfigurace by se s malými změnami měla týkat i jiných distribucí, jako je Ubuntu.
Nejprve chci říci, že to není jediný způsob, jak nastavit takový systém. Je mnoho způsobů, jak tohoto cíle dosáhnout, ale já volím tento způsob. Neposkytuji žádnou záruku, že to pro vás bude fungovat!
1 předběžná poznámka
Název hostitele našeho systému je server1.example.com a máme na něm web www.example.com s kořenem dokumentu /var/www/www.example.com/web.
Než začnete instalovat Munin, ujistěte se, že je systém aktuální, spusťte:
apt-get update
apt-get upgrade
Apache se používá k zobrazení stránek Munin, modul apache fcgid je vyžadován pro funkci přiblížení grafu Munin. Nainstalujte apache a modul fcgid pomocí apt.
apt-get install apache2 libcgi-fast-perl libapache2-mod-fcgid
Povolte modul fcgid v Apache.
a2enmod fcgid
2 Instalace a konfigurace Munin
Chcete-li nainstalovat Munin na Debian Jessie, uděláme toto:
apt-get install munin munin-node munin-plugins-extra
Když server běží MySQL nebo MariaDB, povolte několik dalších modulů Munin pluginů pro monitorování MySQL:
cd /etc/munin/plugins
ln -s /usr/share/munin/plugins/mysql_ mysql_
ln -s /usr/share/munin/plugins/mysql_bytes mysql_bytes
ln -s /usr/share/munin/plugins/mysql_innodb mysql_innodb
ln -s /usr/share/munin/plugins/mysql_isam_space_ mysql_isam_space_
ln -s /usr/share/munin/plugins/mysql_queries mysql_queries
ln -s /usr/share/munin/plugins/mysql_slowqueries mysql_slowqueries
ln -s /usr/share/munin/plugins/mysql_threads mysql_threads
Dále musíme upravit konfigurační soubor Munin /etc/munin/munin.conf. Odkomentujte řádky dbdir, htmldir, logdir, rundir a tmpldir (výchozí hodnoty jsou v pořádku). Chceme, aby Munin ve výstupu HTML používal název server1.example.com místo localhost.localdomain, proto nahradíme localhost.localdomain server1.example.com v sekci jednoduchého hostitelského stromu. Bez komentářů vypadá změněný soubor takto:
nano /etc/munin/munin.conf
# Example configuration file for Munin, generated by 'make build'

# The next three variables specifies where the location of the RRD
# databases, the HTML output, logs and the lock/pid files. They all
# must be writable by the user running munin-cron. They are all
# defaulted to the values you see here.
#
dbdir /var/lib/munin
htmldir /var/cache/munin/www
logdir /var/log/munin
rundir /var/run/munin

# Where to look for the HTML templates
#
tmpldir /etc/munin/templates

# Where to look for the static www files
#
#staticdir /etc/munin/static

# temporary cgi files are here. note that it has to be writable by
# the cgi user (usually nobody or httpd).
#
# cgitmpdir /var/lib/munin/cgi-tmp

# (Exactly one) directory to include all files from.
includedir /etc/munin/munin-conf.d
[...]
# a simple host tree
[server1.example.com]
 address 127.0.0.1
 use_node_name yes
[...]
Měli bychom najít konfigurační soubor Apache 2.4 pro Munin /etc/munin/apache24.conf – definuje alias s názvem munin do výstupního adresáře HTML munin /var/cache/munin/www, což znamená, že k munin máme přístup ze všech webových stránek na tomto serveru. pomocí relativní cesty /munin (např. http://www.example.com/munin).
Konfigurace Apache Munin není ve výchozím nastavení povolena, toto bylo změněno z DebianWheezy na Jessie. Nový konfigurační adresář je /etc/apache2/conf-enabled namísto /etc/apache2/conf.d, který byl používán ve starších verzích, jako jsou Wheezy a Squeeze.
Spuštěním těchto příkazů povolíte a načtete konfiguraci do apache.
cd /etc/apache2/conf-enabled/
ln -s /etc/munin/apache24.conf munin.conf
service apache2 restart
Ujistěte se, že zakomentujete řádek Vyžadovat místní a místo toho přidáte Vyžadovat vše uděleno a Možnosti FollowSymLinks SymLinksIfOwnerMatch (jinak budete mít přístup k výstupu Munin pouze z localhost):
nano /etc/munin/apache24.conf
Alias /munin /var/cache/munin/www
<Directory /var/cache/munin/www>
 # Require local
 Require all granted
 Options FollowSymLinks SymLinksIfOwnerMatch
 Options None
</Directory>

ScriptAlias /munin-cgi/munin-cgi-graph /usr/lib/munin/cgi/munin-cgi-graph
<Location /munin-cgi/munin-cgi-graph>
 # Require local
 Require all granted
 Options FollowSymLinks SymLinksIfOwnerMatch
 <IfModule mod_fcgid.c>
 SetHandler fcgid-script
 </IfModule>
 <IfModule !mod_fcgid.c>
 SetHandler cgi-script
 </IfModule>
</Location>
Restartujte Apache:
service apache2 restart
Poté restartujte Munin:
service munin-node restart
Nyní počkejte několik minut, aby Munin mohl vytvořit svůj první výstup, a poté přejděte ve svém prohlížeči na http://www.example.com/munin/ a uvidíte první statistiky:
(Toto je jen malý výňatek z mnoha grafik, které munin produkuje...)
3 Ochrana výstupního adresáře Munin heslem (Volitelné, ale vysoce doporučeno)
Nyní je dobré chránit heslem výstupní adresář munin, pokud nechcete, aby každý mohl vidět každou malou statistiku o vašem serveru.
K tomu musíme vytvořit soubor s hesly /etc/munin/munin-htpasswd. Chceme se přihlásit s uživatelským jménem admin, takže uděláme toto:
htpasswd -c /etc/munin/munin-htpasswd admin
Zadejte heslo pro admin. Poté znovu otevřete /etc/munin/apache24.conf...
nano /etc/munin/apache24.conf
... komentovat „Vyžadovat udělení všech souhlasů a přidat řádky, které jsem označil červeně:
Alias /munin /var/cache/munin/www
<Directory /var/cache/munin/www>
 # Require local
 # Require all granted
 AuthUserFile /etc/munin/munin-htpasswd
 AuthName "Munin"
 AuthType Basic
 Require valid-user
 Options None
</Directory>

ScriptAlias /munin-cgi/munin-cgi-graph /usr/lib/munin/cgi/munin-cgi-graph
<Location /munin-cgi/munin-cgi-graph>
 # Require local
 # Require all granted
 AuthUserFile /etc/munin/munin-htpasswd
 AuthName "Munin"
 AuthType Basic
 Require valid-user
 <IfModule mod_fcgid.c>
 SetHandler fcgid-script
 </IfModule>
 <IfModule !mod_fcgid.c>
 SetHandler cgi-script
 </IfModule>
</Location>
Poté restartujte Apache:
service apache2 restart
4 Povolit další moduly v Muninu
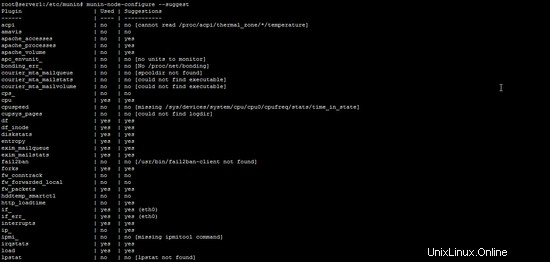
Příkaz Munin "munin-node-configure --suggest" lze použít k získání doporučení pro další moduly Munin, které lze na serveru povolit. Spustit:
munin-node-configure --suggest
Výstup by měl být podobný tomuto:
Sloupec "použito" ukazuje, zda je modul povolen, sloupec "Návrhy" ukazuje, zda na serveru běží služba, kterou lze monitorovat tímto modulem. Vytvořte symbolický odkaz pro modul v /etc/munin/plugins, abyste jej povolili.
Zde povolím například moduly apache_*:
cd /etc/munin/plugins
ln -s /usr/share/munin/plugins/apache_accesses
ln -s /usr/share/munin/plugins/apache_processes
ln -s /usr/share/munin/plugins/apache_volume
Restartujte Munin, aby se načetla nová konfigurace.
service munin-node restart
5 Instalace a konfigurace Monit
Chcete-li nainstalovat Monit, provedeme toto:
apt-get install monit
Nyní musíme upravit /etc/monit/monitrc. Výchozí /etc/monit/monitrc má spoustu příkladů a další příklady konfigurace můžete najít na http://mmonit.com/monit/documentation/. V mém případě však chci sledovat proftpd, sshd, mysql, apache a postfix, chci povolit webové rozhraní Monit na portu 2812, chci webové rozhraní https, chci se přihlásit do webového rozhraní pomocí uživatelského jména admin a heslo howtoforge a chci, aby Monit zasílal e-mailová upozornění na [email protected], takže můj soubor vypadá takto (do konfigurace jsem přidal příklady pro jiné démony, abyste si mohli soubor upravit podle svých potřeb):
cp /etc/monit/monitrc /etc/monit/monitrc_orig
cat /dev/null > /etc/monit/monitrc
nano /etc/monit/monitrc
set daemon 60
set logfile syslog facility log_daemon
set mailserver localhost
set mail-format { from: [email protected] }
set alert [email protected]
set httpd port 2812 and
 SSL ENABLE
 PEMFILE /var/certs/monit.pem
 allow admin:howtoforge

check process sshd with pidfile /var/run/sshd.pid
 start program "/usr/sbin/service ssh start"
 stop program "/usr/sbin/service ssh stop"
 if failed port 22 protocol ssh then restart
 if 5 restarts within 5 cycles then timeout

check process apache with pidfile /var/run/apache2/apache2.pid
 group www
 start program = "/usr/sbin/service apache2 start"
 stop program = "/usr/sbin/service apache2 stop"
 if failed host localhost port 80 protocol http
 and request "/monit/token" then restart
 if cpu is greater than 60% for 2 cycles then alert
 if cpu > 80% for 5 cycles then restart
 if totalmem > 500 MB for 5 cycles then restart
 if children > 250 then restart
 if loadavg(5min) greater than 10 for 8 cycles then stop
 if 3 restarts within 5 cycles then timeout

# ---------------------------------------------------------------------------------------------
# NOTE: Replace example.pid with the pid name of your server, the name depends on the hostname
# ---------------------------------------------------------------------------------------------
#check process mysql with pidfile /var/lib/mysql/example.pid
# group database
# start program = "/usr/sbin/service mysql start"
# stop program = "/usr/sbin/service mysql stop"
# if failed host 127.0.0.1 port 3306 then restart
# if 5 restarts within 5 cycles then timeout

#check process proftpd with pidfile /var/run/proftpd.pid
# start program = "/usr/sbin/service proftpd start"
# stop program = "/usr/sbin/service proftpd stop"
# if failed port 21 protocol ftp then restart
# if 5 restarts within 5 cycles then timeout
#
#check process postfix with pidfile /var/spool/postfix/pid/master.pid
# group mail
# start program = "/usr/sbin/service postfix start"
# stop program = "/usr/sbin/service postfix stop"
# if failed port 25 protocol smtp then restart
# if 5 restarts within 5 cycles then timeout
#
#check process nginx with pidfile /var/run/nginx.pid
# start program = "/usr/sbin/service nginx start"
# stop program = "/usr/sbin/service nginx stop"
# if failed host 127.0.0.1 port 80 then restart
#
#check process memcached with pidfile /var/run/memcached.pid
# start program = "/usr/sbin/service memcached start"
# stop program = "/usr/sbin/service memcached stop"
# if failed host 127.0.0.1 port 11211 then restart
#
#check process pureftpd with pidfile /var/run/pure-ftpd/pure-ftpd.pid
# start program = "/usr/sbin/service pure-ftpd-mysql start"
# stop program = "/usr/sbin/service pure-ftpd-mysql stop"
# if failed port 21 protocol ftp then restart
# if 5 restarts within 5 cycles then timeout
#
#check process named with pidfile /var/run/named/named.pid
# start program = "/usr/sbin/service bind9 start"
# stop program = "/usr/sbin/service bind9 stop"
# if failed host 127.0.0.1 port 53 type tcp protocol dns then restart
# if failed host 127.0.0.1 port 53 type udp protocol dns then restart
# if 5 restarts within 5 cycles then timeout
#
#check process ntpd with pidfile /var/run/ntpd.pid
# start program = "/usr/sbin/service ntp start"
# stop program = "/usr/sbin/service ntp stop"
# if failed host 127.0.0.1 port 123 type udp then restart
# if 5 restarts within 5 cycles then timeout
#
#check process mailman with pidfile /var/run/mailman/mailman.pid
# group mail
# start program = "/usr/sbin/service mailman start"
# stop program = "/usr/sbin/service mailman stop"
#
#check process amavisd with pidfile /var/run/amavis/amavisd.pid
# group mail
# start program = "/usr/sbin/service amavis start"
# stop program = "/usr/sbin/service amavis stop"
# if failed port 10024 protocol smtp then restart
# if 5 restarts within 5 cycles then timeout
#
#check process courier-imap with pidfile /var/run/courier/imapd.pid
# group mail
# start program = "/usr/sbin/service courier-imap start"
# stop program = "/usr/sbin/service courier-imap stop"
# if failed host localhost port 143 type tcp protocol imap then restart
# if 5 restarts within 5 cycles then timeout
#
#check process courier-imap-ssl with pidfile /var/run/courier/imapd-ssl.pid
# group mail
# start program = "/usr/sbin/service courier-imap-ssl start"
# stop program = "/usr/sbin/service courier-imap-ssl stop"
# if failed host localhost port 993 type tcpssl sslauto protocol imap then restart
# if 5 restarts within 5 cycles then timeout
#
#check process courier-pop3 with pidfile /var/run/courier/pop3d.pid
# group mail
# start program = "/usr/sbin/service courier-pop start"
# stop program = "/usr/sbin/service courier-pop stop"
# if failed host localhost port 110 type tcp protocol pop then restart
# if 5 restarts within 5 cycles then timeout
#
#check process courier-pop3-ssl with pidfile /var/run/courier/pop3d-ssl.pid
# group mail
# start program = "/usr/sbin/service courier-pop-ssl start"
# stop program = "/usr/sbin/service courier-pop-ssl stop"
# if failed host localhost port 995 type tcpssl sslauto protocol pop then restart
# if 5 restarts within 5 cycles then timeout
#
#check process dovecot with pidfile /var/run/dovecot/master.pid
# group mail
# start program = "/usr/sbin/service dovecot start"
# stop program = "/usr/sbin/service dovecot stop"
# if failed host localhost port 993 type tcpssl sslauto protocol imap then restart
# if 5 restarts within 5 cycles then timeout
Konfigurační soubor je docela samovysvětlující; pokud si nejste jisti některou možností, podívejte se na dokumentaci Monit:http://mmonit.com/monit/documentation/monit.html
V části Apache konfigurace Monit najdete toto:
   if failed host localhost port 80 protocol http
      and request "/monit/token" then restart
což znamená, že se Monit pokusí připojit k localhost na portu 80 a pokusí se získat přístup k souboru /monit/token, což je /var/www/html/monit/token, protože kořen dokumentu naší webové stránky je /var/www/html. Pokud Monit neuspěje, znamená to, že Apache neběží a Monit jej restartuje. Nyní musíme vytvořit soubor /var/www/html/monit/token a napsat do něj nějaký náhodný řetězec:
mkdir /var/www/html/monit
echo "hello" > /var/www/html/monit/token
Dále vytvoříme pem cert (/var/certs/monit.pem), který potřebujeme pro webové rozhraní Monit šifrované SSL:
mkdir /var/certs
cd /var/certs
K vytvoření našeho certifikátu potřebujeme konfigurační soubor OpenSSL. Může to vypadat takto:
nano /var/certs/monit.cnf
# create RSA certs - Server

RANDFILE = ./openssl.rnd

[ req ]
default_bits = 2048
encrypt_key = yes
distinguished_name = req_dn
x509_extensions = cert_type

[ req_dn ]
countryName = Country Name (2 letter code)
countryName_default = MO

stateOrProvinceName             = State or Province Name (full name)
stateOrProvinceName_default     = Monitoria

localityName                    = Locality Name (eg, city)
localityName_default            = Monittown

organizationName                = Organization Name (eg, company)
organizationName_default        = Monit Inc.

organizationalUnitName          = Organizational Unit Name (eg, section)
organizationalUnitName_default  = Dept. of Monitoring Technologies

commonName                      = Common Name (FQDN of your server)
commonName_default              = server.monit.mo

emailAddress                    = Email Address
emailAddress_default            = [email protected]

[ cert_type ]
nsCertType = server
Nyní vytvoříme certifikát takto:
openssl req -new -x509 -days 365 -nodes -config ./monit.cnf -out /var/certs/monit.pem -keyout /var/certs/monit.pem
openssl gendh 1024 >> /var/certs/monit.pem
openssl x509 -subject -dates -fingerprint -noout -in /var/certs/monit.pem
chmod 600 /var/certs/monit.pem
Konečně můžeme spustit Monit:
service monit start
Nyní nasměrujte svůj prohlížeč na https://www.example.com:2812/ (ujistěte se, že port 2812 není blokován vaším firewallem), přihlaste se pomocí admin a howtoforge a měli byste vidět webové rozhraní Monit. Mělo by to vypadat takto:
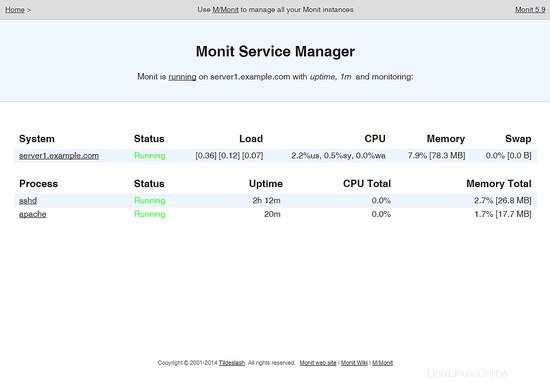
(Hlavní obrazovka)
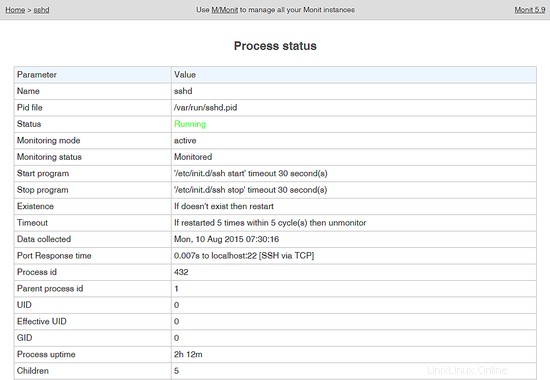
(Stránka stavu SSHd)
V závislosti na vaší konfiguraci v /etc/monit/monitrc monit restartuje vaše služby, pokud selžou, a odešle e-maily s upozorněním, pokud se změní ID procesů služeb atd.
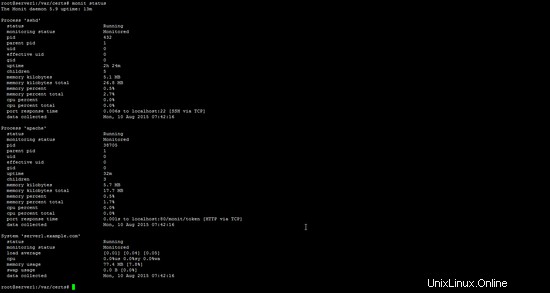
Chcete-li získat stav Monit na shell, spusťte příkaz "monit status":
monit status
Příkaz zobrazí stav všech sledovaných služeb.
6 odkazů
- munin:http://munin-monitoring.org/
- monit:http://mmonit.com/monit/