Tento tutoriál popisuje instalaci klastrovaného webového, e-mailového, databázového a DNS serveru, který má být použit pro redundanci, vysokou dostupnost a vyrovnávání zátěže na Debianu 8 s ovládacím panelem ISPConfig 3. Replikace MySQL Master/Master bude použita k replikaci klientských databází MySQL mezi servery, Unison bude použit k synchronizaci /var/www (webové stránky) a e-maily budou synchronizovány s Dovecot.
1 obecná poznámka
V tomto nastavení bude jeden hlavní server (na kterém běží rozhraní ovládacího panelu ISPConfig) a jeden podřízený server, který zrcadlí web (apache), e-mail (postfix a dovecot), dns (bind) a databázové (MySQL nebo MariaDB) služby. hlavního serveru.
K instalaci clusterového nastavení potřebujeme dva servery s minimální instalací Debianu 8.4 a stejnou verzí ISPConfig.
V mém příkladu používám následující názvy hostitelů a IP adresy pro dva servery:
Hlavní server
Název hostitele:server1.example.tld
Adresa IP:192.168.0.105
Adresa IPv6:2001:db8::1
Podřízený server
Název hostitele:server2.example.tld
Adresa IP:192.168.0.106
Adresa IPv6:2001:db8::2
Kdekoli se tyto názvy hostitelů nebo adresy IP vyskytují v příštích instalačních krocích, budete je muset změnit tak, aby odpovídaly IP a hostitelským názvům vašich serverů.
Všechny příkazy musí být spuštěny jako uživatel root. Pokud potřebujete provést změny v MySQL, přihlaste se do MySQL pomocí root-hesla pro MySQL:
mysql -u root -p
2 Instalace hlavního serveru
Nejprve musíme nainstalovat ISPConfig na Master-Server. Pokud jste již na tento server nainstalovali ISPConfig, můžete instalaci přeskočit (ujistěte se, že stávající instalace je aktuální).
Nainstalujte ISPConfig na Master-Server podle The Perfect Server - Debian 8.4 Jessie (Apache2, BIND, Dovecot, ISPConfig 3.1).
Přidejte podřízený server do souboru /etc/hosts
vi /etc/hosts
takže to vypadá takto:
127.0.0.1       localhost
192.168.0.105   server1.example.tld server1
2001:db8::1     server1.example.tld server1
192.168.0.106   server2.example.tld
2001:db8::2     server2.example.tld

# The following lines are desirable for IPv6 capable hosts
::1     localhost ip6-localhost ip6-loopback
fe00::0 ip6-localnet
ff00::0 ip6-mcastprefix
ff02::1 ip6-allnodes
ff02::2 ip6-allrouters
ff02::3 ip6-allhosts
3 Příprava podřízeného serveru
Spusťte kroky 1–19 z The Perfect Server – Debian 8.4 Jessie (Apache2, BIND, Dovecot, ISPConfig 3.1).
Zatím ISPConfig na server2 neinstalujte.
Přidejte hlavní server do souboru /etc/hosts
vi /etc/hosts
takže to vypadá takto:
127.0.0.1       localhost
192.168.0.105   server1.example.tld
2001:db8::1     server1.example.tld
192.168.0.106   server2.example.tld server2
2001:db8::2     server2.example.tld server2

# The following lines are desirable for IPv6 capable hosts
::1     localhost ip6-localhost ip6-loopback
fe00::0 ip6-localnet
ff00::0 ip6-mcastprefix
ff02::1 ip6-allnodes
ff02::2 ip6-allrouters
ff02::3 ip6-allhosts
4 Bezklíčové přihlášení ze serveru1 na server2
Na serveru 2:
Dočasně umožňujeme root-login na server2 s heslem. Otevřete /etc/sshd_config:
vi /etc/ssh/sshd_config
a změnit
PermitRootLogin without-password
do
PermitRootLogin yes
poté restartujte démona ssh:
service ssh restart
Na serveru 1:
Vytvořte pár soukromých/veřejných klíčů:
ssh-keygen
Generating public/private rsa key pair.
Enter file in which to save the key (/root/.ssh/id_rsa): <-- ENTER
Created directory '/root/.ssh'.
Enter passphrase (empty for no passphrase): <-- ENTER
Enter same passphrase again: <-- ENTER
Your identification has been saved in /root/.ssh/id_rsa.
Your public key has been saved in /root/.ssh/id_rsa.pub.
The key fingerprint is:
f3:d0:62:a7:24:6f:f0:1e:d1:64:a9:9f:12:6c:98:5a [email protected]
The key's randomart image is:
+---[RSA 2048]----+
|                 |
|           .     |
|          +      |
|       + *       |
|      E S +      |
|     o O @ .     |
|    .   B +      |
|       o o       |
|        .        |
+-----------------+
Je důležité, abyste nezadávali přístupovou frázi, jinak nebude zrcadlení fungovat bez lidské interakce, takže jednoduše stiskněte ENTER!
Dále zkopírujeme náš veřejný klíč na server2.example.tld:
ssh-copy-id -i /root/.ssh/id_rsa.pub [email protected]
The authenticity of host '192.168.0.106 (192.168.0.106)' can't be established.
ECDSA key fingerprint is 25:d8:7a:ee:c2:4b:1d:92:a7:3d:16:26:95:56:62:4e.
Are you sure you want to continue connecting (yes/no)? <-- yes (you will see this only if this is the first time you connect to server2)
/usr/bin/ssh-copy-id: INFO: attempting to log in with the new key(s), to filter out any that are already installed
/usr/bin/ssh-copy-id: INFO: 1 key(s) remain to be installed -- if you are prompted now it is to install the new keys
[email protected]'s password: <- enter root password from server2
Nyní se zkuste přihlásit k počítači:
ssh [email protected]
A zkontrolujte /root/.ssh/authorized_keys, abyste se ujistili, že jsme nepřidali další klíče, které jste nečekali.
cat /root/.ssh/authorized_keys
ssh-dss AAAAB3NzaC1kc3MAAACBAPhiAexgEBexnw0rFG8lXwAuIsca/V+lhmv5lhF3BqUfAbL7e2sWlQlGhxZ8I2UnzZK8Ypffq6Ks+lp46yOs7MMXLqb7JBP9gkgqxyEWqOoUSt5hTE9ghupcCvE7rRMhefY5shLUnRkVH6hnCWe6yXSnH+Z8lHbcfp864GHkLDK1AAAAFQDddQckbfRG4C6LOQXTzRBpIiXzoQAAAIEAleevPHwi+a3fTDM2+Vm6EVqR5DkSLwDM7KVVNtFSkAY4GVCfhLFREsfuMkcBD9Bv2DrKF2Ay3OOh39269Z1rgYVk+/MFC6sYgB6apirMlHj3l4RR1g09LaM1OpRz7pc/GqIGsDt74D1ES2j0zrq5kslnX8wEWSHapPR0tziin6UAAACBAJHxgr+GKxAdWpxV5MkF+FTaKcxA2tWHJegjGFrYGU8BpzZ4VDFMiObuzBjZ+LrUs57BiwTGB/MQl9FKQEyEV4J+AgZCBxvg6n57YlVn6OEA0ukeJa29aFOcc0inEFfNhw2jAXt5LRyvuHD/C2gG78lwb6CxV02Z3sbTBdc43J6y [email protected]
Zakázat root-login pomocí hesla. Otevřete /etc/sshd_config:
vi /etc/ssh/sshd_config
a změnit
PermitRootLogin yes
do
PermitRootLogin without-password
poté restartujte démona ssh:
service ssh restart
Odhlášení ze serveru 2:
exit
logout
Connection to 192.168.0.106 closed.
Nyní jsme zpět na serveru 1.
5. MySQL Master-Master Replication
5.1 Příprava serveru1
Přihlaste se do MySQL a vytvořte si účet speciálně pro replikaci v MySQL. Pro replikaci používám samostatného uživatele, abych minimalizoval možnost kompromitace s jinými účty (uživatelské jméno a heslo jsou uloženy jako prostý text v souboru nebo tabulce hlavního úložiště informací):
CREATE USER 'slaveuser2'@'server2.example.tld' IDENTIFIED BY 'slave_user_password';
CREATE USER 'slaveuser2'@'192.168.0.106' IDENTIFIED BY 'slave_user_password';
CREATE USER 'slaveuser2'@'2001:db8::2' IDENTIFIED BY 'slave_user_password';
a udělte oprávnění REPLICATION SLAVE:
GRANT REPLICATION SLAVE ON *.* TO 'slaveuser2'@'server2.example.tld';
GRANT REPLICATION SLAVE ON *.* TO 'slaveuser2'@'192.168.0.106';
GRANT REPLICATION SLAVE ON *.* TO 'slaveuser2'@'2001:db8::2';
QUIT;
Proveďte nějaké změny pro replikaci do vašeho MySQL-Config:
vi /etc/mysql/my.cnf
Vyhledejte sekci, která začíná [mysqld], a vložte do ní následující možnosti (okomentujte všechny existující konfliktní možnosti):
[...]
[mysqld]
server-id                = 1
replicate-same-server-id = 0
auto-increment-increment = 2
auto-increment-offset    = 1
log_bin                  = mysql-bin.log
expire_logs_days         = 10
max_binlog_size          = 100M
binlog_format            = mixed
sync_binlog              = 1
relay-log                = slave-relay.log
relay-log-index          = slave-relay-log.index
slave_skip_errors        = 1007,1008,1050, 1396
bind-address             = ::
a poté restartujte MySQL:
service mysql restart
Jednoduše přeskočím některé otrocké chyby. Vysvětlil jsem to na svém blogu:
- 1007 =Nelze vytvořit databázi '%s'; databáze existuje
- 1008 =Nelze zrušit databázi '%s'; databáze neexistuje
- 1050 =Tabulka '%s' již existuje
- 1396 =Operace %s selhala pro %s – nelze vytvořit uživatele
seznam chybových kódů MySQL naleznete zde:Chybové kódy a zprávy serveru
5.2 Příprava serveru2
Proveďte nějaké změny pro replikaci do vašeho MySQL-Config:
vi /etc/mysql/my.cnf
Vyhledejte sekci, která začíná [mysqld], a vložte do ní následující možnosti (okomentujte všechny existující konfliktní možnosti):
[...]
[mysqld]
server-id                = 2
log_bin                  = mysql-bin.log
expire_logs_days         = 10
max_binlog_size          = 100M
binlog_format            = mixed
sync_binlog              = 1
slave_skip_errors        = 1007,1008,1050, 1396
5.3 Vytvořte snímek existujících databází na serveru1
Uložte databáze na server1 a zadejte kořenové heslo MySQL:
mysqldump -p --all-databases --allow-keywords --master-data --events --single-transaction > /root/mysqldump.sql
Zkopírujte výpis na server2:
scp /root/mysqldump.sql [email protected]:/root
5.4 Import výpisu na server2
mysql -u root -p < /root/mysqldump.sql
Vypněte mysql na server2 :
service mysql stop
Zkopírujte výchozí soubor pro MySQL ze serveru1 na server2. Přepněte na server1 a spustit
scp /etc/mysql/debian.cnf [email protected]:/etc/mysql/debian.cnf
Spusťte MySQL na server2 :
service mysql start
a přihlaste se do MySQL pro nastavení hlavního serveru pomocí:
CHANGE MASTER TO MASTER_HOST="server1.example.tld", MASTER_USER="slaveuser2", MASTER_PASSWORD="slave_user_password";
Spusťte otroka:
START SLAVE;
a zkontrolujte stav slave pomocí
ZOBRAZIT STAV SLAVE \G
Výsledek bude něco jako
*************************** 1. row ***************************
               Slave_IO_State: Waiting for master to send event
                  Master_Host: server1.example.tld
                  Master_User: slaveuser2
                  Master_Port: 3306
                Connect_Retry: 60
              Master_Log_File: mysql-bin.000001
          Read_Master_Log_Pos: 109989
               Relay_Log_File: mysqld-relay-bin.000002
                Relay_Log_Pos: 110276
        Relay_Master_Log_File: mysql-bin.000001
             Slave_IO_Running: Yes
            Slave_SQL_Running: Yes
              Replicate_Do_DB:
          Replicate_Ignore_DB:
           Replicate_Do_Table:
       Replicate_Ignore_Table:
      Replicate_Wild_Do_Table:
  Replicate_Wild_Ignore_Table:
                   Last_Errno: 0
                   Last_Error:
                 Skip_Counter: 0
          Exec_Master_Log_Pos: 109989
              Relay_Log_Space: 110574
              Until_Condition: None
               Until_Log_File:
                Until_Log_Pos: 0
           Master_SSL_Allowed: No
           Master_SSL_CA_File:
           Master_SSL_CA_Path:
              Master_SSL_Cert:
            Master_SSL_Cipher:
               Master_SSL_Key:
        Seconds_Behind_Master: 0
Master_SSL_Verify_Server_Cert: No
                Last_IO_Errno: 0
                Last_IO_Error:
               Last_SQL_Errno: 0
               Last_SQL_Error:
  Replicate_Ignore_Server_Ids:
             Master_Server_Id: 1
               Master_SSL_Crl:
           Master_SSL_Crlpath:
                   Using_Gtid: No
                  Gtid_IO_Pos:
Pokud "Seconds Behind Master" není 0, počkejte, dokud Slave nenačte všechna data z masteru (pro získání aktuální hodnoty stačí příkaz zopakovat). Ujistěte se, že server2 používá správnou pozici hlavního protokolu a protokolu.
Na server1 spustit v MySQL:
SHOW MASTER STATUS \G
*************************** 1. row ***************************
            File: mysql-bin.000991
        Position: 69185362
    Binlog_Do_DB:
Binlog_Ignore_DB:
1 row in set (0.00 sec)
A porovnejte souřadnice hlavního binárního protokolu replikace.
Provozujeme MySQL Master-Slave-Replication, kde server1 je master a server2 slave.
5.5 MySQL Master-Master-Replication
Vytvořte uživatele MySQL pro replikaci a udělte oprávnění v MySQL:
CREATE USER 'slaveuser1'@'server1.example.tld' IDENTIFIED BY 'slave_user_password';
CREATE USER 'slaveuser1'@'192.168.0.105' IDENTIFIED BY 'slave_user_password';
CREATE USER 'slaveuser1'@'2001:db8::1' IDENTIFIED BY 'slave_user_password';
GRANT REPLICATION SLAVE ON *.* TO 'slaveuser1'@'server1.example.tld';
GRANT REPLICATION SLAVE ON *.* TO 'slaveuser1'@'192.168.0.105';
GRANT REPLICATION SLAVE ON *.* TO 'slaveuser1'@'2001:db8::1';
QUIT;
Proveďte nějaké změny pro replikaci do vašeho MySQL-Config na server2 :
vi /etc/mysql/my.cnf
Vyhledejte sekci, která začíná [mysqld], a vložte do ní následující možnosti (okomentujte všechny existující konfliktní možnosti):
[...]
[mysqld]
[...]
replicate-same-server-id = 0
auto-increment-increment = 2
auto-increment-offset    = 2
relay-log                = slave-relay.log
relay-log-index          = slave-relay-log.inde
a restartujte MySQL:
service mysql restart
Přihlaste se do MySQL a získejte hlavní binární logové souřadnice:
SHOW MASTER STATUS \G
*************************** 1. row ***************************
            File: mysql-bin.000002
        Position: 326
    Binlog_Do_DB:
Binlog_Ignore_DB:
1 row in set (0.00 sec)
Přihlaste se do MySQL na server1 a nastavte hlavní server pomocí
CHANGE MASTER TO MASTER_HOST="server2.example.tld", MASTER_USER="slaveuser1", MASTER_PASSWORD="slave_user_password", MASTER_LOG_FILE='mysql-bin.000002', MASTER_LOG_POS=326;
Spusťte otroka:
START SLAVE;
a zkontrolujte stav slave pomocí
ZOBRAZIT STAV SLAVE \G
Zkontrolujte, zda je slave spuštěn:
Slave_IO_Running:Ano
Slave_SQL_Running:Ano
Pokud vaše replikace přestane fungovat, další informace naleznete zde:
- Jak přeskočit určité chyby při replikaci MySQL
- restartujte replikaci mysql master-master
- mysql-replication – Nelze analyzovat záznam události protokolu přenosu
6 Instalace ISPConfig na podřízený server
Přihlaste se do MySQL a vytvořte uživatele root pro server2:
CREATE USER 'root'@'192.168.0.106' IDENTIFIED BY 'myrootpassword';
GRANT ALL PRIVILEGES ON * . * TO 'root'@'192.168.0.106' WITH GRANT OPTION MAX_QUERIES_PER_HOUR 0 MAX_CONNECTIONS_PER_HOUR 0 MAX_UPDATES_PER_HOUR 0 MAX_USER_CONNECTIONS 0 ;
CREATE USER 'root'@'server2.example.tld' IDENTIFIED BY 'myrootpassword';
GRANT ALL PRIVILEGES ON * . * TO 'root'@'server2.example.tld' WITH GRANT OPTION MAX_QUERIES_PER_HOUR 0 MAX_CONNECTIONS_PER_HOUR 0 MAX_UPDATES_PER_HOUR 0 MAX_USER_CONNECTIONS 0;
CREATE USER 'root'@'2a01:dddd::2' IDENTIFIED BY 'myrootpassword';
GRANT ALL PRIVILEGES ON * . * TO 'root'@'2001:db8::2' WITH GRANT OPTION MAX_QUERIES_PER_HOUR 0 MAX_CONNECTIONS_PER_HOUR 0 MAX_UPDATES_PER_HOUR 0 MAX_USER_CONNECTIONS 0;
QUIT;
Replikace pokrývá celou databázi. Zkopírujte db-configs pro PHPMyAdmin a roundcube ze serveru1 na server2.
Na server1 :
scp /etc/dbconfig-common/phpmyadmin.conf [email protected]:/etc/dbconfig-common/phpmyadmin.conf
scp /etc/phpmyadmin/config-db.php [email protected]:/etc/phpmyadmin/config-db.php
scp /etc/dbconfig-common/roundcube.conf [email protected]:/etc/dbconfig-common/roundcube.conf
scp /etc/roundcube/debian-db.php [email protected]:/etc/roundcube/debian-db.php
Na server2 :
Stáhněte si ISPConfig 3.1:
cd /tmp
wget -O ISPConfig-3.1-beta.tar.gz  https://git.ispconfig.org/ispconfig/ispconfig3/repository/archive.tar.gz?ref=stable-3.1
tar xfvz xfz ISPConfig-3.1-beta.tar.gz
cd ispconfig3-stable-3.1*
cd install
a spusťte instalační program pomocí
php -q install.php
--------------------------------------------------------------------------------
 _____ ___________   _____              __ _         ____
|_   _/  ___| ___ \ /  __ \            / _(_)       /__  \
  | | \ `--.| |_/ / | /  \/ ___  _ __ | |_ _  __ _    _/ /
  | |  `--. \  __/  | |    / _ \| '_ \|  _| |/ _` |  |_ |
 _| |_/\__/ / |     | \__/\ (_) | | | | | | | (_| | ___\ \
 \___/\____/\_|      \____/\___/|_| |_|_| |_|\__, | \____/
                                              __/ |
                                             |___/
--------------------------------------------------------------------------------


>> Initial configuration

Operating System: Debian 8.0 (Jessie) or compatible

    Following will be a few questions for primary configuration so be careful.
    Default values are in [brackets] and can be accepted with <ENTER>.
    Tap in "quit" (without the quotes) to stop the installer.


Select language (en,de) [en]: <-- Hit Enter

Installation mode (standard,expert) [standard]: expert <-- expert

Full qualified hostname (FQDN) of the server, eg server1.domain.tld  [server2.example.tld]: <-- Hit Enter

MySQL server hostname [localhost]: <-- Hit Enter

MySQL server port [3306]: <-- Hit Enter

MySQL root username [root]: <-- Hit Enter

MySQL root password []: <-- Enter your MySQL root password

MySQL database to create [dbispconfig]: <-- dbispconfig2 (the local ispconfig database name of the master and slave must be different, as both servers share the same databases)

MySQL charset [utf8]: <-- Hit Enter

The next two questions are about the internal ISPConfig database user and password.
It is recommended to accept the defaults which are 'ispconfig' as username and a random password.
If you use a different password, use only numbers and chars for the password.

ISPConfig mysql database username [ispconfig]: <-- ispconfig2

ISPConfig mysql database password [06d434604a3371a706a100f9786aec9b]: <-- Hit Enter

Shall this server join an existing ISPConfig multiserver setup (y,n) [n]: <-- y

MySQL master server hostname []: <-- server1.example.tld

MySQL master server port []: <-- Hit Enter

MySQL master server root username [root]: <-- Hit Enter

MySQL master server root password []: <-- Enter the root password of the master server here

MySQL master server database name [dbispconfig]: <-- Hit Enter

Adding ISPConfig server record to database.

Configure Mail (y,n) [y]: <-- Hit Enter

Configuring Postgrey
Configuring Postfix
Generating a 4096 bit RSA private key
........................................................................++
....................++
writing new private key to 'smtpd.key'
-----
You are about to be asked to enter information that will be incorporated
into your certificate request.
What you are about to enter is what is called a Distinguished Name or a DN.
There are quite a few fields but you can leave some blank
For some fields there will be a default value,
If you enter '.', the field will be left blank.
-----
Country Name (2 letter code) [AU]: <-- Enter 2 letter country code
State or Province Name (full name) [Some-State]: <-- Enter the name of the  state
Locality Name (eg, city) []: <-- Enter your city
Organization Name (eg, company) [Internet Widgits Pty Ltd]: <-- Enter company name or press enter
Organizational Unit Name (eg, section) []: <-- Hit Enter
Common Name (e.g. server FQDN or YOUR name) []: <-- Enter the server hostname, in my case: server2.example.com
Email Address []: <-- Hit Enter
Configuring Mailman
Configuring Dovecot
Configuring Spamassassin
Configuring Amavisd
Configuring Getmail
Configuring Jailkit
Configuring Pureftpd
Configure DNS Server (y,n) [y]: <-- Hit Enter

Configuring BIND
Configure Web Server (y,n) [y]: <-- Hit Enter

Configuring Apache
Configuring vlogger
[WARN] autodetect for OpenVZ failed
Force configure OpenVZ (y,n) [n]: <-- Hit Enter

Skipping OpenVZ

Configure Firewall Server (y,n) [y]: <-- Hit Enter

Configuring Ubuntu Firewall
Configuring Metronome XMPP Server
writing new private key to 'localhost.key'
-----
Country Name (2 letter code) [AU]: <-- Enter 2 letter country code
Locality Name (eg, city) []: <-- Enter your city
Organization Name (eg, company) [Internet Widgits Pty Ltd]: <-- Enter company name or press enter
Organizational Unit Name (eg, section) []: <-- Hit Enter
Common Name (e.g. server FQDN or YOUR name) [server2.example.tld]: <-- Enter the server hostname, in my case: server2.example.tld
Email Address []: <-- Hit Enter

Install ISPConfig Web Interface (y,n) [n]: <-- Hit Enter


Configuring DBServer
Installing ISPConfig crontab
Detect IP addresses
Installation completed.
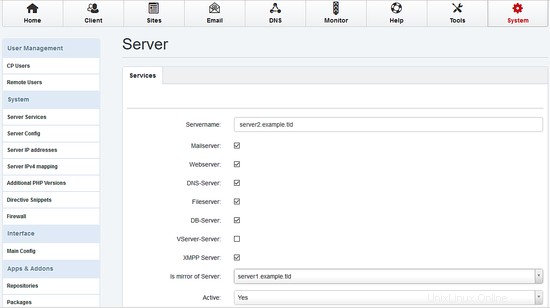
Přihlaste se do ISPConfig na serveru1 a přejděte do Systém / Služby serveru a zvolte server2.example.tld a nastavte Je zrcadlem serveru na server1.example.tld:
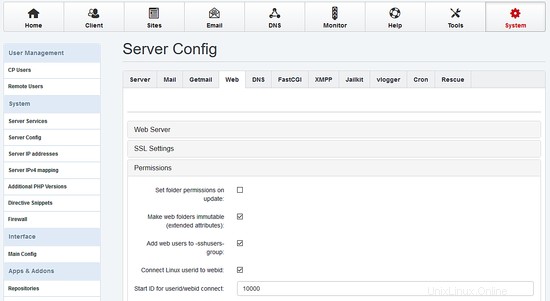
Přejděte na Konfigurace serveru , zvolte Tab Web a nastavte oprávnění pro oba servery:
Pokud již na serveru1 běží data (webové stránky, pošta....), přejděte na Nástroje / Znovu synchronizovat a spusťte úplnou resynchronizaci (povolte všechna zaškrtávací políčka).
7 Nainstalujte Unison
Dále nainstalujeme Unison. Unison se používá k synchronizaci adresáře /var/www mezi server1 a server2.
Nainstalujte unison na server1 a server2 s
apt-get install unison
Nyní nainstalujeme soubor unisono konfigurace na server1 :
Vytvořte nový soubor /root/.unison/web:
mkdir /root/.unison
vi /root/.unison/web.prf
... a přidejte následující obsah:
# Roots of the synchronization
root = /var/www
root = ssh://192.168.0.106//var/www

# Paths to synchronize
#path = www
#path = vmail

# Some regexps specifying names and paths to ignore
#ignore = Path stats    ## ignores /var/www/stats
#ignore = Path stats/*  ## ignores /var/www/stats/*
#ignore = Path */stats  ## ignores /var/www/somedir/stats, but not /var/www/a/b/c/stats
#ignore = Name *stats   ## ignores all files/directories that end with "stats"
#ignore = Name stats*   ## ignores all files/directories that begin with "stats"
#ignore = Name *.tmp    ## ignores all files with the extension .tmp
ignore = Name sess_*
ignore = Name *access.log*
ignore = Name error.log
ignore = Name webalizer.conf

#          When set to true, this flag causes the user interface to skip
#          asking for confirmations on non-conflicting changes. (More
#          precisely, when the user interface is done setting the
#          propagation direction for one entry and is about to move to the
#          next, it will skip over all non-conflicting entries and go
#          directly to the next conflict.)
auto=true

#          When this is set to true, the user interface will ask no
#          questions at all. Non-conflicting changes will be propagated;
#          conflicts will be skipped.
batch=true

#          !When this is set to true, Unison will request an extra
#          confirmation if it appears that the entire replica has been
#          deleted, before propagating the change. If the batch flag is
#          also set, synchronization will be aborted. When the path
#          preference is used, the same confirmation will be requested for
#          top-level paths. (At the moment, this flag only affects the
#          text user interface.) See also the mountpoint preference.
confirmbigdel=true

#          When this preference is set to true, Unison will use the
#          modification time and length of a file as a `pseudo inode
#          number' when scanning replicas for updates, instead of reading
#          the full contents of every file. Under Windows, this may cause
#          Unison to miss propagating an update if the modification time
#          and length of the file are both unchanged by the update.
#          However, Unison will never overwrite such an update with a
#          change from the other replica, since it always does a safe
#          check for updates just before propagating a change. Thus, it is
#          reasonable to use this switch under Windows most of the time
#          and occasionally run Unison once with fastcheck set to false,
#          if you are worried that Unison may have overlooked an update.
#          The default value of the preference is auto, which causes
#          Unison to use fast checking on Unix replicas (where it is safe)
#          and slow checking on Windows replicas. For backward
#          compatibility, yes, no, and default can be used in place of
#          true, false, and auto. See the section "Fast Checking" for more
#          information.
fastcheck=true

#          When this flag is set to true, the group attributes of the
#          files are synchronized. Whether the group names or the group
#          identifiers are synchronizeddepends on the preference numerids.
group=true

#          When this flag is set to true, the owner attributes of the
#          files are synchronized. Whether the owner names or the owner
#          identifiers are synchronizeddepends on the preference
#          extttnumerids.
owner=true

#          Including the preference -prefer root causes Unison always to
#          resolve conflicts in favor of root, rather than asking for
#          guidance from the user. (The syntax of root is the same as for
#          the root preference, plus the special values newer and older.)
#          This preference is overridden by the preferpartial preference.
#          This preference should be used only if you are sure you know
#          what you are doing!
prefer=newer

#          When this preference is set to true, the textual user interface
#          will print nothing at all, except in the case of errors.
#          Setting silent to true automatically sets the batch preference
#          to true.
silent=true

#          When this flag is set to true, file modification times (but not
#          directory modtimes) are propagated.
times=false

#          When this flag is set, Unison will log all changes to the filesystems on a file.
log=false

#          When this flag is set to true, groups and users are synchronized numerically, rather than by name.
#          The special uid 0 and the special group 0 are never mapped via user/group names even if this
#          preference is not set.
numericids=true
Chceme automatizovat synchronizaci, proto vytvoříme malý skript a vytvoříme cronjob na server1 :
mkdir /root/scripts
vi /root/scripts/unison.sh
a přidejte následující obsah:
#!/bin/sh
lockdir=/tmp
UNISON=/usr/bin/unison
LOGGER=/usr/bin/logger

if [ ! -f /$lockdir/unison ]; then
        touch $lockdir/unison

        $UNISON -testserver web
        rc=$?
        if [[ $rc != 0 ]] ; then
                echo "error"
                $LOGGER -d -t unison "web - error connecting remote"
        else
                $UNISON web
        fi

        rm $lockdir/unison
else
        $LOGGER -d -t unison "unison already running"
fi
udělejte skript spustitelným:
chmod 700 /root/scripts/unison.sh
A spusťte první synchronizaci. Chcete-li získat nějaký výstup během synchronizace, nastavte v /root/.unsion/web.prf tichý =false. Afterwards, start unison:
/root/scripts/unison.sh
Finally, we create the cronjob:
crontab -e
# unison
*  * * * *  /root/scripts/unison.sh > /dev/null
8 Sync Emails with Dovecot
Since Dovecot 2 it`s possible to use Dovect's dsync to keep the main base in sync. If you have already mail's on server1, they will be replicated to server2 without any further interaction.
You must use the same port (4711 ) and the same password (replication_password ) on both servers.
server1:
Open /etc/dovecot/dovecot-sql.conf
vi /etc/dovecot/dovecot-sql.conf
and enable the iterate_query:
old:
#iterate_query = SELECT email as user FROM mail_user
new:
iterate_query = SELECT email as user FROM mail_user
Open /etc/dovecot/dovecot.conf
vi /etc/dovecot/dovecot.conf
and add the following content:
# Enable the replication plugin globally
mail_plugins = $mail_plugins notify replication quota

# Both the client and the server need to have a shared secret
doveadm_password = replication_password

# configure how many dsyncs can be run in parallel (10 by default)
replication_max_conns = 10

service aggregator {
        fifo_listener replication-notify-fifo {
                user = vmail
                mode = 0666
        }

        unix_listener replication-notify {
                user = vmail
                mode = 0666
        }
}

service replicator {
        unix_listener replicator-doveadm {
                mode = 0666
        }
}

service doveadm {
        user = vmail
        inet_listener {
                port = 4711
        }
}

service config {
        unix_listener config {
                user = vmail
        }
}

# use tcp:ip as the dsync target
plugin {
        replication_full_sync_interval = 1 hours
        mail_replica = tcp:192.168.0.106:4711
}

protocol imap {
        mail_plugins = quota imap_quota notify replication
}
restart Dovecot:
service dovecot restart
server2:
Open /etc/dovecot/dovecot-sql.conf
vi /etc/dovecot/dovecot-sql.conf
and enable the iterate_query:
old:
#iterate_query = SELECT email as user FROM mail_user
new:
iterate_query = SELECT email as user FROM mail_user
Open /etc/dovecot/dovecot.conf
vi /etc/dovecot/dovecot.conf
and add the following content:
# Enable the replication plugin globally
mail_plugins = $mail_plugins notify replication quota

# Both the client and the server need to have a shared secret
doveadm_password = replication_password

# configure how many dsyncs can be run in parallel (10 by default)
replication_max_conns = 10

service aggregator {
        fifo_listener replication-notify-fifo {
                user = vmail
                mode = 0666
        }

        unix_listener replication-notify {
                user = vmail
                mode = 0666
        }
}

service replicator {
        unix_listener replicator-doveadm {
                mode = 0666
        }
}

service doveadm {
        user = vmail
        inet_listener {
                port = 4711
        }
}

service config {
        unix_listener config {
                user = vmail
        }
}

# use tcp:ip as the dsync target
plugin {
        replication_full_sync_interval = 1 hours
        mail_replica = tcp:192.168.0.105:4711
}

protocol imap {
        mail_plugins = quota imap_quota notify replication
}
restart Dovecot:
service dovecot restart
You can check the replication on each server:
doveadm replicator status '*'
username                                                                                priority fast sync full sync failed
[email protected]                                                                     none     00:16:34  00:16:40  -
9 Additional Notes
When you want to activate a firewall on the master or slave server, ensure that you open port 3306 for MySQL, 22 for SSH and 4711 for Dovecot on both servers.
10 Links
- ISPConfig Website:http://www.ispconfig.org/
- ISPConfig Forum:https://www.howtoforge.com/forums/
- ISPConfig Bugtracker:http://bugtracker.ispconfig.org/