Toto je "kopírovat a vložit" Jak na to! Nejjednodušší způsob, jak postupovat podle tohoto návodu, je použít klienta příkazového řádku/SSH klienta (jako je PuTTY pro Windows) a jednoduše zkopírovat a vložit příkazy (kromě případů, kdy musíte poskytnout vlastní informace, jako jsou IP adresy, názvy hostitelů, hesla,... ). To pomáhá vyhnout se překlepům.
ISP-ServerSetup -Ubuntu 5.0.4 "The Hoary Hedgehog"
Verze 1.0
Autor:Till Brehm
Toto je podrobný popis kroků, které je třeba podniknout k nastavení Ubuntu založený server (Ubuntu 5.0.4 - The Hoary Hedgehog), který nabízí všechny služby potřebné pro ISP a hostitele (webový server (s podporou SSL), poštovní server (s SMTP-AUTH a TLS!), DNS server, FTP server, MySQL server, POP3 /POP3/IMAP/IMAP, kvóta, brána firewall atd.).
Budu používat následující software:
- Webový server:Apache 2.0.x
- Poštovní server:Postfix (snáze se konfiguruje než sendmail; má kratší historii bezpečnostních děr než sendmail)
- Server DNS:BIND9
- FTP Server:proftpd
- POP3/POP3s/IMAP/IMAPs:v tomto příkladu si můžete vybrat mezi tradičním formátem poštovní schránky UNIX (my pak používáme ipopd/ uw-imapd) nebo formátu Maildir (v tomto případě použijemeCourier-POP3/Courier-IMAP).
- Statistiky webových stránek Webalizer
Nakonec byste měli mít systém, který funguje spolehlivě a je připraven na bezplatný webhostingovládací panel ISPConfig (tj. ISPConfig na něm běží mimo box).
Chci nejprve říci, že to není jediný způsob, jak takový systém nastavit. Existuje mnoho způsobů, jak tohoto cíle dosáhnout, ale já volím tento způsob. Nezaručuji, že to pro vás bude fungovat!
Požadavky
K instalaci takového systému budete potřebovat následující:
- Instalační CD Ubuntu (dostupné zde:http://www.ubuntu.com/download/)
- Připojení k internetu, protože v tomto dokumentu popíšu síťovou instalaci.
1 TheBase System
Vložte instalační CD Ubuntu do svého systému a nabootujte z něj (zadejte server při zaváděcí výzvě k instalaci pouze základního systému vhodného pro servery).

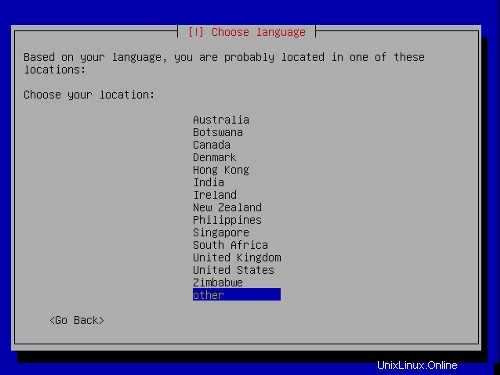
Instalace se spustí a nejprve si musíte vybrat jazyk:
Vyberte svou polohu:

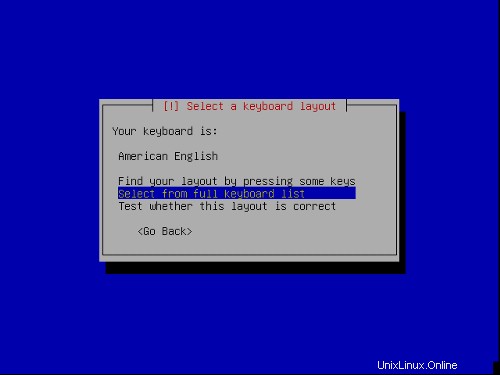
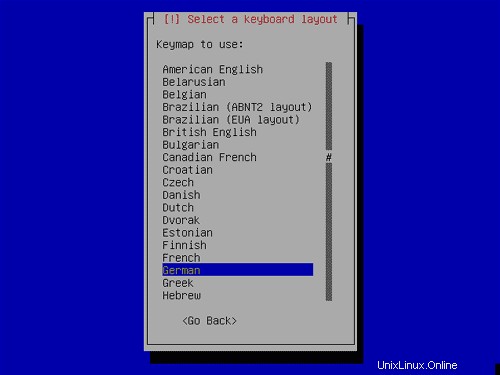
Vyberte rozložení klávesnice:

Spustí se detekce hardwaru:

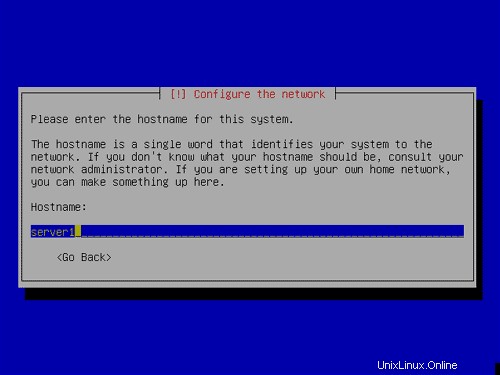
Zadejte název hostitele. V tomto příkladu se můj systém nazývá server1 .example.com ,takže zadám server1 :
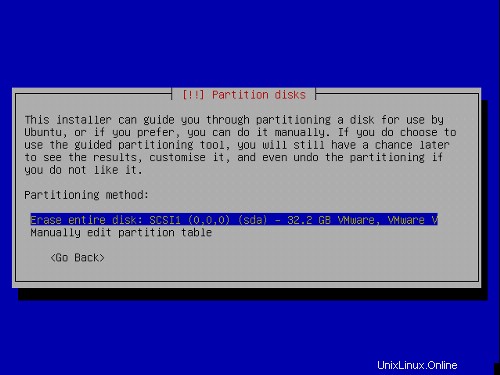
Nyní vytvoříme oddíly. Vyberte Ručně upravit tabulku oddílů . Pokud již nějaké oddíly existují, odstraňte je nejprve jejich výběrem, stiskněte klávesu Return a poté vyberte možnost delete.

Použiji následující schéma rozdělení:
/boot 50 MB
/swap 1 GB
/ 10 GB
/var zbytek hardisku
Vytvoření oddílu:Vyberte Volné místo , hitenter a poté:

1) Vyberte Vytvořit nový oddíl .
2) Zadejte velikost oddílu. Hodnoty lze zadávat v MB a GB nebo procentech (%)
3) Vyberte typ oddílu:primární
4) Vyberte umístění oddílu:začátek
5) Změnit Použít jako :EXT3 použiji pro všechny oddíly kromě odkládacího oddílu, který je typu swap.
6) Změna:Vyberte bod připojení
7) Vyberte Dokončeno nastavení oddílu
Toto opakujte pro všechny oddíly ve výše uvedené tabulce oddílů.
Vaše tabulka oddílů by nyní měla vypadat takto:
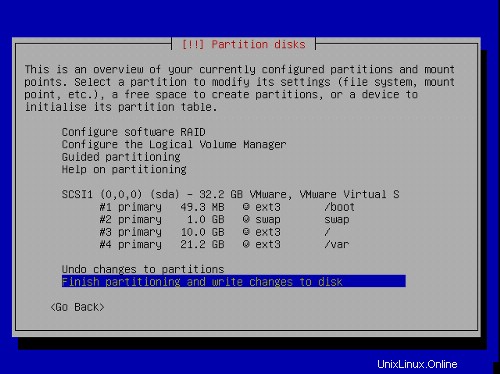
Vyberte Dokončit rozdělení a zapsat změny na disk a poté Ano ,a pokračujte dalším krokem.
Nyní se instaluje základní systém:

Konfigurace časového pásma:

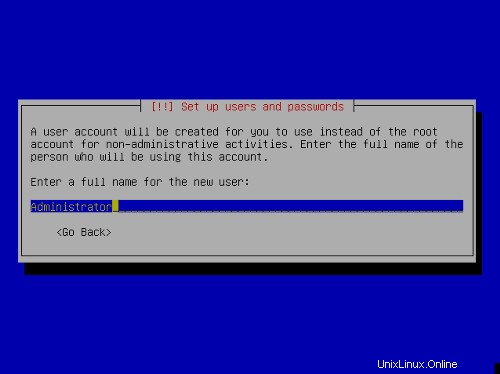
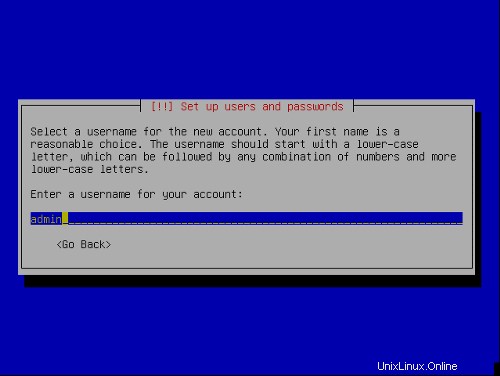
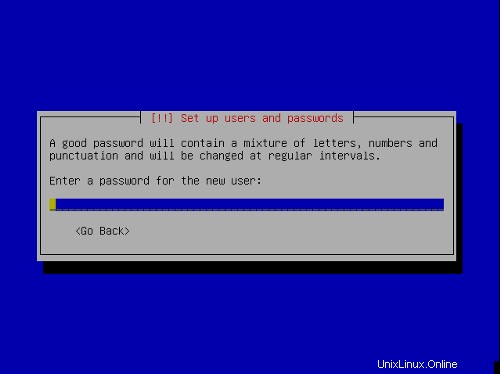
Nastavení uživatele:
První fáze instalačního procesu je dokončena a server se spustí do nainstalovaného linuxu Ubuntu.

2 Instalace a konfigurace zbytku systému
Povolit uživatele root
Nyní se mohu přihlásit pomocí uživatelského jména a hesla, které jsem zadal výše. Nejprve povolím uživatele root pro snadnou instalaci. Pokud chcete, můžete jej později zakázat.
sudopasswd root
su
Nyní jsme přihlášeni jako uživatel root.
Konfigurovat TheNetwork
Protože instalační program Ubuntu nakonfiguroval náš systém tak, aby získal nastavení sítě přes DHCP, musíme to nyní změnit, protože server by měl mít statickou IP adresu . Upravit/etc/network/interfaces a upravte ji podle svých potřeb (v tomto příkladu nastavení použiji IP adresu 192.168.0.100 ):
# This file describes the network interfaces available on your system |
Pokud chcete přidat IP adresu 192.168.0.101 do rozhraní eth0 měli byste změnit soubor, aby vypadal takto:
# This file describes the network interfaces available on your system |
Potom restartujte síť:
/etc/init.d/networkingrestart
Upravit /etc/hosts a přidejte své nové IP adresy:
127.0.0.1 localhost.localdomain localhost server1 |
Nastavení názvu hostitele
echo server1.example.com> /etc/hostname
/bin/hostname -F /etc/hostname
Upravte /etc/apt/sources.listA aktualizujte svou instalaci Linuxu
Upravit /etc/apt/sources.list .Mělo by to vypadat takto:
#deb cdrom:[Ubuntu 5.04 _Hoary Hedgehog_ - Release i386 (20050407)]/ hoary main restricted |
aktualizace apt-get
upgrade apt-get
Install SSH Daemon
apt-get install ssh
Instalovat/odebrat software
Nyní si nainstalujme software, který později potřebujeme, a odebereme některé balíčky, které nepotřebujeme:
apt-get install fetchmailunzip zip libarchive-zip-perl zlib1g-dev libpopt-dev nmap openssl lynx gcc flexmake ncftp libdb4.3-dev
update-inetd --removedaytime
update-inetd --remove telnet
update-inetd --remove time
update-inetd --remove finger
update-inetd --remove talk
update-inetd --remove ntalk
update-inetd --remove ftp
update-inetd --odstranit zahodit
/etc/init.d/inetd reload
Kvóta
instalační kvóta apt-get
Upravit /etc/fstab vypadat takto (přidal jsem ,usrquota,grpquota do oddílů s bodem připojení / a /var ):
# /etc/fstab: static file system information. |
Potom spusťte:
dotkněte se /quota.user /quota.group
chmod 600 /quota.*
mount -o remount /
dotkněte se /var/quota.user /var/quota.group
chmod 600 /var/quota.*
mount -o remount /var
quotacheck -avugm
quotaon -avug
Server DNS
apt-getinstall bind9
Z bezpečnostních důvodů chceme spouštět BIND chrooted, takže musíme provést následující kroky:
/etc/init.d/bind9 stop
Upravit soubor /etc/default/bind9 takže démon poběží jako neprivilegovaný uživatel 'bind písmo> ',chrooted to /var/lib/named .Upravte řádek:OPTS=" -ubind " tak, aby znělo OPTIONS="-u bind-t /var/lib/named" :
OPTIONS="-u bind -t /var/lib/named" |
Vytvořte potřebné adresáře pod /var/lib :
mkdir -p /var/lib/named/etc
mkdir /var/lib/named/dev
mkdir -p /var/lib/named/var/cache/bind
mkdir -p /var/lib/named/var/run/bind/run
Potom přesuňte konfigurační adresář z /etc do /var/lib/named/etc :
mv /etc/bind /var/lib/named/etc
Vytvořte symbolický odkaz na nový konfigurační adresář ze starého umístění (abyste předešli problémům při budoucí aktualizaci bindis):
ln -s /var/lib/named/etc/bind/etc/bind
Nastavte null a randomdevices a opravte oprávnění adresářů:
mknod /var/lib/named/dev/nullc 1 3
mknod /var/lib/named/dev /random c 1 8
chmod 666 /var/lib/named/dev/null /var/lib/named/dev/random
chown -R bind:bind /var/lib/named/var/ *
chown -R bind:bind /var/lib/named/etc/bind
Potřebujeme upravit spouštěcí skript /etc/init.d/ sysklogd z sysklogd abychom mohli stále dostávat důležité zprávy zaznamenávané do systémových protokolů. Upravte řádek: SYSLOGD="-u syslog" tak, že zní:SYSLOGD="-u syslog -a /var/lib/named/dev/log" :
#! /bin/sh |
Restartujte loggingdaemon:
/etc/init.d/sysklogd restart
Spusťte BIND a zkontrolujte /var/log/syslog za případné chyby:
/etc/init.d/bind9 start
MySQL
apt-getinstall mysql-server mysql-client libmysqlclient12-dev
mysqladmin -u root passwordyourrootsqlpassword
mysqladmin -h server1.example.com -u root password yourrootsqlpassword
Když spustíte netstat-tap nyní byste měli vidět řádek jako tento:
tcp 0 0 localhost.localdo:mysql *:* LISTEN 2449/mysqld |
což znamená, že MySQL je přístupný na portu 3306. Můžete přejít k další části (Postfix). Pokud tento řádek nevidíte, upravte /etc/mysql/my.cnf a komentovat skip-networking :
# skip-networking |
Pokud jste museli upravit/etc/mysql/my.cnf musíte restartovat MySQL:
/etc/init.d/mysql restart
Postfix
Chcete-li nainstalovat Postfix s SMTP-AUTH a TLS, proveďte následující kroky:
apt-get install postfixpostfix-tls libsasl2 sasl2-bin moduly libsasl2 libdb3-util procmail (1 řádek!)
dpkg-reconfigurepostfix
<- Internetové stránky
<- ŽÁDNÉ
<- server1.example.com
<- server1.example.com, localhost.example.com, localhost
<- Ne
<- 127.0.0.0/8
<- 0
<- +
postconf -e 'smtpd_sasl_local_domain='
postconf -e 'smtpd_sasl_auth_enable =yes'
postconf -e 'smtpd_sasl =noanonymous'
postconf -e 'broken_sasl_auth_clients =ano'
postconf -e 'smtpd_recipient_restrictions =permit_sasl_authenticated,permit_mynetworks,reject_unauth_destination'
postconf>met_eface saslauthd'>> /etc/postfix/sasl/smtpd.conf
echo 'mech_list:plain login'>> /etc/postfix/sasl/smtpd.conf
mkdir /etc/postfix/ssl
cd /etc/postfix/ssl/
openssl genrsa - des3 -rand /etc/hosts -out smtpd.key 1024
chmod 600 smtpd.key
openssl req -new -key smtpd.key -out smtpd.csr
openssl x509 -req -days 3650 -in smtpd.csr -signkey smtpd.key -out smtpd.crt
openssl rsa -in smtpd.key -out smtpd.key.unencrypted
mv -f smtpd.key.unencrypted smtpd.key
openssl req -new -x509 -extensions v3_ca -keyout cakey.pem -out cacert.pem -days3650
postconf -e 'smtpd_tls_auth_only=no'
postconf -e 'smtp_use_tls =yes'
postconf - e 'smtpd_use_tls =yes'
postconf -e 'smtp_tls_note_starttls_offer =yes'
postconf -e 'smtpd_tls_key_file =/etc/postfix/ssl/smtpd.key'_tpd_tm etc/postfix/ssl/smtpd.crt'
postconf -e 'smtpd_tls_CAfile =/etc/postfix/ssl/cacert.pem'
postconf -e 'smtpd_tls_loglevel =1'
postconf -e 'smtpd_tls_received_header =yes'
postconf -e 'smtpd_tls_session_cache_timeout =3600s'
postconf -e 'tls_random_source =dev:/dev/urandom'
Soubor /etc/postfix/main.cf by nyní měl vypadat takto:
# See /usr/share/postfix/main.cf.dist for a commented, more complete version |
/etc/init.d/postfixrestart
Ověření provede saslauthd .Musíme změnit pár věcí, aby to fungovalo správně. Protože Postfix je zakořeněn v /var/spool/postfix musíme udělat následující:
mkdir -p /var/spool/postfix/var/run/saslauthd
rm -fr /var/run/saslauthd
Nyní musíme upravit /etc/default/saslauthd za účelem aktivace saslauthd .Odstranit # před START=ano a přidejte řádek PARAMS="-m/var/spool/postfix/var/run/saslauthd" :
# This needs to be uncommented before saslauthd will be run automatically |
Finally we haveto edit /etc/init.d/saslauthd .Change the line
dir=`dpkg-statoverride --list $PWDIR` |
to
#dir=`dpkg-statoverride --list $PWDIR` |
Then change thevariables PWDIR and PIDFILE and add the variable dir at the beginning of the file:
PWDIR="/var/spool/postfix/var/run/${NAME}" |
/etc/init.d/saslauthd should now looklike this:
#!/bin/sh -e |
Now start saslauthd :
/etc/init.d/saslauthd start
To see if SMTP-AUTHand TLS work properly now run the following command:
telnetlocalhost 25
After you haveestablished the connection to your postfix mail server type
ehlolocalhost
If you see thelines
250-STARTTLS
and
250-AUTH
everything is fine.
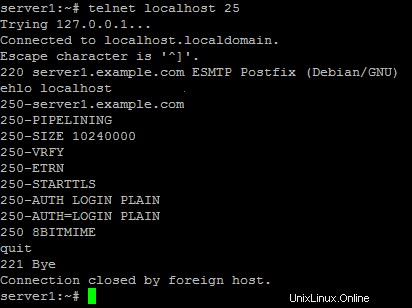
Type
quit
to return to thesystem's shell.
Courier-IMAP/Courier-POP3
Install Courier-IMAP/Courier-IMAP-SSL(for IMAPs on port 993) and Courier-POP3/Courier-POP3-SSL (for POP3s on port995).
apt-get install courier-authdaemoncourier-base courier-imap courier-imap-ssl courier-pop courier-pop-ssl courier-sslgamin libgamin0 libglib2.0-0 (oneline!)
<- No
<- OK
Then configurePostfix to deliver emails to a user's Maildir:
postconf -e 'home_mailbox=Maildir/'
postconf -e 'mailbox_command ='
/etc/init.d/postfix restart
Please go sureto enable Maildir underManagement -> Settings -> EMail in the ISPConfig web interface.
Apache
Run
apt-get install apache2apache2-common apache2-doc apache2-mpm-prefork apache2-utils libapr0 libexpat1ssl-cert (1line!)
apt-get install autoconf automake1.4 autotools-dev libapache2-mod-php4 libkrb53php4 php4-common php4-dev php4-imagick php4-mcrypt php4-rrdtool php4-sqlitephp4-curl php4-domxml php4-gd php4-imap php4-ldap php4-mcal php4-mhash php4-mysqlphp4-odbc php4-pear php4-xslt (1 line!)
Edit /etc/apache2/apache2.conf . Change
DirectoryIndex index.html index.cgi index.pl index.php index.xhtml |
to
DirectoryIndex index.html index.htm index.shtml index.cgi index.php index.php3 index.pl index.xhtml |
Edit /etc/mime.types and comment out the following lines:
#application/x-httpd-php phtml pht php |
Edit /etc/apache2/mods-enabled/php4.conf and comment out the following lines:
<IfModule mod_php4.c> |
Edit /etc/apache2/ports.conf and add Listen 443 :
Listen 80 |
Now we have toenable some Apache modules (SSL , rewrite and suexec ):
cd /etc/apache2/mods-enabled
ln -s /etc/apache2/mods-available/ssl.conf ssl.conf
ln -s /etc/apache2/mods-available/ssl.load ssl.load
ln -s /etc/apache2/mods-available/rewrite.load rewrite.load
ln -s /etc/apache2/mods-available/suexec.load suexec.load
ln -s /etc/apache2/mods-available/include.load include.load
Restart Apache:
/etc/init.d/apache2restart
Proftpd
apt-getinstall proftpd proftpd-common ucf
<- standalone
For security reasonsyou can add the following lines to /etc/proftpd.conf (thanks to Reinaldo Carvalho; more information can be found here:http://proftpd.linux.co.uk/localsite/Userguide/linked/userguide.html):
DefaultRoot ~
IdentLookups off
ServerIdent on "FTP Server ready."
and restart Proftpd:
/etc/init.d/proftpd restart
Webalizer
apt-getinstall libfreetype6 libgd2-noxpm libjpeg62 libpng12-0 webalizer
Synchronizethe System Clock
If you want tohave the system clock synchronized with an NTP server you can run the following:
apt-get install ntpdate
/etc/init.d/ntpdate start
The system startup links for /etc/init.d/ntpdate should already exist so thatntpdate starts automatically at boot time; if it does not, run
update-rc.d ntpdate defaults
to create these links.
Then add the followinglines to /var/spool/cron/crontabs/root (if the file does not exist, create it by running
touch/var/spool/cron/crontabs/root ):
#update time with ntp server
0 */2 * * * /etc/init.d/ntpdate restart &> /dev/null
Then run
chmod600 /var/spool/cron/crontabs/root
/etc/init.d/cronrestart
Install somePerl Modules needed by SpamAssassin (comes with ISPConfig)
apt-get installlibhtml-parser-perl libdb-file-lock-perl libnet-dns-perl
On To TheNext Step...
The configurationof the server is now finished, and we go on by installing ISPConfigon it.
3 Installing ISPConfig
I will installthe current ISPConfig version. Download the current ISPConfig version from http://www.ispconfig.org/downloads.htmto your /tmp directory.
Unpack the ISPConfig-archiveand change to the directory install_ispconfig :
tarxvfz ISPConfig*.tar.gz
cd install_ispconfig
Start the setupscript
./setup
The installer willnow compile an Apache with PHP5 that will run on port 81 and is needed by theISPConfig system itself. It will not interfere with your existing Apache installationso you can go on unworried.
When the ISPConfigApache is built, a custom SSL certificate is built. Therefore you are askeda few questions. You can accept the default values, or you can enter new valuesthere, this does not matter:
In step 7 (EncryptingRSA private key of CA with a pass phrase for security [ca.key] ) andstep 8 (Encrypting RSA private keyof SERVER with a pass phrase for security [server.key] ) of the certificatecreation process you are asked if you want to encrypt the respective key now.Choose n there becauseotherwise you will always be asked for a password whenever you want to restartthe ISPConfig system which means it cannot be restarted without human interaction!
If the compilationfails, the setup is stopped and all compiled files are removed. From the errormessage you get you should be able to see the reason for the failure (in mostcases a package (like the MySQL header files) is missing). Try to solve theproblem and the re-run ./setup .
In case of successthe setup goes on:
Pleasechoose your language. This is the language of the ISPConfig interface.
Afterwards youare shown the ISPConfig licence (BSD licence). Please read it carefully! Youaccept it by typing y .If you do not want to accept the ISPConfig licence, type n ,and the installation routine stops.
As installationmode I chose expert becausei want to set the website root to /var/www .When you are asked for installation mode, type 2 and hit return.
Now you are askif the daemons like postfix etc. are recognized correctly and for their filelocations, chose yes y .
When you are asked:
Web-Root:/home/www
Is this correct? [y/n]
choose n and enter /var/www as Web-Root.
Now you are askedfor some installation settings:
Pleaseenter your MySQL server: localhost
Please enter your MySQL user: root
Please enter your MySQL password: (Enter the password you chose when setting up the MySQL Server)
Please enter a name for the ISPConfigdatabase (e.g. db_ispconfig): db_ispconfig
Please enter the IP addressof the ISPConfig web (e.g. 192.168.0.1): 192.168.0.100 (Enteryour IP here)
Now you are askto enter the host and domain of your server. If your server has a host and domainname,enter them now. As this is a test install in my local network, I leave the hostempty and enter my IP address instead of the domain.
Pleaseenter the host name (e.g. www):
Please enter the domain (e.g.xyz.de): 192.169.0.100
Pleaseselect the protocol (http or https (SSL encryption)) to use to access the ISPConfigsystem:
1) HTTPS
2) HTTP
Your Choice: 1
After you haveanswered the questions ISPConfig should be duly installed. If you indicated www as host and xyz.com as the domain during the installation, you will find the ISPConfig interfaceunder https://www.xyz.com:81 or http://www.xyz.com:81 .Here you can login first with the user name admin and password admin . Itis recommended to change the password immediately! This can be done in the ISPConfigweb interface under Tools -> Changepassword .
Then go to Management-> Server -> Settings in the ISPConfig control panel and tickthe Maildir checkbox onthe EMail tab.
If your serverhas more than one IP address, please check if your additional IP addresses havebeen correctly detected by the installation routine under Management-> Server ->
Settings on the tab Server-> IP List .
You can find thewhole ISPConfig installation instructions here:http://www.ispconfig.org/manual_installation.htm
The ISPConfig manualscan be found here:http://www.ispconfig.org/documentation.htm
Links
- http://www.ubuntu.com
- http://www.ispconfig.org