Na této stránce DNS protokol a BIND DNS server jsou vysvětleny, stejně jako modul Webmin pro vytváření a správu domén DNS.
- Viz Úvod do systému doménových jmen
Obsah
Modul BIND DNS Server
BIND (Berkeley Internet Name Domain) je nejběžnějším DNS serverem pro systémy Unix. V průběhu let bylo vydáno několik verzí, nejnovější je verze 9. Modul BIND DNS Server (nachází se v kategorii Servery) podporuje konfiguraci verzí 8 a 9. Starší verze 4 má jiný formát konfiguračního souboru a může lze nakonfigurovat pomocí modulu BIND 4 DNS Server, zdokumentovaného v pozdější části této kapitoly.
Protože BIND je k dispozici pro téměř všechny unixové systémy a funguje identicky bez ohledu na operační systém, platí pokyny v této kapitole nejen pro Linux, ale i pro ostatní verze Unixu. Většina verzí Unixu a Linuxu obsahuje BIND 8 nebo 9 jako standardní balíček, takže je zřídka nutné jej instalovat. Pokud modul nenajde DNS server, zobrazí se na hlavní stránce chybová zpráva – pokud k tomu dojde, zkontrolujte CD nebo web s operačním systémem, zda neobsahuje balíček BIND, nebo si stáhněte a zkompilujte zdrojový kód z http://www.isc .org/.
Primární konfigurační soubor BIND je /etc/named.conf, který obsahuje všechny zóny, které server hostí, a globální konfigurační nastavení, která platí pro všechny zóny. Záznamy v každé zóně jsou uloženy v samostatných souborech, které se obvykle nacházejí v adresáři /var/named. Tento modul Webmin vždy aktualizuje všechny tyto soubory přímo, namísto komunikace s běžícím procesem BIND. To znamená, že pokud používáte nějaký jiný program, který dynamicky aktualizuje zóny pomocí komunikace s BIND (jako je DHCP server), pak by tento modul neměl být používán, protože může tyto změny rušit. Jen velmi málo systémů má však tento druh dynamické aktualizace aktivován.
Verze 9 BIND má některé funkce, které verze 8 nemá. Nejdůležitější z nich, které tento modul Webmin podporuje, jsou pohledy. Pohled je sada zón, které jsou viditelné pouze pro některé klienty DNS. Normálně všichni klienti vidí stejné zóny, ale s BIND 9 můžete omezit viditelnost některých domén pouze na konkrétní klienty, identifikované jejich IP adresami. To může být užitečné pro vytváření zón, které jsou viditelné pouze pro systémy v interní síti, i když je váš server DNS připojen k internetu.
Pokud jste na svém systému nikdy nenastavili BIND, při prvním vstupu do modulu se na hlavní stránce zobrazí formulář pro nastavení serveru DNS, jak je uvedeno níže. Tento formulář se zobrazí pouze v případě, že Webmin zjistí, že konfigurační soubor s názvem.conf neexistuje, nebo pokud zadaný adresář zónových souborů neexistuje. Pokud jste si jisti, že vaše konfigurace BIND je platná a že DNS server již běží, neklikejte na Vytvořit , protože váš soubor named.conf bude přepsán. Místo toho klikněte na Konfigurace modulu odkaz a zkontrolujte, zda jsou všechny cesty správné pro váš systém.
-
 Vázaná instalace
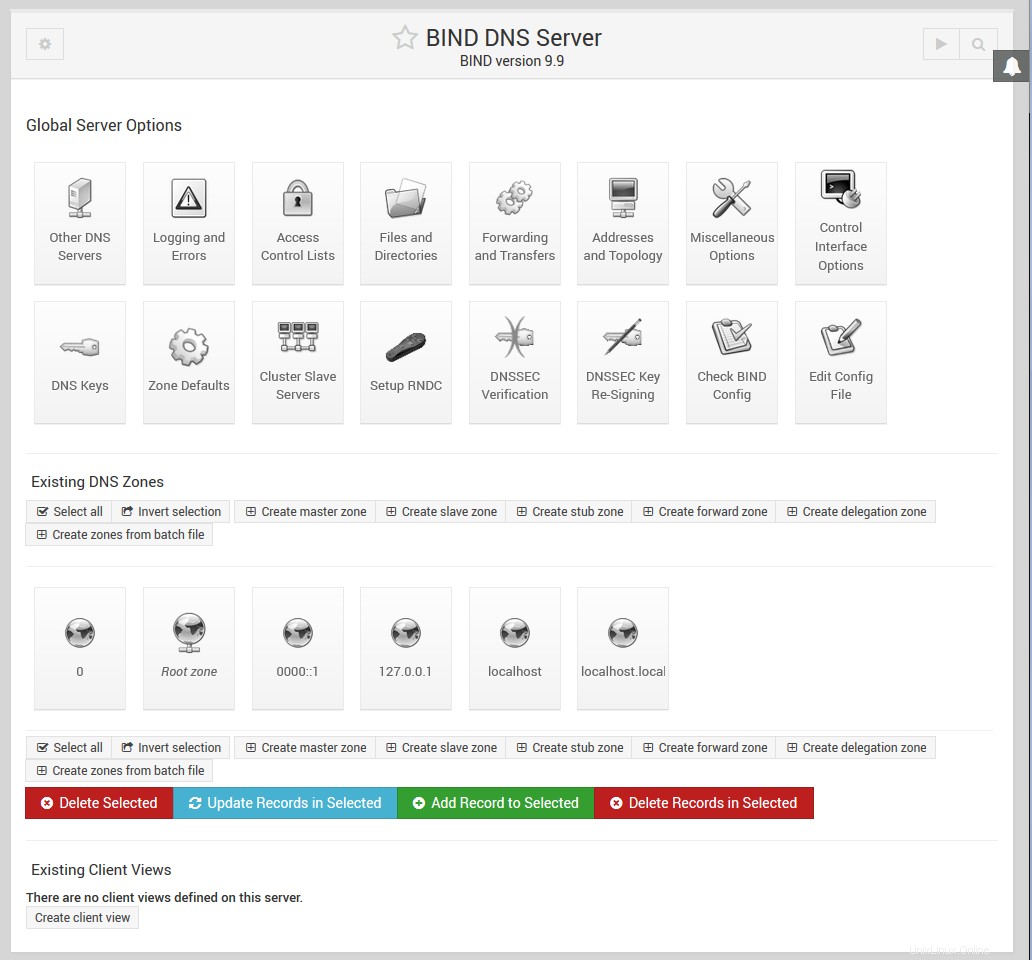
Po nastavení BIND ve vašem systému se zobrazí hlavní stránka, jak je znázorněno na obrázku níže. V horní části je tabulka ikon pro nastavení globálních možností, které platí pro celý váš DNS server. Pod nimi jsou ikony pro každou ze zón, které váš server hostí, následované ikonami pro zobrazení, pokud používáte BIND verze 9. Úplně dole jsou tlačítka pro použití aktuální konfigurace DNS nebo spuštění serveru BIND.
Pokud jste právě nastavili BIND poprvé, bude pravděpodobně existovat pouze jedna ikona zóny – kořenová zóna. Některé distribuce Linuxu, které obsahují balíček BIND, se dodávají se základním konfiguračním souborem, který definuje zóny jako localdomain a 127.0.0, které se používají k rozlišení localhost a 127.0.0.l zpětného názvu hostitele a IP adresy.
-
 Svázat hlavní stránku serveru DNS
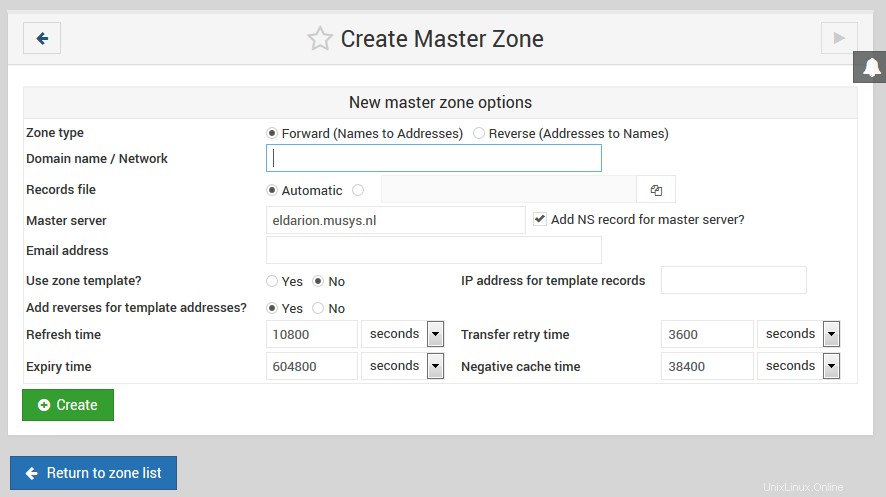
Vytvoření nové hlavní zóny
Hlavní zóna je zóna, pro kterou je autoritativním zdrojem informací váš server DNS. Jednu zónu může hostovat více serverů, ale pouze jeden je hlavní – všechny ostatní jsou podřízené. Pokud chcete do konfigurace serveru přidat novou hlavní zónu, postupujte takto:
- Rozhodněte se o názvu nové zóny, například example.com nebo interní. Pokud se má jednat o internetovou doménu, která bude viditelná všem ostatním na světě, název domény nesmí být dosud nikým registrován. Za normálních okolností jej však nemůžete zaregistrovat sami, dokud nebude váš server DNS nastaven jako hostitel.
- Na hlavní stránce modulu klikněte na Vytvořit novou hlavní zónu odkaz pod tabulkou stávajících zón. Tím se dostanete na stránku zobrazenou na obrázku níže, kde můžete zadat podrobnosti o nové zóně.
- Pokud se má jednat o dopřednou zónu jako example.com nebo foo.com.au, ponechte Typ zóny pole nastaveno na Přeposlat . Pokud se však jedná o reverzní zónu pro vyhledávání názvů hostitelů z IP adres, nastavte pole na Reverse .
- V Název domény / Síť zadejte název zóny bez tečky na konci. Pro reverzní zónu stačí zadat síťovou adresu jako 192.168.1. Webmin to automaticky převede do formátu in-addr.arpa při vytvoření domény.
- Soubor záznamů pole řídí, kde je uložen konfigurační soubor obsahující záznamy zóny. Pokud to necháte nastavené na Automaticky , název souboru bude určen automaticky na základě konfigurace modulu a nastavení adresáře v souboru named.conf. Toto je obvykle nejlepší možnost, protože to povede k vytvoření souboru záznamů ve stejném adresáři jako jakékoli existující zóny, jako je /var/named. Pokud však zrušíte výběr možnosti Automaticky a zadejte místo toho název souboru, všechny záznamy pro zónu budou zapsány do tohoto souboru. Pokud zadáte název existujícího souboru, bude při vytvoření domény přepsán.
- Na Hlavním serveru zadejte úplný název domény hlavního serveru DNS pro tuto zónu. Musí to být kanonický název vašeho systému, například server.example.com, nikoli krátký název jako server. Tento server (a hodnoty z následujícího
- pole) se používají k vytvoření záznamu SOA nové zóny.
- V části E-mailová adresa do pole zadejte adresu osoby odpovědné za tuto zónu. V adrese můžete použít symbol @, který Webmin automaticky převede na tečku pro zařazení do SOA záznamu.
- Čas obnovení určuje, jak často mají sekundární servery kontrolovat u tohoto hlavního serveru aktualizace zóny. Výchozí hodnota je rozumná, ale možná ji budete chtít zvýšit pro zóny, které se mění jen zřídka, nebo snížit pro zóny, které jsou často aktualizovány.
- Čas opakování přenosu určuje, jak dlouho by měl sekundární server čekat po neúspěšném přenosu zóny, než se o to pokusí znovu.
- Doba vypršení platnosti pole řídí maximální dobu, po kterou by měl sekundární server DNS pro zónu ukládat záznamy do mezipaměti, než je znovu přenese z hlavního serveru.
- Výchozí doba trvání pole určuje TTL záznamů v zóně, které nemají explicitně nastavenu jednu.
- Klikněte na tlačítko Vytvořit tlačítko v dolní části stránky. Pokud byl formulář správně vyplněn a zóna na vašem serveru ještě neexistuje, budete přesměrováni na stránku pro přidání nových záznamů do zóny.
- Vraťte se na hlavní stránku modulu, která nyní bude obsahovat ikonu vaší nové zóny, a klikněte na tlačítko Použít změny tlačítko ve spodní části pro jeho aktivaci.
- Vytvořit hlavní zónu.png
Nově vytvořená zóna bude obsahovat pouze jeden záznam (pokud nemáte nastavenou šablonu). Chcete-li přidat další, postupujte podle pokynů v další části. Jakmile nastavíte základní záznamy ve své doméně, můžete si ji zaregistrovat u úřadu, který spravuje nadřazenou doménu, např. .com nebo .com.au. Některé doménové autority vám nedovolí zaregistrovat zóny, které nemají alespoň dva servery (jeden hlavní a jeden podřízený) a záznamy názvových serverů v zóně pro tyto servery.
Přidávání a úprava záznamů
-
 Svázat – upravit hlavní zónu
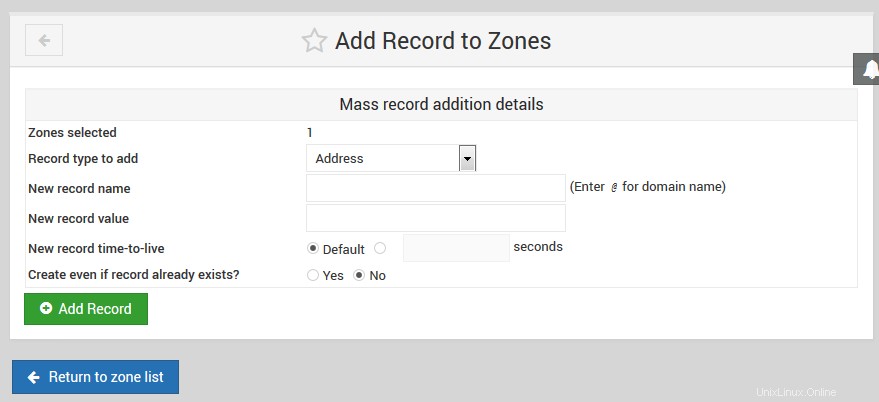
Nejužitečnější funkcí modulu BIND DNS Server je možnost přidávat, upravovat a mazat záznamy v hlavních zónách hostovaných vaším serverem. Pokud byste například chtěli nastavit webový server ve své doméně example.com, museli byste přidat záznam adresy pro www.example.com s IP adresou serveru. Chcete-li přidat nový záznam, jako je tento, postupujte takto:
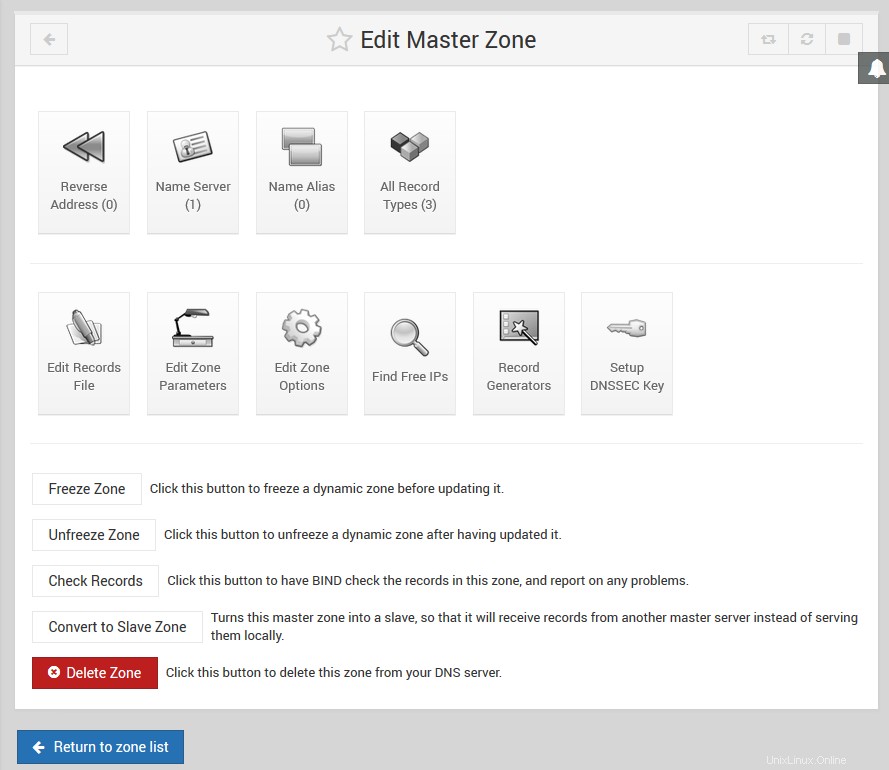
- Na hlavní stránce modulu klikněte na ikonu zóny, do které chcete přidat. Zobrazí se stránka zobrazená níže, v horní části je tabulka ikon, jedna pro každý typ záznamu.
- Klikněte na ikonu typu záznamu, který chcete přidat. Nejběžnějším typem je Adresa , který spojuje IP adresu s názvem hostitele. Viz #typy záznamů sekce níže, kde najdete úplný seznam všech podporovaných typů záznamů.
- Kliknutím na ikonu přejdete na stránku se seznamem všech existujících záznamů daného typu. Nad seznamem je formulář pro zadání nového záznamu.
- V části Jméno zadejte název nového záznamu relativně k názvu zóny. Pokud například chcete přidat záznam www.example.com, stačí zadat www . Je také možné zadat celý název záznamu, pokud má na konci tečku, která označuje, že se nevztahuje k zóně. Nezadávejte pouze www.example.com , protože bude převeden na www.example.com.example.com, což pravděpodobně není to, co chcete.
- Pokud se tento záznam bude měnit častěji než zbytek zóny, změňte Time-To-Live pole z Výchozího na odhadovaný čas mezi změnami. To určuje, jak dlouho budou klienti DNS a další servery ukládat záznam do mezipaměti.
- Pokud přidáváte záznam adresy, zadejte úplnou IP adresu hostitele do pole Adresa pole. V tabulce níže naleznete popis polí, která se objeví při přidávání jiných typů záznamů, a co znamenají.
- Pole Aktualizovat obráceně? zobrazí se pouze při přidávání záznamu adresy. Řídí automatické vytvoření odpovídajícího záznamu v reverzní zóně, která spojuje název hostitele s IP adresou. To lze samozřejmě provést pouze v případě, že zadaná IP adresa je v síti, pro kterou je váš systém primárním reverzním DNS serverem. To udržuje přední a zadní zóny synchronizované, což může být velmi užitečné. Pokud Ano Pokud je vybrán, bude přidán záznam reverzní adresy, pokud již neexistuje v reverzní zóně pro stejnou IP adresu. Mnoho názvů hostitelů bude mít často stejnou IP adresu, jako jsou ty, které se používají pro virtuální hosting založený na jménech. V případech, jako jsou tyto, nechcete měnit zpětné mapování, pokud již existuje. Možnost *Ano (a nahradit stávající)* funguje stejně jako Ano , ale pokud reverzní záznam pro IP adresu již existuje, bude aktualizován s novým názvem hostitele. To může být užitečné, pokud víte, že existuje existující záznam, který chcete nahradit. Pokud Ne je vybrána, nevytvoří se žádná zpětná adresa, i když je to možné.
- Po dokončení formuláře klikněte na Vytvořit tlačítko ve spodní části. Pokud je správně vyplněn, záznam bude přidán do seznamu pod formulářem. Při zápisu do souboru záznamů zóny Webmin použije pro název záznamu úplný kanonický formát, jako je www.example.com., i když zadáte pouze www.
- Chcete-li aktivovat nový záznam, aby jej mohli vyhledat klienti DNS a další servery, budete muset kliknout na tlačítko Použít změny tlačítko na hlavní stránce modulu. Pokud plánujete přidat nebo upravit několik záznamů, je obvykle lepší počkat, až budou všechny změny dokončeny, než stisknete tlačítko použít. Pokud je k dispozici, můžete místo toho použít Použít změny tlačítko v dolní části stránky hlavní zóny zobrazené níže. To používá příkaz ndc, aby řekl BINDu, aby znovu načetl pouze soubor pro tuto zónu, což může být mnohem rychlejší na systému, který má velký počet domén.
-
 Svázat – Přidat záznam do zón
Ačkoli jsou výše uvedené pokyny zaměřeny na přidání záznamu adresy, proces přidávání dalších typů záznamů do dopředné zóny je téměř identický. Reverzní aktualizace? pole neexistuje a Adresa pole je nahrazeno jedním nebo více různými poli. Typy záznamů sekce níže podrobně vysvětluje, jaká pole jsou k dispozici pro jednotlivé typy záznamů, které Webmin zná.
Při přidávání záznamu reverzní adresy do reverzní zóny je formulář zcela odlišný. Adresa pole se objeví před Název hostitele a název hostitele musí být vždy zadán v kanonickém tvaru s tečkou na konci, například www.example.com . Reverzní aktualizace? pole je nahrazeno textem Aktualizovat dál? , který řídí automatické vytvoření záznamu v odpovídající dopředné zóně. Neexistuje však možnost přepsání existujícího předávaného záznamu – pokud již existuje záznam se stejným názvem, nebude se ho dotýkat, i když Ano je vybráno.
Pokaždé, když je záznam přidán nebo aktualizován v zóně pomocí Webmin, jeho sériové číslo se automaticky zvýší. To platí také pro reverzní zóny, které se automaticky aktualizují při přidání záznamu adresy, a naopak. To znamená, že když použijete změny, ostatní servery DNS budou schopny zjistit, že se zóna změnila, porovnáním nového sériového čísla se starým, které uložili do mezipaměti.
Chcete-li upravit existující záznam v zóně, postupujte takto:
- Na hlavní stránce modulu klikněte na ikonu zóny, kterou chcete upravit, čímž se dostanete na stránku zobrazenou výše.
- Klikněte na ikonu u typu záznamu, který chcete změnit, čímž se zobrazí stránka se seznamem všech záznamů tohoto typu v zóně. Případně můžete kliknout na Všechny typy záznamů ikona, která vyvolá seznam každého jednotlivého záznamu v zóně bez ohledu na typ.
- Klikněte na název záznamu, který chcete upravit. Váš prohlížeč zobrazí formulář podobný tomu, který se používá pro přidání záznamu, ale s již vyplněnými poli s údaji o stávající adrese.
- Chcete-li přejmenovat záznam, upravte obsah Název pole. Zpočátku se zobrazí v kanonické podobě s tečkou na konci, ale pokud si přejete, můžete jej změnit na název související s doménou.
- Upravte Time-To-Live chcete, aby měl tento záznam jiné TTL, nebo jej nastavte na Výchozí aby to bylo stejné jako zbytek zóny.
- Pokud se jedná o záznam adresy, změňte IP v Adresa pole. U ostatních typů záznamů jsou pole stejná jako ve formuláři pro vytvoření záznamu a mají stejný význam.
- U záznamů adres pole Aktualizovat obráceně? je zobrazen. Výběrem Ano způsobí, že název a adresa odpovídajícího záznamu v reverzní zóně budou změněny tak, aby odpovídaly tomuto dopřednému záznamu. Pokud změníte IP tak, že reverzní adresa již není ve stejné síti, bude odstraněna ze staré reverzní zóny a přidána do nové reverzní zóny (pokud je hostována vaším serverem).
- U záznamů reverzní adresy pole Aktualizovat dál? je zobrazeno místo toho. Pokud Ano Pokud je vybrána, odpovídající záznam adresy v jeho dopředné zóně se změní tak, aby odpovídal všem změnám, které provedete v tomto formuláři.
- Klikněte na tlačítko Uložit tlačítko pro aktualizaci záznamu v souboru zóny a návrat do seznamu typů záznamů.
- Chcete-li změny aktivovat, klikněte na tlačítko Použít změny tlačítko zpět na hlavní stránku modulu.
Chcete-li odstranit záznam ze zóny, klikněte na Smazat tlačítko na editačním formuláři místo Uložit . Pro záznamy adres, pokud Aktualizovat obráceně? pole je nastaveno na Ano , bude smazán i odpovídající záznam reverzní adresy. Kromě toho je proces mazání záznamu identický bez ohledu na jeho typ. Totéž se stane při mazání záznamu reverzní adresy – odpovídající záznam adresy je rovněž smazán, pokud Přesměrovat aktualizaci? pole je nastaveno na Ano .
Seznam záznamů v zóně je zpočátku řazen podle konfigurace modulu, což obvykle znamená, že záznamy budou zobrazeny v pořadí, v jakém byly přidány. Chcete-li to změnit, můžete kliknout na záhlaví sloupce, například Název , Adresa nebo Skutečné jméno místo toho je seřadit podle tohoto sloupce. Třídění je však pouze dočasné a pokud se vrátíte na hlavní stránku a znovu otevřete zónu, bude ztraceno. Chcete-li jej trvale změnit, přečtěte si Pořadí zobrazení záznamů v pole v části Konfigurace modulu BIND DNS Server .
Typy záznamů
Webmin nepodporuje všechny typy záznamů, o kterých BIND ví, pouze ty nejběžněji používané. Níže uvedený seznam pokrývá všechny podporované typy a vysvětluje, k čemu se používají a jaká pole jsou k dispozici při přidávání nebo úpravě záznamu daného typu ve Webminu. Vedle každého názvu typu je krátký kód používaný samotným BIND k identifikaci typu v souboru záznamů.
- Adresa (A)
- Záznam adresy spojuje adresu IPv4 s názvem hostitele. Každý systém, ke kterému se chcete připojit přes HTTP, telnet nebo nějaký jiný protokol pomocí jeho názvu hostitele, musí mít záznam adresy, aby klienti mohli vyhledat jeho IP. Jeden název hostitele může mít více než jeden záznam adresy, což se často provádí za účelem rozložení zátěže webu na více serverů. Je také platné vytvořit více záznamů tohoto typu s různými názvy, ale stejnou IP, například při nastavování virtuálních serverů Apache založených na názvech. Při vytváření nebo úpravě záznamu adresy pole Adresa se zobrazí pro zadání IP spojené s názvem hostitele. Pole označené Aktualizovat obráceně? se také objeví, který řídí automatické vytvoření a úpravu záznamu Reverzní adresy v příslušné reverzní zóně. Viz Přidávání a úprava záznamů sekce výše pro více podrobností.
- Adresa IPv6 (AAAA)
- Záznam adresy IPv6 spojuje adresu IPv6 s názvem hostitele podobným záznamu A.
- Name Server (NS)
- Záznamy tohoto typu definují jmenný server, který je zodpovědný za zónu. Každá zóna musí mít pro sebe alespoň jeden záznam Name Server a může mít další záznamy, které určují servery DNS odpovědné za subdomény. Pokud nastavujete sekundární server DNS pro zónu, nezapomeňte přidat záznam Name Server pro zónu na hlavním serveru. V tomto případě bude názvem záznamu kanonický název zóny, například example.com. . Při vytváření nebo úpravě záznamu tohoto typu se zobrazí pole označené Názvový server se zobrazí. Toto musí být vyplněno IP adresou nebo názvem hostitele serveru DNS, který je zodpovědný za zónu. Pokud zadáte název hostitele, musí mít IP adresu nastavenou záznamem adresy v některé zóně na vašem serveru.
- Alias jména (CNAME)
- Tento typ záznamu vytváří další název pro existující záznam adresy nebo reverzní adresy. Když klient DNS požaduje IP adresu záznamu tohoto typu, získá místo toho IP záznamu, na který odkazuje alias jména. Tento druh záznamu může být užitečný, pokud máte jediného hostitele, který musí být přístupný pod několika různými názvy, jako je například webový server provozující virtuální hosting založený na názvu. I když to lze provést také vytvořením více záznamů adres, vytvoření pouze jedné adresy a více aliasů jmen je flexibilnější, protože umožňuje snazší aktualizaci, pokud se IP adresa hostitele někdy změní. Formuláře pro úpravu a vytváření záznamů aliasů jména obsahují pole označené Skutečné jméno . Toto musí být vyplněno buď kanonickým názvem záznamu, na který alias ukazuje (např. webserver.example.com. ), nebo s krátkým názvem, který je relativní k zóně, ve které je záznam Name Alias.
- Mail Server (MX) Záznamy poštovního serveru
- informují programy pro doručování pošty, jako je Sendmail a Qmail, na který systém se mají obrátit při doručování pošty do domény nebo hostitele. Bez záznamu tohoto typu bude pošta pro doménu doručována do systému, jehož IP adresa je uvedena v záznamu Adresa pro samotnou zónu. To není vždy žádoucí, protože můžete chtít, aby tato IP byla adresa webového serveru, aby se webové prohlížeče mohly připojit k http://example.com/ stejně jako http://www.example.com/. Záznam poštovního serveru může tento problém vyřešit tím, že se na jiný hostitele odešle pouze e-mail pro example.com a veškerý další provoz na webový server. Každý záznam poštovního serveru má prioritu, která sděluje programům pro doručování pošty, který poštovní server by se měl vyzkoušet jako první. Záznam s nejnižší prioritou by měl ukazovat na systém, který skutečně přijímá a uchovává e-maily pro doménu, zatímco záznamy s vyšší prioritou obecně odkazují na systémy, které budou poštu jednoduše předávat. Doručovací programy postupně zkusí každý z nich počínaje nejnižším, takže pokud je primární poštovní server mimo provoz, e-maily budou stále odesílány na relé, které je může podržet, dokud se primární server nevrátí.
- Při přidávání nebo úpravě záznamu poštovního serveru se zobrazí dvě další pole. První je označena jako Poštovní server a musí být vyplněno kanonickým nebo relativním názvem hostitele systému, který může přijímat poštu pro doménu nebo název hostitele zadaný do pole Název pole. Druhá je označena jako Priorita a musí se použít k určení číselné priority pro tento konkrétní poštovní server. Normálně se priorita 5 používá pro primární poštovní server a 10 pro záložní přenosy. Pokud máte pro svou doménu pouze jeden poštovní server, nezáleží na tom, jaké číslo je do tohoto pole zadáno. Je možné, že dva servery budou mít stejnou prioritu, v takovém případě bude náhodně vybrán jeden, na který se bude doručovat. Záznam poštovního serveru může ve svém názvu používat zástupný znak *, který poštovním programům označuje, že konkrétní poštovní server je zodpovědný za všechny hostitele v doméně. Například záznam s názvem *.example.com by odpovídalo názvu hostitele pc1.example.com a všem ostatním hostitelům v zóně. To může být užitečné, pokud chcete přinutit poštu, která by byla jinak doručována přímo na pracovní stanice ve vaší doméně, aby místo toho procházela centrálním poštovním serverem. Webmin vám nedovolí používat zástupné znaky, pokud Povolit zástupné znaky možnost konfigurace modulu je nastavena na Ano jak je však vysvětleno v části *Konfigurace modulu BIND DNS Server*.
- Informace o hostiteli (HINFO)
- Záznamy tohoto typu se používají k záznamu informací o hardwaru a operačním systému konkrétního hostitele. Můžete například vytvořit takový, který říká, že server1.example.com je x86 PC se systémem Linux. Používají se však velmi zřídka a ve skutečnosti jsou považovány za bezpečnostní riziko, protože potenciálním útočníkům poskytují informace, které by mohly být použity k převzetí serveru. Při vytváření nebo úpravě záznamu Informace o hostiteli se zobrazí pole Hardware a Operační systém se zobrazí pro zadání architektury a typu operačního systému hostitele. Hodnoty, které zadáváte, nesmí obsahovat žádné mezery – obvykle jsou v řetězcích typu hardwaru a operačního systému nahrazeny znaky _.
- Text (TXT)
- Textový záznam spojuje libovolnou zprávu nějakého druhu se jménem. Záznamy TXT lze použít k poskytování informací o vlastnictví poštovním zařízením jako SPF a DKIM. Uvědomte si však, že takové komentáře budou dostupné komukoli na internetu, kdo může vyhledávat záznamy ve vaší doméně, a neměly by tedy obsahovat citlivé informace. Pole Zpráva se zobrazí při zadávání nebo úpravě textového záznamu. Můžete zadat libovolný text, včetně mezer.
- Dobře známá služba (WKS)
- Záznam tohoto typu spojuje název hostitele, port a protokol se jménem. Lze si to představit jako zobecněnou variantu záznamu poštovního serveru, která klientům sděluje, který hostitel poskytuje konkrétní službu pro nějakou doménu nebo název hostitele. Záznamy WKS však ve skutečnosti téměř žádné programy nevyhledávají, takže v praxi jsou v podstatě k ničemu. Při přidávání nebo úpravě jednoho z těchto záznamů se zobrazí pole Adresa , Protokol a Služby jsou dostupné. První je pro zadání IP adresy hostitele, který poskytuje služby pro hostitele nebo doménu zadanou do Název pole. Druhý je pro výběr síťového protokolu, který služby používají, buď TCP nebo UDP. Poslední je pro zadání seznamu čísel nebo názvů portů (ze souboru /etc/services) pro služby, které hostitel poskytuje.
- Odpovědná osoba (PR)
- Tento typ záznamu se používá pro specifikaci osoby nebo skupiny odpovědné za konkrétního hostitele. Ke každému z těchto záznamů jsou přidruženy dvě hodnoty – e-mailová adresa a název textového záznamu obsahujícího jméno osoby. Záznamy odpovědných osob jsou k vidění jen zřídka a nepoužívají je žádný program pro doručování pošty ani internetový klient. E-mailová adresa pole zobrazené při úpravě nebo přidávání jednoho z těchto záznamů slouží k zadání úplné adresy (jako jcameron@example.com ) osoby odpovědné za hostitele, jejíž jméno je zadáno do pole Jméno pole. Název textového záznamu pole je pro zadání relativního nebo kanonického jména textového záznamu, který obsahuje skutečné jméno osoby.
- Umístění (LOC)
- Záznamy o poloze se používají k určení fyzické polohy hostitele v zeměpisné šířce a délce. Nejsou téměř nikdy vidět, a proto je mnoho programů nepoužívá. Mohou však být užitečné ve velkých organizacích, které mají hostitele v mnoha zemích. Při přidávání nebo úpravě záznamu o poloze se v poli Název zobrazí pole *Zeměpisná šířka a délka* pro zadání polohy hostitele. pole. Musí být naformátován jako _42 21 43,528 N 71 05 06,284 W 12,00 m 30,00 m 10000,00 m 10,00 m_.
- Adresa služby (SRV)
- Záznamy tohoto typu se používají k přiřazení názvu domény, názvu služby a protokolu ke konkrétnímu hostiteli. Umožňují vám určit, který server by měl klient kontaktovat pro konkrétní službu a název hostitele, namísto pouhého připojení k hostiteli. Svým způsobem jsou jako záznamy poštovního serveru, ale jsou mnohem flexibilnější. Můžete například určit, že server POP3 pro example.com je mail.example.com , ale webový server je www.example.com . V době psaní tohoto článku jsou záznamy SRV většinou používány klientskými systémy Windows. Při přidávání nebo úpravě záznamu adresy služby se zobrazí pole Protokol a Název služby jsou zobrazeny vedle Jména Textové pole. Pro protokol musíte z nabídky vybrat buď TCP nebo UDP. Jako název služby musíte zadat dobře známý název ze souboru /etc/services, například pop3 nebo telnet . K vyhledání záznamu SRV klient zkombinuje název služby, protokol a název a získá název záznamu jako ___telnet.___tcp.example.com . Webmin to za vás udělá automaticky při úpravě nebo přidání záznamu adresy služby, ale na stránce se seznamem záznamů tohoto typu můžete vidět kombinovaný název. Webmin také automaticky přidal _s před službu a protokol, ale skryje je, když se zobrazuje nebo upravuje záznam SRV. To znamená, že při vytváření nebo úpravě záznamu tohoto typu není nutné zadávat ručně. Priorita pole musí být použito k zadání číselné priority pro tento server, která má stejný význam jako priorita v záznamu poštovního serveru. Hmotnost pole musí obsahovat vážení pro tento konkrétní server nebo nulu, pokud existuje pouze jeden záznam se stejným názvem, protokolem a názvem služby. Vyšší váha říká klientům, aby zkoušeli tento server častěji než server s nižší váhou. Port pole musí obsahovat číslo portu, ke kterému se mohou klienti připojit na serveru, což nemusí být nutně standardní port pro službu. V Serveru musíte zadat název hostitele nebo IP adresu systému, který skutečně poskytuje službu a ke kterému se klienti skutečně připojují.
Typy záznamů, které Webmin podporuje v reverzních zónách, jsou:
- Reverzní adresa (PTR)
- Záznam reverzní adresy spojuje název hostitele s adresou IP v reverzní zóně. Aby klienti DNS mohli vyhledávat názvy hostitelů z adres IP ve vaší síti, budete muset pro každého hostitele vytvořit jeden záznam tohoto typu. Ve většině případů to však Webmin provádí automaticky při přidávání a úpravě záznamů adres. Pokud vytváříte své vlastní záznamy reverzní adresy, ujistěte se, že jsou synchronizovány s odpovídajícími záznamy adres. Při přidávání nebo úpravě záznamu tohoto typu se zobrazí pole Adresa a Název hostitele jsou zobrazeny. První je pro zadání úplné IP adresy, například 192.168.1.10 . Webmin to automaticky převede do formátu in-addr.arpa, který interně používá systém DNS pro reverzní adresy. Druhé pole je pro zadání názvu hostitele v kanonickém tvaru, například pc1.example.com. , nezapomeňte vždy dát na konec tečku, jinak bude název hostitele relativní k reverzní zóně, což rozhodně není to, co chcete.
- Name Server (NS) Záznamy
- Name Server v reverzní zóně mají stejný účel jako záznamy v dopředné doméně – sdělují ostatním DNS serverům IP adresu nebo název hostitele serveru odpovědného za zónu nebo subdoménu. To znamená, že jeden musí být přidán pro každý primární nebo sekundární server DNS pro danou zónu. Pole *Název zóny*, které se objeví při přidávání nebo úpravě záznamu tohoto typu, slouží k zadání názvu zóny, za kterou je server zodpovědný, což bude obvykle zóna obsahující záznam. Na rozdíl od záznamů reverzní adresy však toto pole není automaticky převedeno do formátu in-addr.arpa. Místo toho jej musíte zadat v plně kvalifikované podobě, jako je 1.168.192.in-addr.arpa. pokud definujete jmenný server pro 192.168.1 síť. Do pole *Name Server* musíte zadat IP adresu nebo kanonickou formu názvu hostitele pro DNS server, například ns1.example.com. .
- Alias jména (CNAME)
- Záznamy tohoto typu se chovají v reverzních zónách úplně stejně jako v dopředných doménách. Musíte však vyplnit Jméno a skutečné jméno pole s obrácenými názvy ve formátu in-addr.arpa, protože Webmin je nepřevede za vás. Name Alias fields are most useful in reverse zones for doing partial subnet delegation, as covered in the *Partial reverse delegation* section below.
Editing a master zone
You can use Webmin to edit many of the settings that apply to an entire master zone, such as the expiry and retry times, and the clients that are allowed to query it. These settings effectively apply to all records in the zone, although some (such as the TTL) can be overridden on a per-record basis.
Webmin uses the term zone parameters to refer to all information stored in the domain's SOA record, including the primary nameserver, administrator email address and retry and expiry times. All of these are set when the zone is created, but you can edit them at any time by following these steps:
- On the module's main page, click on the icon for the zone that you want to edit.
- Click on the Zone Parameters icon, which will bring up a form for editing the parameters.
- The Master server field only needs to be edited if the Internet hostname of the DNS server has changed. Enter a fully-qualified hostname, with a dot at the end.
- To change the address of the person responsible for the zone, edit the Email address field. Any @ symbols that it contains will be automatically converted to dots for use in the SOA record, as BIND requires.
- The Refresh time , Transfer retry time , Expiry time and Default time-to-live fields all have the same meanings as explained in the section on Creating a new master zone . If records in your zone are going to be changing frequently in future, you may want to reduce some of these times. However, any changes, may not be detected by secondary servers and DNS clients until the old refresh or expiry time has elapsed, even if the new times are much lower. This is because they will wait for the old times to elapse before checking with the master server again to discovered the new ones.
- Klikněte na tlačítko Uložit button at the bottom of the page when you are done, and then the Apply Changes button back on the module's main page. The serial number in the SOA record will be automatically incremented when the form is saved, so that secondaries now that the zone has changed.
There is another set of options that you can edit for a master zone, stored in the named.conf file in the zone's section. These control which servers and clients are allowed to query records in the zone, do zone transfers and update records over the network. The most useful of these options specifies a list of slave DNS servers for the zone that should be notified when a change occurs, so that they can perform immediate zone transfers and thus remain synchronized.
To edit these master zone options, the process to follow is:
- On the module's main page, click on the icon for the zone that you want to edit. This will take you to the form shown in Figure 30-4.
- Click on the Edit Zone Options icon, which will bring up a form showing the existing settings.
- The Check names? field determines the level of checking that BIND performs on records in this zone when it reads the records file. The available options are :
- Warn
- If an invalid record is found, an error will be written to the system log file but processing of other records continues normally.
- Fail
- Invalid records cause the entire zone to be rejected, but other zones will still be processed normally.
- Ignore
- No checking is done at all.
- Default
- The global default from the Zone Defaults page is used. If it is not set, then the default complied into BIND will be used instead, which is to fail when invalid records are encounterd.
- To have secondary servers notified when records in the zone change, set the Notify slaves of changes? field to Yes . BIND works out which slaves will be notified by looking at the Name Server records for the zone, and the list of IP addresses in the Also notify slaves field. If your zone has an secondary servers, then you should definitely turn this option on.
- To allow some systems to update records in the zone dynamically, fill in the Allow updates from field with a list of IP addresses, IP networks (like 192.168.1.0/24) and BIND ACL names. Only those hosts that match will be able to modify records using commands like nsupdate, and if the list is left empty updates will not be allowed at all. You should be careful allowing the dynamic update of zones in which Webmin is also being used to edit records, as it is very likely that updates made dynamically will be overwritten by changes made in this module, or vice-versa.
- By default, all DNS clients and servers will be able to lookup records in the zone. This may not be what you want for a zone that is used only on an internal network, as it may give away sensitive information to potential attackers. To restrict queries, fill in the Allow queries from field with a list of IP addresses, IP networks and BIND ACL names. If the field is left empty, the field with the same name on the global Zone Defaults page determines which clients are allowed.
- To restrict the clients and servers that are allowed to perform zone transfers of all the records in this domain, fill in the Allow transfers from field. Often you will only want to allow secondary servers to perform transfers, especially if your zone is very large or contains records that you want to hide from attackers. Enter a list of IP addresses, IP networks and ACL names into the field to limit transfers to only matching clients. If it is left empty, the Allow transfers from field on the Zone Defaults page applies instead.
- To specify additional slave servers to be notified when the zone changes, fill in the Also notify slaves field with a list of IP addresses. BIND normally works out with addresses of all secondary servers for the zone from its Name Server records, but this may not always be complete.
- When you are done, click the Save button at the bottom of the page to update the BIND configuration file with your changes. You will need to use the Apply Changes button on the module's main page to make them active.
If a master zone is no longer needed, you can use this Webmin module to totally delete it along with all the records that it contains. To do this, the steps to follow are:
- On the module's main page, click on the icon for the zone that you want to edit.
- Click on the Delete Zone button at the bottom of the page.
- When deleting a forward zone, the field *Delete reverse records in other zones?* controls whether matching Reverse Address records in hosted reverse zones for all of the Address records in this one should be removed as well. This is generally safe to set to Yes , as only records with the exact same IP address and hostname will be deleted.
- Similarly, when deleting a reverse zone the field *Delete forward records in other zones?* determines whether matching forward records should be deleted too.
- Once you have made your selection and are sure you want to go ahead with the deletion, click the Delete knoflík. The zone's entry in the named.conf file will be removed, and its records file deleted.
You can convert a master zone to a slave zone of the same name without needing to delete and re-create it. This can be useful if the new server is taking over as the master for some domain, or if the master and secondary servers are switching roles. The section on Editing a slave zone explains how to carry out the reverse action of converting a slave zone to a master, which may be useful in this situation.
To convert a zone, the steps to follow are:
- On the module's main page, click on the icon for the zone that you want to edit, then on the Edit Zone Options icon.
- When you click on the Convert to slave zone button , zone's entry in named.conf will be immediately updated to convert it to a slave zone. The browser will then return to the module's main page.
- Normally, every slave zone has a list of master server IP addresses that it can use to perform zone transfers from. In the case of converted zones, this list will be initially empty unless the Default master server(s) for slave zones module configuration option is set. Follow the instructions in the *Edit a slave zone* section to set the master servers addresses correctly.
- To activate the change, click on the Apply Changes button the module's main page.
Creating a new slave zone
A slave or secondary zone is one for which your DNS server gets the list of records from a master server for the zone. Generally, slave servers are used to reduce the load on the primary server, or act as a backup in case it goes down. For important zones (such as a company's Internet domain), you should always have at least one slave server so that your website is still accessible and email can still be delivered even if the primary goes down.
The secondary DNS server for a domain should not usually be located on the same network as the master, so that the failure of that network cannot take them both down. Many ISPs and hosting companies will host secondary zones for their customer's domains for free, on their own DNS servers. If your ISP provides this service and you want to set up a secondary server for an Internet domain, you should take advantage of it. If so, most of this section can be skipped. However, if you want to add a slave server for an internal domain or have a large company network with many connections to the Internet, then the instructions below explain how to set it up:
- On the main page of the BIND DNS Server module, click on the Create a new slave zone link above or below the list of existing zones. This will bring up the form shown below, for entering the details of the new domain.
- For a forward zone like example.com , set the Zone type field to Forward and enter the zone name into the *Domain name / Network* field. For a reverse zone that maps IP addresses to hostnames for a network, choose the Reverse option and enter the network address (like 192.168.1 ) into the *Domain name / Network* text field.
- The Records file field determines if BIND keeps a cache of the records in this zone in a file, and if so where that file is located. If the option None is chosen, records that the DNS server transfers from the master will be kept in memory only, and lost when the server is re-started. This should only be chosen if there is a good network connect between the master and slave servers, as it will increase the number of zone transfers that your server must perform. If you choose Automatic , Webmin will generate a filename in the zone files directory specified in the named.conf file (usually /var/named). Whenever your server does a zone transfer, all records will be written to this file in the standard format. If the final option is selected, you can enter the full path to a file in which records should be stored into the field next to. This can be useful if you want to separate the records files for master and slave zones.
- In the Master servers field, enter the IP addresses of the master DNS server and any other secondary servers for the zone. BIND will try these servers in order when doing a zone transfer, so the master should be first on the list. You must enter at least one address, so that your server knows where to get records from.
- Klikněte na tlačítko Vytvořit button to have the new slave zone added to your server's configuration. Your browser will be re-directed to a page for editing options for the zone.
- Return to the module's main page, and click the Apply Changes button on the main page to make the addition active.
- On the master server, add a new Name Server (NS) record for the zone with the IP address of the secondary server. This can be easily done in Webmin by following the instructions in the Adding and editing records section.
- Configure the master DNS server to notify this slave of any changes to records in the zone. The steps in the section on Editing a master zone explain how.
- If this is an Internet domain, notify the registrar for the parent zone of the new secondary server. Most provide online forms for editing the list of nameservers for a domain, to which you can add the secondary's IP. This is necessary so that other hosts on the Internet know to use the slave server is the master is down.

The slave zone creation form
Another type of zone that is closely related to the slave zone is the stub. They are like slave zones, but only contain Name Server records that have been transferred from a master server, instead of all the records. Stub zones are rarely used, but can be useful for ensuring that the Name Server records in a zone for its sub-domains are the same as those use in the sub-domain itself. The steps for creating one are almost identical to those above, but in step 1 you must use the Create a new stub zone link on the main page instead.
Editing a slave zone
After a slave zone has been created, it is still possible to edit several options that apply to it. Naturally there is no way to add or edit the actual records within the zone, but you can still change the list of master servers, the records file and the clients that allowed to query it. To change these setting, the steps to follow are:
- On the module's main page, click on the icon for the slave zone that you want to edit. Your browser will display the form shown in the screenshot below.
- Scroll down to the Zone Options form at the bottom of the page.
- To edit the list of other master and slave servers for this zone, change the IP addresses in the *Master servers *field. If a new secondary server has been added, it should be added to this list on all other secondaries so that they can do zone transfers from it. If the IP address of the master has changed, the list must be updated with the new address.
- To change the amount of time that the server will wait before giving up on a zone transfer, de-select Default for the Maximum transfer time field and enter a number of minutes into the text box next to it.
- If the Records file field is set to None , records transferred from the master server for this zone will be kept in memory only. However if a filename is entered, records will be written to that file instead in the standard format. This is the best option, as it minimizes zone transfers and allows you to view the records on the secondary server, as explained below.
- To have this DNS server notify others when the zone changes, change the Notify slaves of changes? field to Yes . This is only really useful if there are other secondary servers that perform zone transfers from this one, and may not be able to receive update notifications from the master server. The DNS servers to notify are determined from the Name Server records for the zone, and the contents of the *Also notify slaves* field.
- By default, all DNS clients and servers will be able to lookup records in the zone. To change this, fill in the *Allow queries from* field with a list of IP addresses, IP networks and BIND ACL names. If the field is left empty, the field with the same name on the global Zone Defaults page determines which clients are allowed.
- To restrict the clients and servers that are allowed to perform zone transfers of all the records in this domain, fill in the Allow transfers from field with a list of IP addresses, IP networks and ACL names. If it is left empty, the *Allow transfers from* field on the Zone Defaults page applies instead.
- The other fields on the form such as Check names? and *Allow updates from?* are not really used for slave zones, and so can be left unchanged.
- When you are done making changes, click the Save button. As long as there were no syntax errors in your input, you will be returned to the module's main page. Click the Apply Changes button there to make the modifications active. Note that this will not always force a re-transfer of the zone, even if the master servers have changed. For slave zones that use records files, BIND will only do a transfer when it the zone expires or the server receives notification of a change.

The slave zone editing form
When editing a slave zones that uses a records file, it is possible to browse the records in Webmin. At the top of the page that appears when you click on the slave zone's icon is a table of record types, just like the one that appears on the master zone form. Each can be clicked on to list the names and values of records of that type in the zone, as known to the secondary server. Editing or adding to them is impossible of course, as any changes must be made on the master server which is the authoritative source of records for the domain.
To stop your system acting as a slave server for a zone, you will need to delete it from the BIND configuration. This is generally a safe procedure, as the all the records in the zone have been copied from a master server and can be easily replaced. However, you should update the Name Server records in the zone and notify the parent domain's registrar that you system is no longer a secondary for the zone, so that other DNS servers do not waste time querying it.
To delete a slave zone, the steps to follow are:
- On the module's main page, click on the icon for the slave zone that you want to edit. This will take you to the form shown in the screenshot above.
- Click on the Delete button in the bottom right-hand corner of the page, which will display a confirmation form.
- Hit the Delete button if you are sure you want to delete the zone.
- After your browser returns to the module's main page, click on Apply Changes to make the deletion active.
- On the master server, remove the Name Server (NS) record for this secondary server from the zone.
- If this is an Internet domain, notify the parent zone registrar of the removal of this secondary server. Failure to do so could cause problems if other DNS servers attempt to query this one for records in the domain when it cannot provide answers.
The final thing that you can do to a slave zone is convert it to a master. This is only possible for zones that use a records file, so that Webmin can view and edit that file in future. If you do such a conversion, make sure that the original master server is changed to become a slave or stops hosting the zone altogether - the same domain cannot be served by two masters.
The steps to convert a zone are:
- Click on its icon on the module's main page.
- Scroll down to the bottom of the slave zone page, and hit the Convert to master zone knoflík. This will immediately update the named.conf file to change the zone's type, but will not make any other changes.
- To make the conversion active, click on the Apply Changes button on the module's main page.
- You can now edit records in the domain just as you would with any normal master zone, by following the instructions in the section on Adding and editing records .
Creating and editing a forward zone
A forward zone is one for which your DNS server simply forwards queries to another server on behalf of whoever is making the request. They can be useful if the zone is actually hosted by another server that cannot be reached by clients of this server. It is possible to set up BIND to forward all requests for any non-hosted zones to another server, as explained in the *Configuring forwarding and transfers* section below. A forward zone entry does the same thing, but for just a single domain.
To set one up, the steps to follow are:
- On the module's main page, click on the *Create a new forward zone* link above or below the list of existing domain icons. This will take you to the zone creation form.
- Set the Zone type field to either Forward or Reverse , as when creating master and slave zones.
- For a forward zone, enter its full name (without a dot at the end) into the Domain name / Network field. For a reverse zone, enter its network (like 192.168.1 ) into the field instead - Webmin will automatically convert it to in-addr.arpa format when the zone is added.
- In the Master servers field, enter a list of IP addresses for the DNS servers that can be queried to lookup records in the zone. These must all be master, slave or forward hosts for the domain. If no addresses are entered at all, BIND will always perform normal lookups of records in the zone instead of forwarding requests to another server. This can be used to override the global forwarding settings on the Forwarding and Transfers page for a single zone.
- Klikněte na tlačítko Vytvořit button to have the zone added to BIND's configuration file. Your browser will be taken to a page for editing options in the new domain.
- Return to the module's main page, and hit the Apply Changes button to make it active.
After a forward zone has been created, you can delete it or edit the few settings that it has by following these steps :
- Click on the icon for the zone on the module's main page, which will bring your browser to a small form for editing its options.
- To change the list of DNS servers that requests are forwarded to, edit the IP addresses in the Master servers field. If none are entered, requests for records in this domain will be looked up directly.
- If the Try other servers? field is set to Yes , BIND will try a normal direct lookup for requests in this zone if it cannot contact any of the listed servers.
- Klikněte na tlačítko Uložit button to store your changes, and then Apply Changes back on the main page to activate them. Or to delete the forward zone, click on Delete and then Delete again on the confirmation page.
Creating a root zone
As the introduction explains, a root zone is one that contains the information that your DNS server needs to contain the Internet root servers. Without one, it is impossible to resolve records in domains other than those hosted by your server. Fortunately, one will almost always exist already in your BIND configuration, created either by Webmin or included as part of the default setup.
You may need to create a root zone if one does not exist yet because you selected the internal non-internet use only option when setting up the module for the first time, but have now connected your system to the Internet. Adding a second root zone can also be useful when views have been configured, as explained in the Using BIND views section.
Webmin will only allow you to create a root zone if none exists yet, or if a view exists that does not contain one, because there is no point having two such zones. To add one, the steps to follow are:
- On the module's main page, click on the Create a new root zone icon.
- Fill in the Store root servers in file field with a filename to use for the root zone file. If one already exists, then this field will already contain its path - otherwise, you should enter something like /var/named/db.cache.
- The Get root servers from field controls where Webmin copies the root file from. The choices are :*Download from root FTP server *This is the best option, as it tells the module to make an FTP connection to rs.internic.net and download the latest version of the file. However, this may not work if your system cannot make perform FTP downloads due to a firewall. *Use Webmin's older root server information *This option should be used if the first will not work. If selected, the module will use a copy of the root zone file that comes with Webmin, which will work but may not be up to date. *Existing root servers in file *If the file entered in step 2 already exists, then this option should be chosen. If you are adding a root zone to a view and one already exists in another view, it will be selected by default so that the file can be shared between both zones.
- Klikněte na tlačítko Vytvořit button to add the zone and return to the module's main page. Then hit Apply Changes to make it active.
Once a root zone has been added, an icon representing it will appear on the main page. You can delete it by clicking on the icon and hitting the Delete button - however, this may prevent the lookup of records in non-hosted Internet domains from working as explained above.
Editing zone defaults
Defaults for new master zones
If you add lots of zones that contain similar records, then it can be a lot of work to add them manually after creating each one. For example, in a web hosting company all of your domains might contain a www Address record for the IP address of your webserver, and an Mail Server record that directs mail to a central server. Fortunately, Webmin allows you to create a list of records that get added to all new domains, called a zone template.
A template consists of one or more records, each of which has a name, type and value. For Address records, the value can be option which indicates that it can be entered by the user at zone creation time. This is useful if one of the records (such as www) in the new domains does not have a fixed address, and you want to be able to easily set it when the zone is added. Templates can only be used when creating forward zones, as they do not make much sense for reverse zones.
It is also possible to edit the default expiry, refresh, TTL and retry times for new zones. Webmin's initial defaults are reasonable, but may not be appropriate for your network. To change these defaults and set up template records, the steps to follow are:
- On the module's main page, click on the Zone Defaults icon. The form at the top of the page labeled Defaults for new master zones contains all the fields that need to be edited.
- Edit the Refresh time , Transfer retry time , Expiry time and Default time-to-live fields if you want to change the defaults times for new zones. Existing master zones will not be effected by any changes you make here though.
- If all your new domains are managed by the same person, enter his address into the Default email address field. This will save you from having to type it in on the master zone creation page every time.
- In the Template records table, two blanks rows appear for entering new records. To add more than two, you will need to save this page and re-edit it. The records in existing rows can be edited by just changing their fields, or deleted by clearing out the record name. Under the Record name column you must enter the name of the record relative to the zone, such as www or ftp. To create a record for the zone itself (such as a Mail Server record for the domain), just enter a single dot. Under the Type column, select a type for the record from the list. See the #Record types section for more information on what each is used for. As its name suggests, the field under the Value column is for entering a value for the new record. For the Address type, you can select From form in which case you will be able to enter an address when creating a new domain, which will be used by all template records that have this option selected. For Mail Server records, both the priority and server name must be entered separated by a space, such as _5 mail.example.com._. Values for records of all other types should be entered in the same format as is used when adding a record to a zone.
- If you are familiar with the records file format used by BIND, you can create your own file of records to be included in new zones. If a filename is entered into the Additional template file field, its contents will be added to the zone file created by Webmin for new master domains.
- When you are done adding template records, click the Save button at the bottom of the page. The changes will apply to any new master zones created from now on.
Now that you have created a template, you can choose whether or not to use it for each new master zone that you create. On the creation form (explained in the Creating a new master zone section) is a field labeled Use zone template? , which is set to Yes by default if there are any template records. Next to it is a field named IP address for template records , which used for entering the IP for records for which the From form option is selected. If you chose to use a template and if there are any records that do not have an IP address specified, then this field must be filled in.
Default zone settings
At the bottom of the Zone Defaults page you will find several options that apply to all existing domains, but can all be set or overridden on a per-zone basis as explained in the Editing a master zone section. You can control which clients are allowed to query the server, and what kind of checking is done for the records of various domain types. Being able to limit the allowed client hosts is particularly useful, so that you can stop non-internal clients using your DNS server. However, you should make sure that master Internet zones hosted by your server are accessible to everyone, so that other DNS servers on the Internet can look them up.
To change these global options, the steps to follow are:
- On the module's main page, click on the Zone Defaults icon and scroll down to the Default zone settings section.
- To control which hosts are allowed to query your DNS server, change the Allow queries from field to Listed and enter a list of IP addresses, IP networks (like 192.168.1.0/24) and ACL names into the text box below. Clients that do not match any entry on the list will be denied, unless they are requesting a record in a zone which has its own separate settings allowing them.
- To control which hosts are allowed to perform zone transfers from your server, change the Allow transfers from field to Listed and fill in the text box below with a list of IP addresses, IP networks and ACL names. Only servers that are acting as secondaries for zones that this server hosts really need to be able to do transfers, so it is usually a good idea to enter just their IP addresses. If you are restricting queries, this field must be filled in so that hosts that cannot lookup records are not allowed to perform transfers either.
- The fields Check names in master zones? and Check names in slave zones? control the checking of records in all zone files for master and slave zones respectively. The available options for each are:
- Warn
- If an invalid record is found, an error will be written to the system log file but processing of other records continues normally.
- Fail
- Invalid records cause the entire zone to be rejected, but other zones will still be processed normally.
- Ignore
- No checking is done at all.
- Default
- The default checking level is used, which is Fail .
- To have BIND check responses that it receives from other DNS servers, set the Check names in responses? field to Warn or Fail . The default is simply to pass potentially erroneous responses on to clients.
- The Notify slaves of changes? field determines whether BIND sends a notification to all slaves of master zones hosted by this server when they change. To turn this on, select Yes - otherwise, select No or Default . Enabling notification is a good idea, as it ensures that secondary servers are kept in sync with the master.
- Po dokončení klikněte na tlačítko Uložit button at the bottom of the page to update the BIND configuration file, and then the Apply Changes button on the module's main page to make the changes active. The new settings will apply to all zones that do not explicitly override them on their own options pages.
Configuring forwarding and transfers
BIND can be configured to forward all requests for zones that it is not the master or slave for to another DNS server. When doing this, it acts like a DNS client itself, accepting requests from real clients and then sending them off to another server or servers for resolution instead of carrying out the normal process of contacting the root zone servers and finding the correct server for the domain. This can be useful if your DNS server is unable to contact the rest of the Internet, but can still communicate with a DNS server that does have full network access. For example, it may be on an internal network behind a firewall that only allows connections to a limited set of destinations.
To set up forwarding, the steps to follow are:
- On the module's main page, click on the Forwarding and Transfers icon.
- In the form that appears, fill in the Servers to forward queries to field the IP addresses of DNS servers that requests should be sent to. BIND will try them in order until one returns a positive or negative a response. If the list is empty, the server will revert to the normal method of looking up records by contacting the root servers and so on.
- If you want your server to attempt to resolve a client's query directly when it cannot contact any of the forwarding servers, set the Lookup directly if no response from forwarder field to Yes . This is only useful if your server is actually capable of doing lookups.
- Klikněte na tlačítko Uložit button at the bottom of the page, and then hit Apply Changes back on the main page to make the new setting active. Assuming the forwarding list was filled in, your server will now send all client queries to the listed servers.
The same form also contains fields for configuring BIND's behavior when doing zone transfers. You can control how long it will wait for a transfer to complete, the protocol used for transfers and the number that can be active at the same time. To edit these settings, follow these steps:
- On the module's main page, click on the Forwarding and Transfers icon.
- By default, BIND will wait 120 minutes (2 hours) for a zone transfer from a master to complete. To change this, enter a different number of minutes into the *Maximum zone transfer time* field. This can also be set or overridden on a per-slave zone basis.
- BIND versions before 8.1 only support the transfer of a single zone at a time. Because this can be slow when transferring many zones from the same master server, the *Zone transfer format* field can be set to Many to use a new format that combines multiple domains into the same transfer. If One at a time or Default is chosen, then each zone will be transferred separately. This is the best choice unless you are sure that all slave servers are running BIND 8.1 or above.
- By default, your nameserver will not carry out more than 2 concurrent zone transfers from the same master server. To increase this limit, change the *Maximum concurrent zone transfers* field to something higher. This can speed up the process of transferring a large number of domains, but at the expense of putting a higher load on the master server.
- Klikněte na tlačítko Uložit button when you are done making changes, and then Apply Changes on the main page to activate them. The new settings will apply to all subsequent zone transfers.
Editing access control lists
An access control list (or ACL) is list of IP addresses, IP networks or other ACLs that are grouped together under a single name. The ACL name can then be used when specifying the list of clients allowed to query, update or perform zone transfers from a zone. This can make be used to reduce the amount of duplication in your BIND configuration, and to make it clearer. For example, the ACL corpnet might match the IP networks 192.168.1.0/24 , 192.168.2.0/24 and 1.2.3.0/24 , which are all part of your company's network. When configuring who can query a zone, you could just enter corpnet instead of that list of network addresses. To view and edit ACLs in Webmin, the steps to follow are :
- On the module's main page, click on the Access Control Lists icon. This will take you to a page listing existing ACLs and allowing the addition of one more. If you want to add more than one ACL, you will need to save the form and re-edit it to force the display of a new blank row.
- To add a new ACL, find the blank row at the bottom of the table and enter a short name consisting of only letters and numbers in the ACL Name column. Then in the field under *Matching addresses, networks and ACLs*, enter a list of IP addresses, IP networks and other ACL names that this new ACL will contain. IP addresses must be entered in their standard format like 192.168.1.1 , but hostnames are not allowed. IP networks must be entered in network/prefix format like 192.168.1.0/24 or 192.168.1/24 . You can also precede any address, network or ACL name with a ! to negate it, so for example the entry !192.168.1.0/24 would match all hosts outside the_ 192.168.1 _network.
- Existing entries in the list can be edited by changing their fields in the table, and ACLs can be deleted by clearing out the field containing their names.
- When you are done adding and editing ACLs, click the Save knoflík. To activate the changes, hit Apply Changes back on the main page. As soon as an ACL is created, it can be used in other query, transfer and update restrictions of other zones.
BIND has four built-in ACLs that can be used in all the same places that user-defined ACLs can. They are:
- any
- Matches any client address.
- none
- Matches nothing.
- localhost
- Matches the IP addresses of all network interfaces on your system. Even though it is called localhost, it doesn't just match 127.0.0.1.
- localnets
- Matches all clients on all networks that your system is directly connected to. BIND works this out by looking at the IP addresses and netmasks of all network interfaces.
Setting up partial reverse delegation
Partial reverse zone delegation is method for transferring the management of a small set of reverse IP addresses to another DNS server. Normally, reverse zones cover an entire class C network containing 256 addresses. However, many organizations have networks much smaller than this, containing maybe 16 or 32 addresses. Normally, this would make it impossible for the organization to manage its own reverse address mappings, as the addresses come from a network that is owned by an ISP or hosting company.
Fortunately, there is a solution - the ISP can set up Name Alias (CNAME) records in the reverse zone for the parent network that point to Reverse Address records in a special zone on the organization's DNS server. The parent zone must also contain a Name Server (NS) record for the special sub-zone that points to the customer's server, so that other DNS clients know where to look when resolving the Name Alias records.
An example may make this clearer - imagine for example than an ISP had granted addresses in the range 192.168.1.100 to 192.168.1.110 to Example Corporation, which owns the example.com domain. The company already runs its own DNS server to host the example.com zone, but wants to control reverse address resolution for its IP range as well. The ISP would create Name Alias records in the 192.168.1 zone pointing to the special sub-zone 192.168.1.100-110, which will contain the actual Reverse Address records named like 192.168.1.100-100.101. The ISP also needs to create a Name Server record for 192.168.1.100-110 which tells other servers that Example Corporation's DNS server should be used to find records under that zone.
Webmin handles reverse address delegation well, and automatically converts special network zones like 192.168.1.100-110 to and from the real zone names used by BIND such as 100-110.1.168.192.in-addr.arpa. The exact steps to follow on both the server that hosts the actual class C network zone and the server that a subset of it is being delegated to are :
- Decide on the range of addresses that are being delegated, such as 192.168.1.100 to 192.168.1.110 . Typically, the sub-zone name is based on the range of addresses being delegated, but this does not have to be the case as long as it is under the parent network domain.
- On the server that hosts the class C network zone, add a Name Server record for 192.168.1.100-110 with the server set to the IP address or name of the sub-zone's DNS server.
- For each address in the range, add a Name Alias record to the reverse zone named like 101.1.168.192.in-addr.arpa. with the Real Name set like 101.100-110.1.168.192.in-addr.arpa . As you can see, the alias points to a record inside the zone for the sub-network.
- When all of the Name Alias records have been created, everything that needs to be done on this server is finished and you can hit Apply Changes .
- On the DNS server for the sub-network, create a new master zone for the reverse network 192.168.1.100-110 . Webmin will automatically convert this to the correct in-addr.arpa format for you.
- Add Reverse Address records to the new zone as normal for IP addresses like 192.168.1.100-110.101 . Adding a record for the IP 192.168.1.101 will not work.
- When you are done creating reverse records, click the *Apply Changes* button to make them active. You should now be able to look them up using a command like nslookup on the server for the parent network zone.
The instructions above can be used to delegate multiple ranges from a single class C network to several different DNS servers. There is no limit on the size of ranges, nor any requirement that they follow normal network block boundaries - however, for routing reasons most IP allocation is done in power-of-two sized blocks (like 4, 8, 16 and so on), which means that any sub-zone ranges will be the same size.
The only problem with reverse address delegation when using Webmin is that Reverse Address are not automatically created and updated when Address records are. This means that you will have to create all such records manually on the sub-zone server, as in the steps above.
One inconvenience in setting up partial reverse delegation is the number of similar Name Alias records that must be created on the parent network zone server. Fortunately, there is a simpler alternative - record generators. A generator is a special BIND configuration entry that creates multiple similar records using an incrementing counter. This module allows you to created and edit generators, by following these steps :
- On the module's main page, click on the icon for the reverse zone that you want to create records in. This will typically be a class C network domain that is going to have a range of addresses delegated to some other Server.
- Click on the Record Generators icon. This takes you to a page containing a table of existing generators, with a blank row for adding a new one.
- In the empty row, select CNAME from the menu under the Type column.
- Under the Range column, enter numbers for the start and end of the address range into the first two fields, such as 100 and 110 . The third field is for entering the gap between each step, and should be left blank. If you were to enter 2, then the range would go 100 , 102 , 104 and so on.
- In the Address pattern field, enter _$_ (a single dollar sign). When the records are created, the $ will be replaced with the number of each record, which will in turn resolve to an IP address in the range. You could also enter $.1.168.192.in-addr.arpa. , which makes things more obvious but is longer to type.
- In the Hostname pattern field, enter $.100-110 . Similarly, the $ will be replace with the number of each record, which will resolve to something like 101.100-110. 1.168.192.in-addr.arpa. .
- If you like, enter a comment that describes what this generator is for into the Comment field.
- Klikněte na tlačítko Uložit button, return to the module's main page and click on Apply Changes .
A generator can replace the Name Alias records that the first set of instructions in this section tell you to create, so there is no need for them anymore. Note that the automatically generated replacements will not be visible or editable in the normal way, only through the Record Generators page.
Using BIND views
BIND version 9 introduced the concept of views, which are groups of zones that are visible only to certain DNS clients. Views can be used to hide internal zones from the Internet, to present the same zone in two different ways, or to stop non-local clients resolving non-hosted domains through your server. Every view has a unique name, and a list of matching IPs addresses and IP networks that determines which clients and servers it is visible to.
When it detects that you are running BIND 9, several additional features are available in the module. You can create views, move zones from one view to another, and choose which view zones are created in. On the main page, each current view is represented by an icon under Existing Client Views heading, and each zone icon has a label that indicates which view it is in.
If any views exist, then every zone must be in a view. Only if none are defined will Webmin allow the creation of zones outside views, as this is not supported by BIND. This includes the root zone, which must be available to a client for DNS requests for records in domains not hosted by this server to succeed. For this reason, it often makes sense to put the root zone in a view that is available to all clients.
To add a new view to your BIND configuration, the steps to follow are:
- On the module's main page, click on the Create a new view link in the Existing Client Views section. This will take you to a form for entering its details.
- Enter a short alphanumeric name for the view (such as internal or everyone ) into the View name field. Each view must have a unique name.
- Leave the DNS records class field set to Default .
- If this zones in this view are to be visible to everyone, set the Apply this view to clients field to All clients . Otherwise, choose Selected addresses, networks and ACLs and enter a list of IP addresses, IP networks and BIND ACL names into the text box below. Only clients that match one of the entries in this list will have access to the view.
- Klikněte na tlačítko Vytvořit button at the bottom of the form. You will be returned to the main page, which will include an icon for your new view.
- Move any existing zones that you want to be in this view into it. A zone can be moved by clicking on its icon, then on *Edit Zone Options*, and then selecting the new view from the menu next to the Move to view button before clicking it. If this is your first view, all existing zones must be moved into it (or another view) before the new configuration will be accepted by BIND.
- When you are done moving zones, click the Apply Changes button on the main page.
Once a view has been created, you can change the list of addresses and networks that it matches by clicking on its icon on the main page and updating the Apply this view to clients field. Then hit the Save button followed by Apply Changes to make the new client list active.
A view can be deleted by clicking the Delete button on the same form. This will bring up a confirmation page that allows you to choose what should happen to the zones that it contains, if any. The available options are:
- Delete totally
- All zones in the view are deleted, along with their records files.
- Move out of views
- Zones in the view are moved out to the top level. This option should only be used when deleting the last view, for the reasons explained above.
- Move to view
- Zones are moved to a different existing view.
When one or more views have been defined on your system, you can choose which one to use when adding new zones. This is done using the Create in view field on the master, slave, forward and root zone creation forms, which allows you to select a view from its menu. Naturally, there is no option for creating a zone outside of any views as this is not allowed by BIND.
One common use of views is hiding internal zones from clients outside your internal network. This is a good way of hiding the structure of your network and the hosts on it from potential attackers. To set it up, the steps to follow are:
- Create a new view called internal that matches clients on your internal LAN.
- Create a second view called everyone that matches all clients.
- Move any zones that are for internal use only into the internal view. Zones for Internet domains such as example.com must not be put in this view, as that would make them inaccessible to the rest of the world.
- Move all other zones (including the root zone) to the everyone view.
Views can also be used to prevent clients outside your network looking up non-hosted domains on your server, as follows:
- Create a new view called internal that matches clients on your internal LAN.
- Create a second view called everyone that matches all clients.
- Move the root zone to the internal view, which will prevent the server from looking up records for non-local clients that require contact with the root servers.
- Move all other zones to the everyone view.
Module access control
Like others, the BIND DNS Server module allows you to control which of its features are available to a particular Webmin user or group. This can be useful for giving people the rights to manage only records in their own zones and nobody else's. Even though this would normally require root access to the records files, with Webmin it can be granted to people without giving them level of power that a root login would allow.
Once you have created a user with access to the module as explained on WebminUsers, the steps to limit his access to only certain zones are:
- Click on the BIND DNS Server next to the name of the user in the Webmin Users module. This will being up a page of access control options.
- Změňte Lze upravit konfiguraci modulu? pole na Ne , so that the user is not allowed to change the paths that the module uses to named.conf and other files.
- For the *Domains this user can edit *field, choose *Selected zones* and select the ones that you want him to have access to from the list to its right. If you want him to be able to edit almost all zones, it may be better to choose All except selected and select only those that he should not be allowed to manage records in. If your DNS server uses views, you can use the *Zones in view* options to allow or deny access to all zones in a view as well.
- Change the fields Can create master zones? , *Can create slave/stub zones?*, Can create forward zones? and *Can edit global options?* to No .
- If you want Reverse Address records in zones that the user does not have access to to be updated by changes to Address records in zones that he does, set the *Can update reverse addresses in any domain?* field to Yes . This may not be a good idea from a security point of view though, as he would be able to change almost any existing Reverse Address record on your system. For that reason, I suggest that this field be set to No .
- To stop the user creating more than one Address record with the same IP, set the *Can multiple addresses have the same IP? field to *No . Even though creating multiple records is harmless, you may want to set this to No to prevent the user allocating the same IP twice.
- Leave the Read-only access mode? field set to No . If it is changed to Yes , the user will only be able to view zones and records using the module, and not change anything. This might be useful for creating a different kind of restricted user though - one who can see all settings, but not edit them.
- Leave the Can apply changes? field set to Yes , so that he can use the Apply Changes button to make his additions and modifications active.
- Unless you want the user to be able to edit his records file manually, change the Can edit records file? pole na Ne . Most un-trusted users are not smart enough to perform manual editing.
- The Can edit zone parameters? field determines if the user can see and use the Edit Zone Parameters icon for his domains. Setting this to Yes is quite safe, as the user can only harm his own zones by setting the parameters to silly values.
- Similarly, the Can edit zone options? field determines if the Edit Zone Options icon is visible or not. You should set this to No , as it is possible for a user to create a syntax error in named.conf by improper use of the zone options form.
- Unless you want the user to be able to delete his own domains, change the Can delete zones? pole na Ne . Users should contact the master administrator instead if they can to delete zones.
- The Can edit record generators? field can be left set to Yes , as it simply allows the creation of multiple records at once. However, some users may get confused by this feature so it might be a good idea to change the field to No .
- The Can lookup WHOIS information? And *Can search for free IP numbers?* fields can also be left on Yes , as those features mere display information to the user.
- Change the Can create and edit views? pole na Ne , so that the user cannot manage BIND 9 views. If the user is allowed to create zones, you can use the *Views this user can edit and add zones to* field to limit those that he can create zones in.
- Can create slave zones on remote servers? should be set to No , but this doesn't really matter as the user is not going to be allowed to create master or slave zones anyway.
- Finally, click the Save button to make the new restrictions for the user active.
See also:
- Resolution for Virtual Hosts