V dnešním podnikání je stále více nutné sdílet pracovní prostory, laboratoře, nástroje a jakýkoli jiný typ zdrojů. Maximální využití dostupných zdrojů se pro moderní podniky stalo konkurenční výhodou.
Každá společnost má omezené zdroje, takže existuje spor o využití těchto zdrojů všemi členy, o to jde, spor o tyto zdroje může způsobit problémy mezi zaměstnanci, opotřebení vztahů a neproduktivitu v organizaci.
Tato diskuse se zdá být daleko od technologie, nicméně k řešení těchto typů problémů je k dispozici mnoho svobodného softwaru a v tomto článku píšu o podnikovém nástroji schopném pomoci organizovat využívání zdrojů spravedlivým a efektivním způsobem. způsobem.
Přehled softwaru
Booked je software s otevřeným zdrojovým kódem napsaný v PHP a MySQL, který pomáhá organizacím a skupinám efektivně spravovat, zaznamenávat a sledovat zdroje jakéhokoli druhu. Umožňuje vám vytvářet plány, aby uživatelé mohli najít plány dostupné pro použití zdrojů.
Rezervováno umožňuje spravedlivé rozdělení zdrojů pomocí kvót. Umožňuje vám také řídit využití zdrojů prostřednictvím schvalování rezerv. Lze také nakonfigurovat automatický rozsah mezi rezervacemi zdroje.
Booked obsahuje skvělé podnikové funkce, jako je podpora mnoha jazyků, webový, mobilní, systém hlášení, připomenutí, LDAP, Active Directory, soubory ical pro integraci s e-mailovými klienty a další.
Životní prostředí
Tento článek pojednává o rezervované instalaci a základní konfiguraci. Tento článek byl napsán na základě následujícího prostředí:Virtual Box VM s CENTOS 7 Minimal, 2 GB RAM, 8 GB HD a 2 síťovými rozhraními (pouze hostitel a NAT).
Zabezpečení
Tento článek nepokrývá zcela toto téma, které je složité a rozsáhlé. Zaměřuje se na jednoduché S.O. konfigurace a konfigurace rezervovaného systému.
Příprava
Za předpokladu, že používáte čerstvou instalaci Centos 7 Minimal, před instalací Booked spusťte následující příkaz pro aktualizaci systému a instalaci dalších balíčků:
yum update
Transaction Summary ================================================================================ Install 1 Package Upgrade 39 Packages Total download size: 91 M Is this ok [y/d/N]: y
Nainstalujte si svůj oblíbený textový editor nebo použijte VI. V tomto článku používám VIM, k jeho instalaci spusťte následující příkaz:
yum install vim
Nainstalujte balíček WGET, spusťte následující příkaz:
yum install wget
Nainstalujte balíček UNZIP a spusťte následující příkaz:
yum install unzip
Chcete-li nakonfigurovat síť, spusťte následující příkaz pro otevření nástroje NMTUI (textové uživatelské rozhraní správce sítě) a upravte síťová rozhraní a název hostitele, jak si přejete:
nmtui
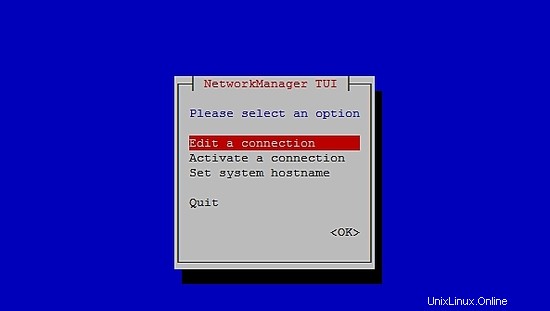
Po nastavení síťových nastavení a názvu hostitele na CentOS 7 spusťte následující příkaz a použijte změny:
service networks restart
Chcete-li ověřit informace o síti, spusťte následující příkaz:
ip addr
Výstup vypadá takto:
1: lo: <LOOPBACK,UP,LOWER_UP> mtu 65536 qdisc noqueue state UNKNOWN qlen 1
link/loopback 00:00:00:00:00:00 brd 00:00:00:00:00:00
inet 127.0.0.1/8 scope host lo
valid_lft forever preferred_lft forever
inet6 ::1/128 scope host
valid_lft forever preferred_lft forever
2: enp0s3: <BROADCAST,MULTICAST,UP,LOWER_UP> mtu 1500 qdisc pfifo_fast state UP qlen 1000
link/ether 08:00:27:67:bc:73 brd ff:ff:ff:ff:ff:ff
inet 10.0.2.15/24 brd 10.0.2.255 scope global dynamic enp0s3
valid_lft 84631sec preferred_lft 84631sec
inet6 fe80::9e25:c982:1091:90eb/64 scope link
valid_lft forever preferred_lft forever
3: enp0s8: <BROADCAST,MULTICAST,UP,LOWER_UP> mtu 1500 qdisc pfifo_fast state UP qlen 1000
link/ether 08:00:27:68:88:f3 brd ff:ff:ff:ff:ff:ff
inet 192.168.56.101/24 brd 192.168.56.255 scope global dynamic enp0s8
valid_lft 1044sec preferred_lft 1044sec
inet6 fe80::a00:27ff:fe68:88f3/64 scope link
valid_lft forever preferred_lft forever
Vypněte SELINUX (Security Enhanced Linux) na Centos 7, upravte následující konfigurační soubor:
vim /etc/selinux/config
"/etc/selinux/config" 14L, 547C# This file controls the state of SELinux on the system.
# SELINUX= can take one of these three values:
#     enforcing - SELinux security policy is enforced.
#     permissive - SELinux prints warnings instead of enforcing.
#     disabled - No SELinux policy is loaded.
SELINUX=enforcing
# SELINUXTYPE= can take one of three two values:
#     targeted - Targeted processes are protected,
#     minimum - Modification of targeted policy. Only selected processes are prootected.
#     mls - Multi Level Security protection.
SELINUXTYPE=targeted
Změňte hodnotu vynucování direktivy SELINUX deaktivovat , uložte soubor a restartujte server.
Chcete-li zkontrolovat stav SELinux na Centos 7, spusťte následující příkaz:
getenforce
Výstup musí být:
Disabled
Chcete-li zakázat FirewallD na Centos 7, spusťte následující příkazy:
systemctl disable firewalld
systemctl stop firewalld
Chcete-li zkontrolovat stav brány firewall na Centos 7, spusťte následující příkaz:
systemctl status firewalld
Instalovat MariaDB, Apache a PHP na Centos 7
Chcete-li nainstalovat MariaDB na Centos 7, spusťte následující příkaz:
yum -y install mariadb-server
Chcete-li spustit MariaDB, spusťte následující příkaz:
systemctl start mariadb
Chcete-li zvýšit zabezpečení MariaDB, spusťte následující příkaz:
/usr/bin/mysql_secure_installation
Nastavte možnosti podle následujícího výstupu nebo použijte své vlastní preference:
NOTE: RUNNING ALL PARTS OF THIS SCRIPT IS RECOMMENDED FOR ALL MariaDB
      SERVERS IN PRODUCTION USE!  PLEASE READ EACH STEP CAREFULLY!

In order to log into MariaDB to secure it, we'll need the current
password for the root user.  If you've just installed MariaDB, and
you haven't set the root password yet, the password will be blank,
so you should just press enter here.

Enter current password for root (enter for none):<Press Enter>

OK, successfully used password, moving on...

Setting the root password ensures that nobody can log into the MariaDB
root user without the proper authorisation.

Set root password? [Y/n] <Press Y>
Nastavte heslo uživatele root:
New password: *******
Re-enter new password: *******
Password updated successfully!
Reloading privilege tables..
 ... Success!

By default, a MariaDB installation has an anonymous user, allowing anyone
to log into MariaDB without having to have a user account created for
them.  This is intended only for testing, and to make the installation
go a bit smoother.  You should remove them before moving into a
production environment.

Remove anonymous users? [Y/n] <Press Y>

... Success!

Normally, root should only be allowed to connect from 'localhost'. This
ensures that someone cannot guess at the root password from the network.

Disallow root login remotely? [Y/n] <Choose acording your needs>

... Success!

By default, MariaDB comes with a database named 'test' that anyone can
access. This is also intended only for testing, and should be removed
before moving into a production environment.

Remove test database and access to it? [Y/n] <Press Y>


- Dropping test database...
 ... Success!
 - Removing privileges on test database...
 ... Success!

Reloading the privilege tables will ensure that all changes made so far
will take effect immediately.

Reload privilege tables now? [Y/n] <Press Y>

... Success!

Cleaning up...

All done! If you've completed all of the above steps, your MariaDB
installation should now be secure.

Thanks for using MariaDB!
Nastavte MariaDB tak, aby se automaticky spouštěla s Centos 7:
systemctl enable mariadb.service
Chcete-li nainstalovat Apache, spusťte následující příkaz:
yum install httpd
Chcete-li spustit Apache, spusťte následující příkaz:
systemctl start httpd.service
Nastavte Apache, aby se automaticky spustil s Centos 7:
systemctl enable httpd.service
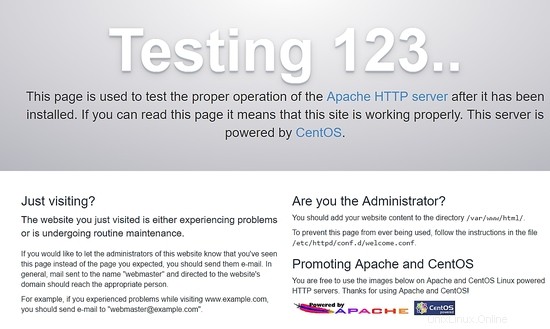
Chcete-li otestovat Apache, zadejte do webového prohlížeče IP adresu svého serveru. Pokud je vše v pořádku, můžete vidět testovací stránku:
Chcete-li nainstalovat PHP, spusťte následující příkaz:
yum install php php-mysql
Restartujte Apache, spusťte následující příkaz:
systemctl restart httpd.service
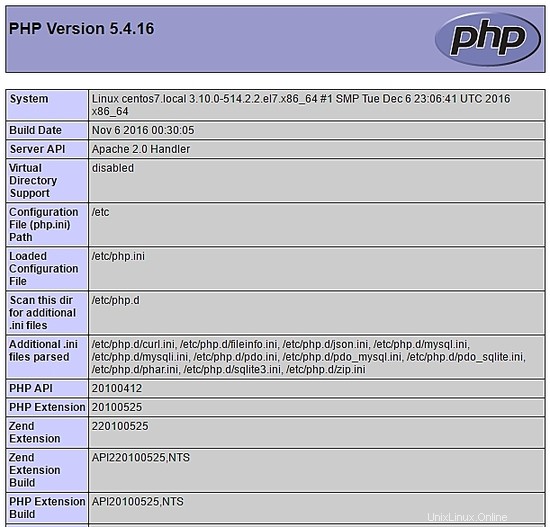
Chcete-li otestovat PHP, vytvořte soubor phpinfo.php v adresáři /var/www/html s následujícím obsahem:
<?php phpinfo(); ?>
Nyní můžete přistupovat k phpinfo.php prostřednictvím prohlížeče s následující URL: http://[vaše-ip-adresa]/phpinfo.php. Pokud je vše v pořádku, můžete vidět následující stránku:
Nastavení databáze prostřednictvím terminálu
Otevřete MariaDB prostřednictvím terminálu a vytvořte databázi bookedscheduler a uživatel booked_user s dostatečnými právy ke správě této databáze. Pomocí terminálu spusťte následující příkazy:
mysql -u root -p
Vytvořte bookedscheduler databáze:
MariaDB [(none)]> create database bookedscheduler;
Vytvořte booked_user na MariaDb:
CREATE USER 'booked_user'@'localhost' IDENTIFIED BY 'your_password';
Udělte oprávnění uživateli booked_user na bookedscheduler databáze:
GRANT ALL PRIVILEGES ON database.bookedscheduler TO 'booked_user'@'localhost';
Importujte schéma a data databáze Booked, z adresáře /var/www/html/booked/database_schema/ je třeba importovat následující soubory SQL, create_schema.sql a create-data.sql :
mysql -u root -p bookedscheduler < create-schema.sql
mysql -u root -p bookedscheduler < create-data.sql
Nastavení databáze prostřednictvím PHPMyAdmin
Instalovat PHPMyAdmin na Centos 7 (volitelné)
PHPMyAdmin je nástroj pro správu databází mysql (mariaDB) přátelským způsobem prostřednictvím prohlížeče. Chcete-li nainstalovat phpmyadmin automaticky, musíte nainstalovat úložiště Epel, spusťte následující příkaz:
yum install epel-release
Nyní můžete spustit následující příkaz:
yum install phpmyadmin
Po instalaci PHPMyAdmin jej musíme nakonfigurovat. Nejprve si vytvořte kopii konfiguračního souboru a upravte soubor phpMyAdmin.conf v /etc/httpd/conf.d/:
cp /etc/httpd/conf.d/phpMyAdmin.conf /etc/httpd/conf.d/phpMyAdmin.conf.old
vim /etc/httpd/conf.d/phpMyAdmin.conf
Změňte hodnoty podle vašeho síťového prostředí, v mém případě jsem změnil následující řádky (17, 25, 34, 42). Můj konfigurační soubor vypadá takto:
# phpMyAdmin - Web based MySQL browser written in php
#
# Allows only localhost by default
#
# But allowing phpMyAdmin to anyone other than localhost should be considered
# dangerous unless properly secured by SSL
Alias /phpMyAdmin /usr/share/phpMyAdmin
Alias /phpmyadmin /usr/share/phpMyAdmin

<IfModule mod_authz_core.c>
# Apache 2.4
<RequireAny>
Require ip 127.0.0.1
Require ip 192.168.56.1
Require ip ::1
</RequireAny>
</IfModule>
 <IfModule !mod_authz_core.c>
 # Apache 2.2
 Order Deny,Allow
 Deny from All
 Allow from 192.168.56.1
 Allow from ::1
 </IfModule>
<Directory /usr/share/phpMyAdmin/setup/>
 <IfModule mod_authz_core.c>
 # Apache 2.4
 <RequireAny>
 Require ip 127.0.0.1
 Require ip ::1
 </RequireAny>
 </IfModule>
<IfModule !mod_authz_core.c>
 # Apache 2.2
 Order Deny,Allow
 Deny from All
 Allow from 192.168.56.1
 Allow from ::1
 </IfModule>
</Directory>
# These directories do not require access over HTTP - taken from the original
# phpMyAdmin upstream tarball
#
<Directory /usr/share/phpMyAdmin/libraries/>
 Order Deny,Allow
 Deny from All
 Allow from None
</Directory>
<Directory /usr/share/phpMyAdmin/setup/lib/>
 Order Deny,Allow
 Deny from All
 Allow from None
</Directory>
<Directory /usr/share/phpMyAdmin/setup/frames/>
 Order Deny,Allow
 Deny from All
 Allow from None
</Directory>
# This configuration prevents mod_security at phpMyAdmin directories from
# filtering SQL etc. This may break your mod_security implementation.
#
#<IfModule mod_security.c>
# <Directory /usr/share/phpMyAdmin/>
# SecRuleInheritance Off
# </Directory>
#</IfModule>
Restartujte Apache, spusťte následující příkaz:
systemctl restart httpd.service
Nyní máte přístup k PHPMyAdmin prostřednictvím prohlížeče s následující URL: http://[your-ip-addres]/phpMyAdmin/
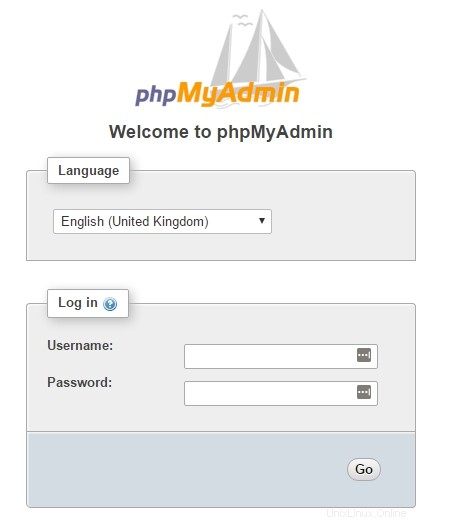
Použijte svůj root účet a heslo dříve definované v instalaci MariaDB pro vytvoření databáze a uživatele. Na hlavním panelu vyberte Databáze možnost vytvoření nové databáze:

Vyplňte formulář názvem databáze a vyberte vytvořit .

Chcete-li importovat data databáze, v levé nabídce vyberte bookedscheduler databáze a Import z řídicího panelu PHPMyAdmin vyberte z instalačních souborů následující soubory create-schema.sql (1) a create-data.sql (2) a importujte je.

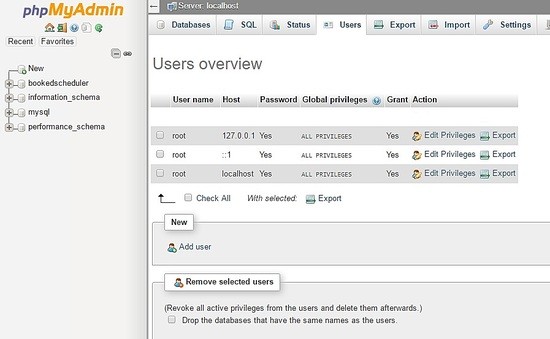
Vytvořte uživatele booked_user s oprávněními ke správě bookedscheduler databáze. Na hlavním panelu PHPMyAdmin vyberte Uživatelé a Přidat :
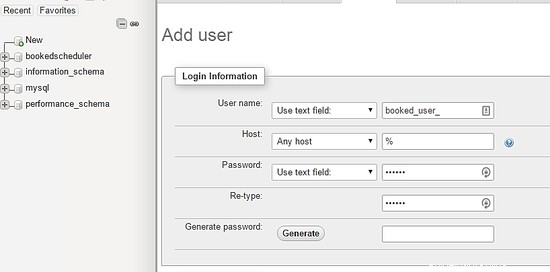
Na obrazovce vytvoření uživatele vyplňte pole databází uživatelů (booked_user), nastavte heslo a vyberte GO na konci stránky:
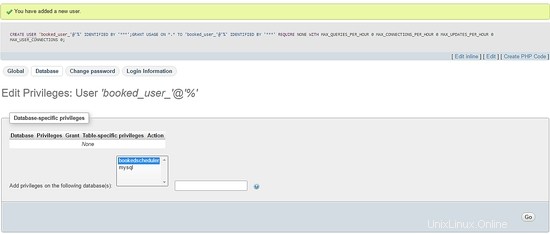
Chcete-li nastavit oprávnění pro uživatele booked_user na bookedscheduler databáze, vyberte bookedscheduler ze seznamu databází a vyberte Přejít:
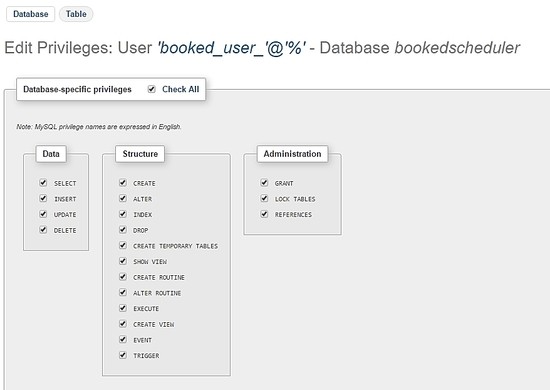
Na obrazovce oprávnění vyberte možnost Zkontrolovat vše a Přejít :
Instalace Booked Scheduler Centos 7
Máme dva způsoby, jak nainstalovat Booked Scheduler, ručně nebo automaticky. Tento článek se zabývá pouze ruční instalací. Chcete-li nainstalovat Booked Scheduler na Centos 7, přejděte do adresáře /tmp a stáhněte si zdrojový kód:
wget https://ufpr.dl.sourceforge.net/project/phpscheduleit/Booked/2.6/booked-2.6.5.zip
Rozbalte soubor v adresáři /var/www/html a spusťte následující příkaz:
unzip booked-2.6.5.zip -d /var/www/html/
Změňte oprávnění rozbaleného souboru.
cd /var/www/html/
chown -R apache:apache /booked
Nastavte konfigurační soubor v /var/www/html/booked/config. Vytvořte kopii souboru config.dist.php do config.php a upravte bloky konfiguračního souboru (je to můj konfigurační soubor):
cp config.dist.php config.php
Změňte hodnoty podle našeho prostředí, zde uvádím hlavní nastavení ke změně a buďte informováni, po prvním přihlášení bude e-mailová adresa správce systému:
<?php
/**
Copyright 2011-2016 Nick Korbel
This file is part of Booked Scheduler.
Booked Scheduler is free software: you can redistribute it and/or modify
it under the terms of the GNU General Public License as published by
the Free Software Foundation, either version 3 of the License, or
(at your option) any later version.
Booked Scheduler is distributed in the hope that it will be useful,
but WITHOUT ANY WARRANTY; without even the implied warranty of
MERCHANTABILITY or FITNESS FOR A PARTICULAR PURPOSE. See the
GNU General Public License for more details.
You should have received a copy of the GNU General Public License
along with Booked Scheduler. If not, see <http://www.gnu.org/licenses/>.
*/
error_reporting(E_ALL & ~E_NOTICE & ~E_STRICT);
//ini_set('display_errors', 1);
//ini_set('display_startup_errors', 1);
/**
* Application configuration
*/
$conf['settings']['app.title'] = 'Booked Scheduler'; // application title
$conf['settings']['default.timezone'] = 'America/Chicago'; // Change your time zone - look up here http://php.net/manual/en/timezones.php
$conf['settings']['allow.self.registration'] = 'true'; // if users can register themselves
$conf['settings']['admin.email'] = '[email protected]'; // fill with the email address of admin user
$conf['settings']['admin.email.name'] = 'Booked Administrator'; // name to be used in From: field when sending automatic emails
$conf['settings']['default.page.size'] = '50'; // number of records per page
$conf['settings']['enable.email'] = 'true'; // global configuration to enable if any emails will be sent
$conf['settings']['default.language'] = 'en_us'; Change acording to your language // find your language in the lang directory
$conf['settings']['script.url'] = 'http://[your-ip-address]/Web'; // public URL to the Web directory of this instance. this is the URL that appears when you are logging in. leave http: or https: off to auto-detect
$conf['settings']['image.upload.directory'] = 'Web/uploads/images'; // full or relative path to where images will be stored
$conf['settings']['image.upload.url'] = 'uploads/images'; // full or relative path to show uploaded images from
$conf['settings']['cache.templates'] = 'true'; // true recommended, caching template files helps web pages render faster
$conf['settings']['use.local.jquery'] = 'false'; // false recommended, delivers jQuery from Google CDN, uses less bandwidth
$conf['settings']['registration.captcha.enabled'] = 'true'; // recommended. unless using recaptcha this requires php_gd2 enabled in php.ini
$conf['settings']['registration.require.email.activation'] = 'true'; // requires enable.email = true
$conf['settings']['registration.auto.subscribe.email'] = 'false'; // requires enable.email = true
$conf['settings']['registration.notify.admin'] = 'true'; // whether the registration of a new user sends an email to the admin (ala phpScheduleIt 1.2)
$conf['settings']['inactivity.timeout'] = '30'; // minutes before the user is automatically logged out
$conf['settings']['name.format'] = '{first} {last}'; // display format when showing user names
$conf['settings']['css.extension.file'] = ''; // full or relative url to an additional css file to include. this can be used to override the default style
$conf['settings']['disable.password.reset'] = 'false'; // if the password reset functionality should be disabled
$conf['settings']['home.url'] = 'your-intranet-portal-url'; // the url to open when the logo is clicked
$conf['settings']['logout.url'] = 'your-intranet-portal-url'; // the url to be directed to after logging out
$conf['settings']['default.homepage'] = '1'; // the default homepage to use when new users register (1 = Dashboard, 2 = Schedule, 3 = My Calendar, 4 = Resource Calendar)
$conf['settings']['schedule']['use.per.user.colors'] = 'false'; // color reservations by user
$conf['settings']['schedule']['show.inaccessible.resources'] = 'true'; // whether or not resources that are inaccessible to the user are visible
$conf['settings']['schedule']['reservation.label'] = '{name}'; // format for what to display on the reservation slot label. Available properties are: {name}, {title}, {description}, {email}, {phone}, {organization}, {position}, {startdate}, {enddate} {resourcename} {participants} {invitees} {reservationAttributes}. Custom attributes can be added using att with the attribute id. For example {att1}
$conf['settings']['schedule']['hide.blocked.periods'] = 'false'; // if blocked periods should be hidden or shown
/**
* ical integration configuration
*/
$conf['settings']['ics']['require.login'] = 'true'; // recommended, if the user must be logged in to access ics files
$conf['settings']['ics']['subscription.key'] = ''; // must be set to allow webcal subscriptions
$conf['settings']['ics']['import'] = 'false'; // enable iCal import
$conf['settings']['ics']['import.key'] = ''; // it's recommended to set this key when iCal import is enabled
/**
* Privacy configuration - Set up here your business rules
*/
$conf['settings']['privacy']['view.schedules'] = 'true'; // if unauthenticated users can view schedules
$conf['settings']['privacy']['view.reservations'] = 'false'; // if unauthenticated users can view reservations
$conf['settings']['privacy']['hide.user.details'] = 'false'; // if personal user details should be displayed to non-administrators
$conf['settings']['privacy']['hide.reservation.details'] = 'false'; // if reservation details should be displayed to non-administrators
$conf['settings']['privacy']['allow.guest.reservations'] = 'false'; // if reservations can be made by users without a Booked account, if true this overrides schedule and resource visibility
/**
* Reservation specific configuration
*/
$conf['settings']['reservation']['start.time.constraint'] = 'future'; // when reservations can be created or edited. options are future, current, none
$conf['settings']['reservation']['updates.require.approval'] = 'false'; // if updates to previously approved reservations require approval again
$conf['settings']['reservation']['prevent.participation'] = 'false'; // if participation and invitation options should be removed
$conf['settings']['reservation']['prevent.recurrence'] = 'false'; // if recurring reservations are disabled for non-administrators
$conf['settings']['reservation']['enable.reminders'] = 'false'; // if reminders are enabled. this requires email to be enabled and the reminder job to be configured
$conf['settings']['reservation']['allow.guest.participation'] = 'false';
$conf['settings']['reservation']['allow.wait.list'] = 'false';
$conf['settings']['reservation']['checkin.minutes.prior'] = '5';
/**
* Email notification configuration
*/
$conf['settings']['reservation.notify']['resource.admin.add'] = 'false';
$conf['settings']['reservation.notify']['resource.admin.update'] = 'false';
$conf['settings']['reservation.notify']['resource.admin.delete'] = 'false';
$conf['settings']['reservation.notify']['resource.admin.approval'] = 'false';
$conf['settings']['reservation.notify']['application.admin.add'] = 'false';
$conf['settings']['reservation.notify']['application.admin.update'] = 'false';
$conf['settings']['reservation.notify']['application.admin.delete'] = 'false';
$conf['settings']['reservation.notify']['application.admin.approval'] = 'false';
$conf['settings']['reservation.notify']['group.admin.add'] = 'false';
$conf['settings']['reservation.notify']['group.admin.update'] = 'false';
$conf['settings']['reservation.notify']['group.admin.delete'] = 'false';
$conf['settings']['reservation.notify']['group.admin.approval'] = 'false';
/**end business rules
* File upload configuration
*/
$conf['settings']['uploads']['enable.reservation.attachments'] = 'false'; // if reservation attachments can be uploaded
$conf['settings']['uploads']['reservation.attachment.path'] = 'uploads/reservation'; // full or relative (to the root of your installation) filesystem path to store reservation attachments
$conf['settings']['uploads']['reservation.attachment.extensions'] = 'txt,jpg,gif,png,doc,docx,pdf,xls,xlsx,ppt,pptx,csv'; // comma separated list of file extensions that users are allowed to attach. leave empty to allow all extensions
/**
* Database configuration
*/
$conf['settings']['database']['type'] = 'mysql';
$conf['settings']['database']['user'] = 'booked_user'; // database user with permission to the booked database
$conf['settings']['database']['password'] = 'your_password'; fill with the booked_user password
$conf['settings']['database']['hostspec'] = '127.0.0.1'; // ip, dns or named pipe
$conf['settings']['database']['name'] = 'bookedscheduler';
/**TIP: if you have problems to conect to database, please, try with the user and passord of root, if it works, go back to user database permitions.
* Mail server configuration
*/To e-mail configurarion I need to use a relay to my e-mail server and in my server I instaled postfix and configurate it to send e-mails
$conf['settings']['phpmailer']['mailer'] = 'mail'; // options are 'mail', 'smtp' or 'sendmail'
$conf['settings']['phpmailer']['smtp.host'] = 'your-mx'; // 'smtp.company.com'
$conf['settings']['phpmailer']['smtp.port'] = '25';
$conf['settings']['phpmailer']['smtp.secure'] = ''; // options are '', 'ssl' or 'tls'
$conf['settings']['phpmailer']['smtp.auth'] = 'true'; // options are 'true' or 'false'
$conf['settings']['phpmailer']['smtp.username'] = '[email protected]';
$conf['settings']['phpmailer']['smtp.password'] = 'your-password';
$conf['settings']['phpmailer']['sendmail.path'] = '/usr/sbin/sendmail';
$conf['settings']['phpmailer']['smtp.debug'] = 'false';
/**
* Plugin configuration. For more on plugins, see readme_installation.html
*/
$conf['settings']['plugins']['Authentication'] = '';
$conf['settings']['plugins']['Authorization'] = '';
$conf['settings']['plugins']['Permission'] = '';
$conf['settings']['plugins']['PostRegistration'] = '';
$conf['settings']['plugins']['PreReservation'] = '';
$conf['settings']['plugins']['PostReservation'] = '';
/**
* Installation settings
*/
$conf['settings']['install.password'] = ''; //just to automated instalation
/**
* Pages
*/
$conf['settings']['pages']['enable.configuration'] = 'true';
/**
* API
*/
$conf['settings']['api']['enabled'] = 'false';
/**
* ReCaptcha
*/
$conf['settings']['recaptcha']['enabled'] = 'false';
$conf['settings']['recaptcha']['public.key'] = '';
$conf['settings']['recaptcha']['private.key'] = '';
/**
*/
$conf['settings']['email']['default.from.address'] = 'your-email-address';
$conf['settings']['email']['default.from.name'] = 'your-system-name';
/**
* Reports
*/
$conf['settings']['reports']['allow.all.users'] = 'false';
/**
* Account Password Rules
*/
$conf['settings']['password']['minimum.letters'] = '6';
$conf['settings']['password']['minimum.numbers'] = '0';
$conf['settings']['password']['upper.and.lower'] = 'false';
/**
* Label display settings
*/
$conf['settings']['reservation.labels']['ics.summary'] = '{title}';
$conf['settings']['reservation.labels']['ics.my.summary'] = '{title}';
$conf['settings']['reservation.labels']['rss.description'] = '<div><span>Start</span> {startdate}</div><div><span>End</span> {enddate}</div><div><span>Organizer</span> {name}</div><div><span>Description</span> {description}</div>';
$conf['settings']['reservation.labels']['my.calendar'] = '{resourcename} {title}';
$conf['settings']['reservation.labels']['resource.calendar'] = '{name}';
$conf['settings']['reservation.labels']['reservation.popup'] = ''; // Format for what to display in reservation popups. Possible values: {name} {dates} {title} {resources} {participants} {accessories} {description} {attributes}. Custom attributes can be added using att with the attribute id. For example {att1}
/**
* Security header settings
*/
$conf['settings']['security']['security.headers'] = 'false'; // Enable the following options
$conf['settings']['security']['security.strict-transport'] = 'true';
$conf['settings']['security']['security.x-frame'] = 'deny';
$conf['settings']['security']['security.x-xss'] = '1; mode=block';
$conf['settings']['security']['security.x-content-type'] = 'nosniff';
$conf['settings']['security']['security.content-security-policy'] = "default-src 'self'"; // Requires careful tuning (know what your doing)
/**
* Google Analytics settings
*/
$conf['settings']['google.analytics']['tracking.id'] = ''; // if set, Google Analytics tracking code will be added to every page in Booked
$conf['settings']['authentication']['allow.facebook.login'] = 'true';
$conf['settings']['authentication']['allow.google.login'] = 'true';
$conf['settings']['authentication']['required.email.domains'] = '';
/**
* Credits functionality
*/
$conf['settings']['credits']['enabled'] = 'false';
Konfigurace webového rozhraní rezervovaného plánovače
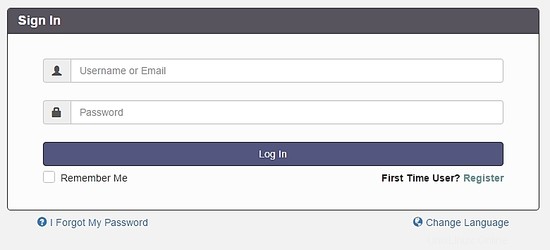
Access the following address http://your-ipaddress/Web/index.php, if everything is working fine, you will see the following screen:
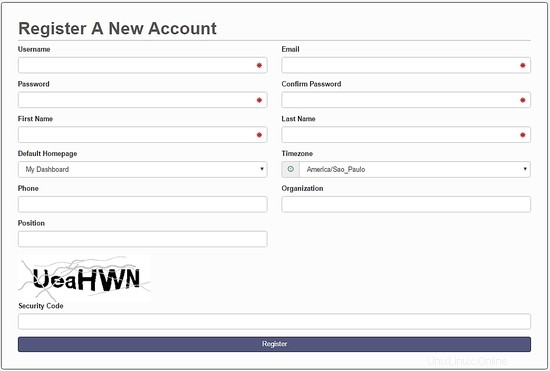
Select the option Register to create an admin account, remember, use the e-mail address previously configured at the file config.php.
After creating your account, go to the login screen and authenticate. A dashboard will be load, like this image:

On the main menu, you can config all system, select Application Management :

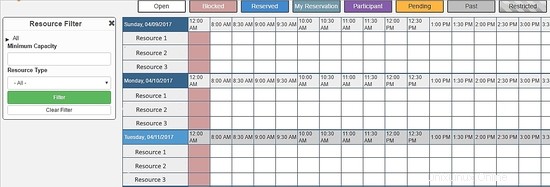
Through this menu, you can configure all resources of Booked Scheduler, to change the config.php, select the Application Configuration :
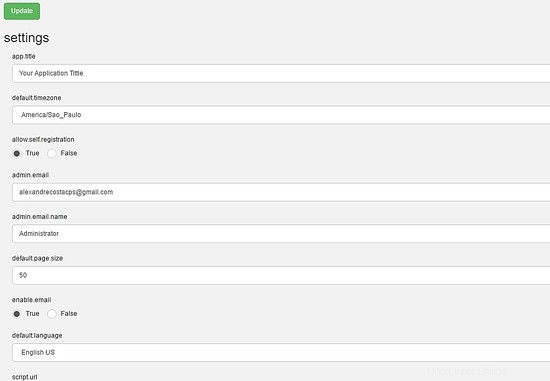
This article is a small overview about Booked Scheduler, this software has a lot of amazing features who can help any environment to provide a rational use of resources.

I hope this article can introduce you to the software, in case you have any problem with the installation, feel free to ask questions. If you want to get more information about Booked Scheduler access http://www.bookedscheduler.com/.