Let’s Encrypt je certifikační autorita, která poskytuje webovým stránkám bezplatné certifikáty SSL, které umožňují šifrování TLS. Byl spuštěn v dubnu 2016.
Let’s Encrypt automatizuje proces vytváření, ověřování, podepisování, implementace a obnovování certifikátů pro zabezpečené webové stránky.
V současné době Let’s encrypt podporuje automatické vydávání certifikací pro Apache, Nginx, Plex a Haproxy.
Předpoklady
V systému RHEL / CentOS byste měli mít nakonfigurovaný zásobník LEMP.
ČTĚTE :Jak nainstalovat LEMP Stack na CentOS 8 / RHEL 8
ČTĚTE: Jak nainstalovat LEMP Stack na CentOS 7 / RHEL 7
Nainstalujte Certbot
Chcete-li vygenerovat certifikát Let’s Encrypt pro vaši doménu, měli byste mít na svém systému nainstalovaný terminálový přístup a klienta Certbot ACME. Zvládá vydávání certifikátů a aktualizuje konfiguraci Nginx, aby používal vytvořený certifikát bez prostojů.
Certbot je dostupný v úložišti EPEL pouze pro CentOS 7 / RHEL 7. Musíme si tedy ručně stáhnout instalační program Certbot pro CentOS 8 / RHEL 8 z jeho oficiálních stránek.
### CentOS 8 / RHEL 8 ###

curl -O https://dl.eff.org/certbot-auto

mv certbot-auto /usr/local/bin/certbot-auto

chmod 0755 /usr/local/bin/certbot-auto

### CentOS 7 ###

rpm -ivh https://dl.fedoraproject.org/pub/epel/epel-release-latest-7.noarch.rpm

yum install -y certbot python2-certbot-nginx

### RHEL 7 ###

rpm -ivh https://dl.fedoraproject.org/pub/epel/epel-release-latest-7.noarch.rpm

subscription-manager repos --enable rhel-7-server-optional-rpms

yum install -y certbot python2-certbot-nginx
Vytvořit virtuální hostitele
Nyní vytvoříme konfigurační soubor virtuálního hostitele (blok serveru) pro doménu www.itzgeek.net.
Tento blok serveru obsluhuje HTTP verzi vaší domény.vi /etc/nginx/conf.d/www.itzgeek.net.conf
Použijte níže uvedené informace.
server {
   server_name www.itzgeek.net;
   root /opt/nginx/www.itzgeek.net;

   location / {
       index index.html index.htm index.php;
   }

   access_log /var/log/nginx/www.itzgeek.net.access.log;
   error_log /var/log/nginx/www.itzgeek.net.error.log;

   location ~ \.php$ {
      include /etc/nginx/fastcgi_params;
      fastcgi_pass 127.0.0.1:9000;
      fastcgi_index index.php;
      fastcgi_param SCRIPT_FILENAME $document_root$fastcgi_script_name;
   }
}
Vytvořte kořen dokumentu pro umístění souborů HTML.
mkdir -p /opt/nginx/www.itzgeek.net
Změňte oprávnění k adresáři.
chown -R nginx:nginx /opt/nginx/www.itzgeek.net
Umístěte testovací soubor HTML do kořenového adresáře dokumentu vaší webové domény.
echo "This is a test site @ www.itzgeek.net" > /opt/nginx/www.itzgeek.net/index.html
Restartujte službu Nginx.
systemctl restart nginx
Vytvořit / aktualizovat záznam DNS
Otevřete svůj nástroj pro správu DNS nebo registrátora domény a vytvořte záznam A/CNAME pro doménu. Příklad:www.itzgeek.net.

Počkejte nějakou dobu, než se záznam rozšíří.
Zkontrolujte šíření DNS pomocí nástroje Nslookup yum install -y bind-utils.

Nainstalujte certifikát Let's Encrypt
Pomocí příkazu certbot vytvořte a nainstalujte certifikát Let’s Encrypt.
### CentOS 8 / RHEL 8 ###

/usr/local/bin/certbot-auto --nginx

### CentOS 7 / RHEL 7 ###

certbot --nginx
Postupujte podle interaktivní výzvy a vygenerujte a nainstalujte certifikát.
Saving debug log to /var/log/letsencrypt/letsencrypt.log
Plugins selected: Authenticator nginx, Installer nginx
Enter email address (used for urgent renewal and security notices) (Enter 'c' to
cancel): itzgeek.web@gmail.com  << Email Address to receive renewal/security notification

- - - - - - - - - - - - - - - - - - - - - - - - - - - - - - - - - - - - - - - -
Please read the Terms of Service at
https://letsencrypt.org/documents/LE-SA-v1.2-November-15-2017.pdf. You must
agree in order to register with the ACME server at
https://acme-v02.api.letsencrypt.org/directory
- - - - - - - - - - - - - - - - - - - - - - - - - - - - - - - - - - - - - - - -
(A)gree/(C)ancel: A  << Access Terms and Conditions

- - - - - - - - - - - - - - - - - - - - - - - - - - - - - - - - - - - - - - - -
Would you be willing to share your email address with the Electronic Frontier
Foundation, a founding partner of the Let's Encrypt project and the non-profit
organization that develops Certbot? We'd like to send you email about our work
encrypting the web, EFF news, campaigns, and ways to support digital freedom.
- - - - - - - - - - - - - - - - - - - - - - - - - - - - - - - - - - - - - - - -
(Y)es/(N)o: Y  << Subscribe to Newsletter

Which names would you like to activate HTTPS for?
- - - - - - - - - - - - - - - - - - - - - - - - - - - - - - - - - - - - - - - -
1: www.itzgeek.net
- - - - - - - - - - - - - - - - - - - - - - - - - - - - - - - - - - - - - - - -
Select the appropriate numbers separated by commas and/or spaces, or leave input
blank to select all options shown (Enter 'c' to cancel): 1  << Choose domain name to generate certificate
Obtaining a new certificate
Performing the following challenges:
http-01 challenge for www.itzgeek.net
Waiting for verification...
Cleaning up challenges
Deploying Certificate to VirtualHost /etc/nginx/conf.d/www.itzgeek.net.conf

Please choose whether or not to redirect HTTP traffic to HTTPS, removing HTTP access.
- - - - - - - - - - - - - - - - - - - - - - - - - - - - - - - - - - - - - - - -
1: No redirect - Make no further changes to the webserver configuration.
2: Redirect - Make all requests redirect to secure HTTPS access. Choose this for
new sites, or if you're confident your site works on HTTPS. You can undo this
change by editing your web server's configuration.
- - - - - - - - - - - - - - - - - - - - - - - - - - - - - - - - - - - - - - - -
Select the appropriate number [1-2] then [enter] (press 'c' to cancel): 2  << Redirect traffic from HTTP to HTTPS
Redirecting all traffic on port 80 to ssl in /etc/nginx/conf.d/www.itzgeek.net.conf

- - - - - - - - - - - - - - - - - - - - - - - - - - - - - - - - - - - - - - - -
Congratulations! You have successfully enabled https://www.itzgeek.net

You should test your configuration at:
https://www.ssllabs.com/ssltest/analyze.html?d=www.itzgeek.net
- - - - - - - - - - - - - - - - - - - - - - - - - - - - - - - - - - - - - - - -

IMPORTANT NOTES:
 - Congratulations! Your certificate and chain have been saved at:
   /etc/letsencrypt/live/www.itzgeek.net/fullchain.pem
   Your key file has been saved at:
   /etc/letsencrypt/live/www.itzgeek.net/privkey.pem
   Your cert will expire on 2019-11-02. To obtain a new or tweaked
   version of this certificate in the future, simply run certbot-auto
   again with the "certonly" option. To non-interactively renew *all*
   of your certificates, run "certbot-auto renew"
 - Your account credentials have been saved in your Certbot
   configuration directory at /etc/letsencrypt. You should make a
   secure backup of this folder now. This configuration directory will
   also contain certificates and private keys obtained by Certbot so
   making regular backups of this folder is ideal.
 - If you like Certbot, please consider supporting our work by:

   Donating to ISRG / Let's Encrypt:   https://letsencrypt.org/donate
   Donating to EFF:                    https://eff.org/donate-le
Přesměrujte požadavky HTTP bez www na www HTTPS pomocí Nginx (volitelné)
Nyní nakonfigurujeme server Nginx tak, aby přesměroval provoz přicházející z webu bez www HTTP na web WW HTTPS, tj. http://itzgeek.net>> https://www.itzgeek.net .
Zde použijeme stejný konfigurační soubor, který jsme vytvořili pro HTTP verzi webu, abychom provedli přesměrování webu HTTP bez www na WW HTTPS.
vi /etc/nginx/conf.d/www.itzgeek.net.conf
Přidejte níže uvedené informace na konec souboru.
# Redirect NON-WWW HTTP to WWW HTTPS

server {
    if ($host = itzgeek.net) {
        return 301 https://www.itzgeek.net$request_uri;
    }


   server_name itzgeek.net;
    listen 80;
    return 404;

}
Restartujte službu Nginx.
systemctl restart nginx
Firewall
Nakonfigurujte bránu firewall tak, aby povolovala požadavky HTTPS.
firewall-cmd --permanent --add-port=443/tcp

firewall-cmd --reload
Ověřte certifikát Let's Encrypt
Ověřte podrobnosti certifikátu Let’s Encrypt tím, že přejdete na HTTPS verzi svého webu.
http://vaše-http-webové-stránkyNEBO
https://vaše-https-webové-stránky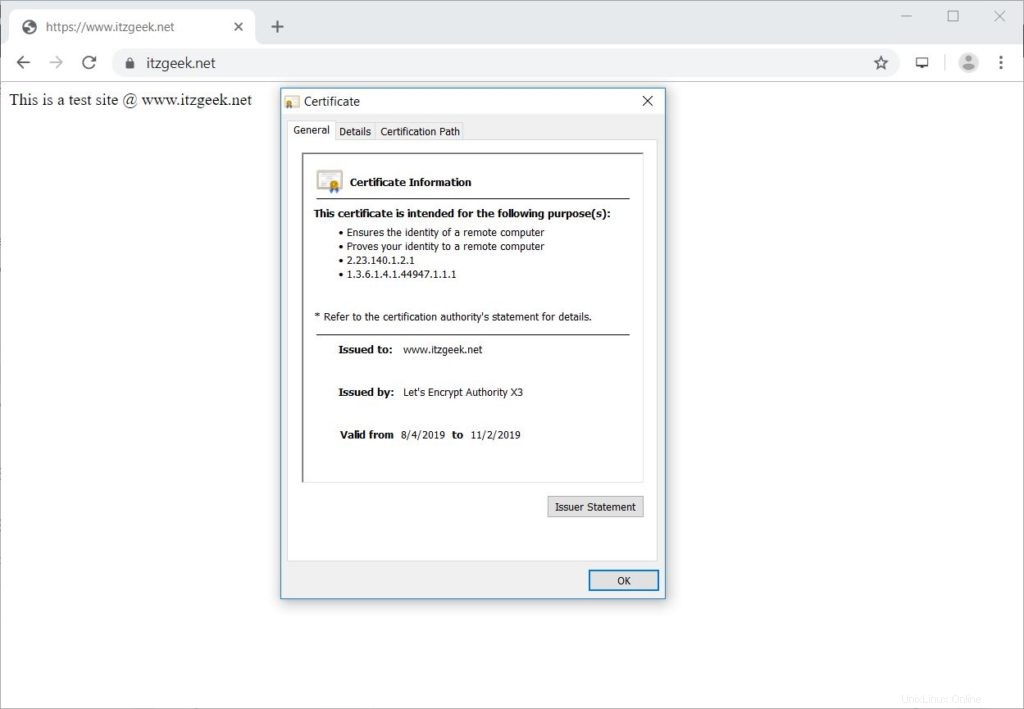
Test certifikát SSL
Přejděte na níže uvedenou adresu URL a zkontrolujte, zda váš certifikát SSL neobsahuje nějaké problémy a jeho bezpečnostní hodnocení.
https://www.ssllabs.com/ssltest/analyze.html?d=www.itzgeek.net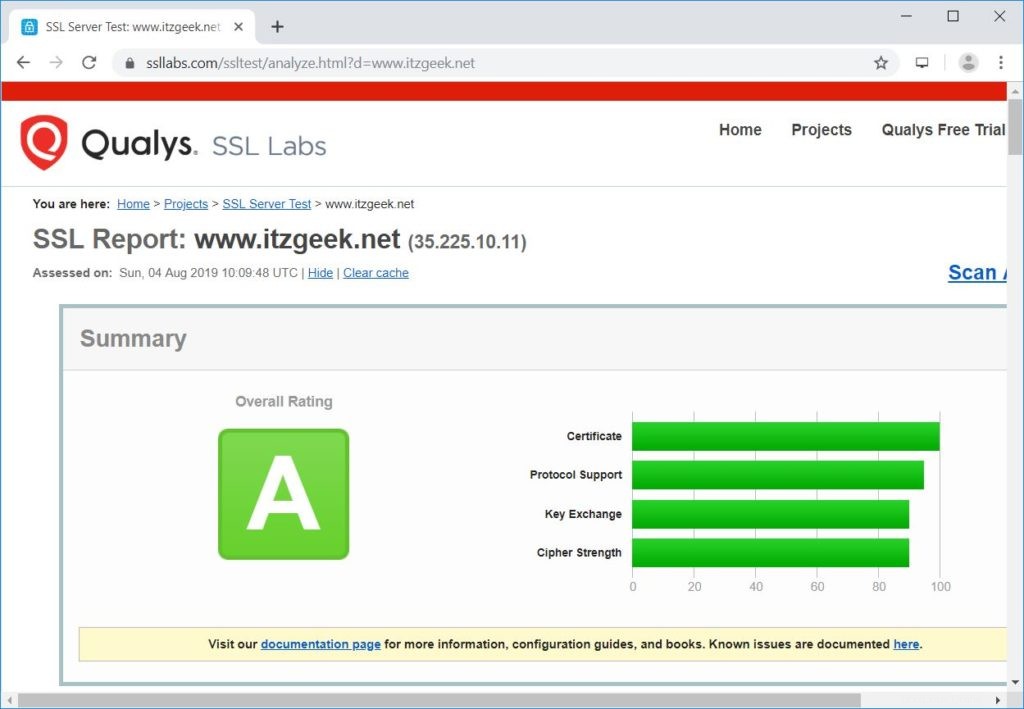
Obnovení certifikátu Let's Encrypt
Certifikát Let’s Encrypt je dodáván s platností 90 dní a před vypršením jeho platnosti je třeba jej obnovit.
Ve výchozím nastavení jsou oba CentOS 7 / RHEL 7 nakonfigurovány se záznamem plánovače cron, který se spouští dvakrát denně pro obnovení certifikátu Let’s Encrypt.
Bohužel pro CentOS 8 / RHEL 8 musíme plánovač cron nakonfigurovat ručně.
echo "0 0,12 * * * root python -c 'import random; import time; time.sleep(random.random() * 3600)' && /usr/local/bin/certbot-auto renew" | sudo tee -a /etc/crontab > /dev/null
Můžete také simulovat proces obnovy certifikátu pomocí níže uvedeného příkazu, abyste zajistili hladký průběh obnovy.
### CentOS 8 / RHEL 8 ###

/usr/local/bin/certbot-auto renew --dry-run

### CentOS 7 / RHEL 7 ###

certbot renew --dry-run
Výstup:
Saving debug log to /var/log/letsencrypt/letsencrypt.log

- - - - - - - - - - - - - - - - - - - - - - - - - - - - - - - - - - - - - - - -
Processing /etc/letsencrypt/renewal/www.itzgeek.net.conf
- - - - - - - - - - - - - - - - - - - - - - - - - - - - - - - - - - - - - - - -
Cert not due for renewal, but simulating renewal for dry run
Plugins selected: Authenticator nginx, Installer nginx
Renewing an existing certificate
Performing the following challenges:
http-01 challenge for www.itzgeek.net
Waiting for verification...
Cleaning up challenges

- - - - - - - - - - - - - - - - - - - - - - - - - - - - - - - - - - - - - - - -
new certificate deployed with reload of nginx server; fullchain is
/etc/letsencrypt/live/www.itzgeek.net/fullchain.pem
- - - - - - - - - - - - - - - - - - - - - - - - - - - - - - - - - - - - - - - -

- - - - - - - - - - - - - - - - - - - - - - - - - - - - - - - - - - - - - - - -
** DRY RUN: simulating 'certbot renew' close to cert expiry
**          (The test certificates below have not been saved.)

Congratulations, all renewals succeeded. The following certs have been renewed:
  /etc/letsencrypt/live/www.itzgeek.net/fullchain.pem (success)
** DRY RUN: simulating 'certbot renew' close to cert expiry
**          (The test certificates above have not been saved.)
- - - - - - - - - - - - - - - - - - - - - - - - - - - - - - - - - - - - - - - -

IMPORTANT NOTES:
 - Your account credentials have been saved in your Certbot
   configuration directory at /etc/letsencrypt. You should make a
   secure backup of this folder now. This configuration directory will
   also contain certificates and private keys obtained by Certbot so
   making regular backups of this folder is ideal.
Pokud výstup nehlásí žádný problém, bude obnovení certifikátu fungovat podle očekávání.
Závěr
To je vše. Doufám, že jste se naučili, jak nastavit Let’s Encrypt SSL Certificate pomocí Nginx na CentOS 8 / RHEL 8 &CentOS 7 / RHEL 7. Podělte se o svůj názor v sekci komentářů.